Working with the code editor
The SnapDevelop editor offers a considerable number of features that make it easy for you to write and manage your code. For example, you can find and replace text in single or multiple files, in current project, or in the entire solution. You can collapse and expand the various blocks of code by using the Outlining feature. You can find code by using such features as Go To Definition, and Find All References.
Moving around in the IDE
The SnapDevelop IDE allows you to move from file to file and window to window using keyboard shortcuts so that you can significantly increase productivity when you are developing in this IDE.
You can use the following methods to navigate through open files or tool windows in the code editor:
Press Ctrl+- or Ctrl + Shift + - to switch forward or backward the open files in the code editor in the order they were most recently accessed.
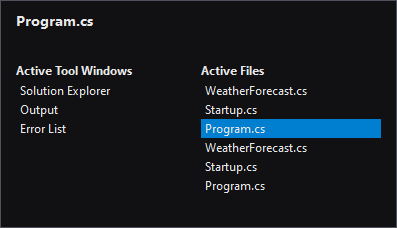
Press Ctrl+Tab to navigate through active tool windows and active files in spite of the order they were accessed. Just hold down the Ctrl key and press Tab repeatedly, and press left or right arrow keys, until you select the intended file.
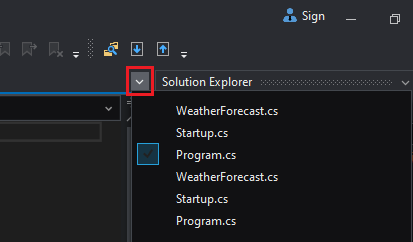
Click the Active Files button in the upper right corner of the editor, and then select the intended file from the list.
Use the keyboard shortcuts as shown with the menu items.
Using the code editor
Basic features
This section describes the basic features of the SnapDevelop code editor, which can help you edit your code quite efficiently and easily.
C# syntax has all of the following features: code highlighting, code folding, quick info, code method signature help, code fixes, code refactoring, symbol renaming, removal of unused usings and sorting, code snippets, code autocompletion (CodeAssist), code metadata, code diagnostics, code formatting, etc.
Grpc syntax has the following functions: code highlighting, code folding, quick info, code diagnosis, code autocompletion (CodeAssist), etc.
Vue syntax have the following features: code highlighting, code folding, quick info, code diagnostics, code autocompletion (CodeAssist), code snippets, and more.
JSON, XML, and YAML syntax have the following features: code highlighting, code folding, code diagnostics, and more.
Quick info
When you hover over a code element (such as a type, variable, etc.), or place the cursor insertion point in the element and click the Show Quick Info button in the toolbar ( ), relevant information about the element will be displayed automatically.
Reference count
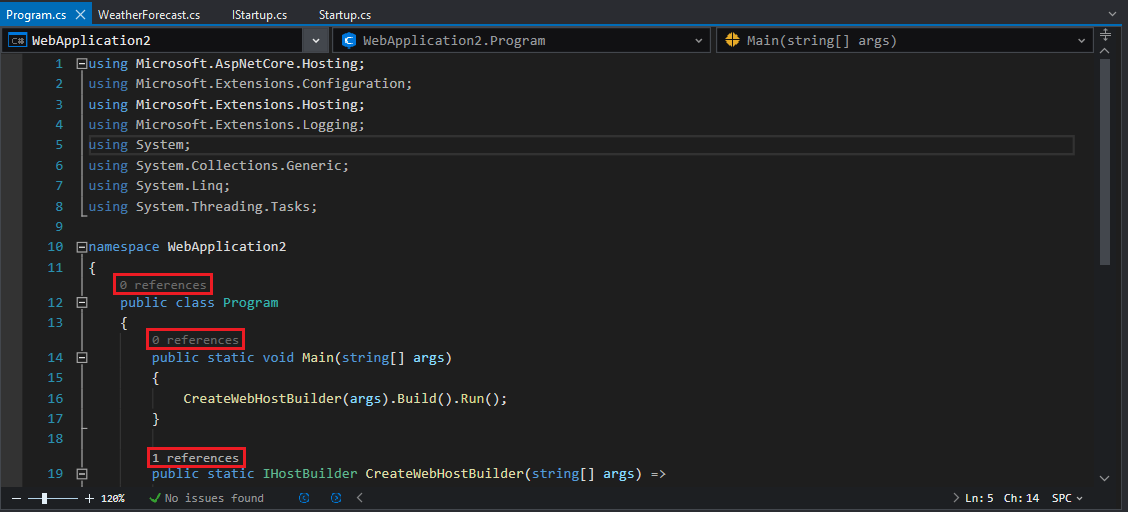
When you write code, you may see a reference count above each class and method. The reference count indicates the number of references to the class, method, or property. The reference count feature is enabled by default.
Code highlighting
Code syntaxes such as keywords, types, method names, etc. are colored in different colors to distinguish them. You can define these colors. For details, please refer to Fonts and Colors.
Error and warning marking
When you write code, you may see wavy underlines of different colors or light bulbs in your code. Red wavy underlines indicate syntax errors and green underlines indicate warnings. If your mouse hovers over an error, potential fixes for the error are suggested right below.

The lower left corner of the code editor will display the number of errors and warnings, as well as provide navigation buttons to quickly locate the code that caused these errors and warnings.

Brace matching
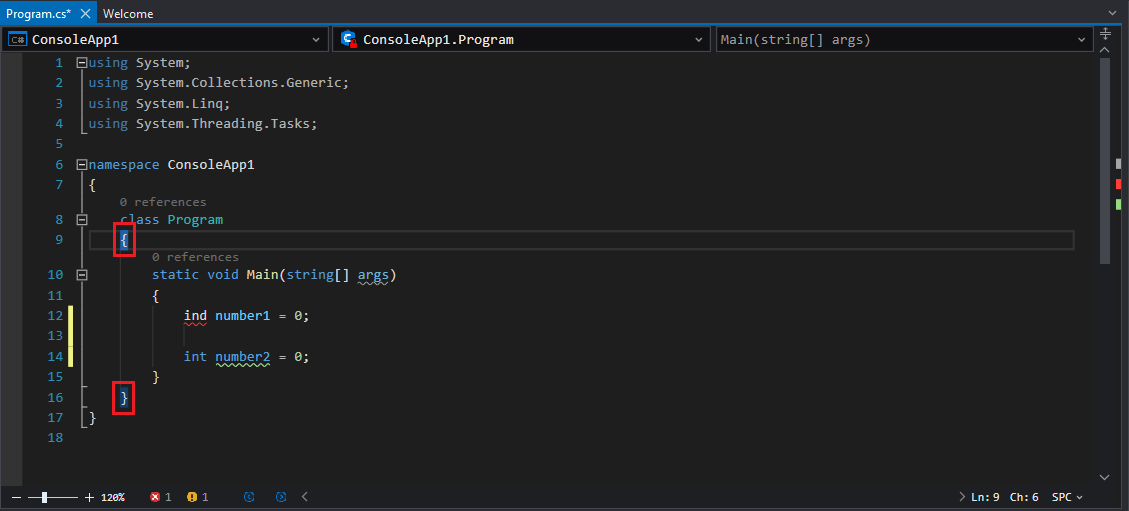
Placing the cursor to the left of an open brace, or to the right of a closing brace, will automatically highlight the brace pair. This allows you to find out which braces are misplaced or missing.
Code auto completion (CodeAssist)
CodeAssist offers all possible options alphabetically as you type the trigger characters in the code editor, and highlights the option that best matches the trigger characters.
You can choose to display one or more types of code via the icons at the bottom of the list, such as code snippets, classes, keywords, delegates, enums, structs, namespaces, interfaces, parameters, etc. Multiple types are allowed to be selected at the same time.

Code snippet
In the list of suggestions in code auto-completion, you can click the Show CodeSnippets only icon at the bottom of the list ( ) and double-click the desired code snippet, the symbol representing the code snippet will be inserted into the code, at this point, press the Tab key twice quickly to activate the code snippet, and the complete code snippet will be displayed.
Line numbering
Line numbers are enabled by default and displayed in the left margin of the code editor. To disable line numbers, go to Tools > Options > Text Editor > General, and disable the Line number margin option.

Change tracking
If you enable the Track changes option in the Tools > Options > Text Editor > General settings, changes you have made since the file was opened but not saved are indicated by yellow vertical lines in the right margin of the code editor.

Code and text selecting
You can select code either in box mode or in the standard continuous stream mode. To select code in box mode, press Alt as you drag the mouse over the selection (or press Alt+Shift+<arrow key>). The selection includes all characters within the rectangle defined by the first character and the last character in the selection. Anything typed or pasted into the selected area is inserted at the same point on each line.

Word wrapping
You can select or clear the Wrap lines according to the word option in the Tools > Options > Text Editor > General dialog box. If you select the option, part of a long line extending beyond the current width of the editor window is displayed on the next line.
Connecting strings using "+"
If you press Enter in a string to start a new line, the two strings are automatically connected using "+".

Multi-cursor editing
You can edit the text at multiple locations (multi-cursors) at the same time. To do this, hold down the Ctrl key and use the mouse to click multiple locations to insert the cursor or select multiple text locations and edit the text.
Undo and redo
You can run the undo or redo command to actions in the current SnapDevelop session by selecting Undo or Redo in the right-click context menu.
Parameter info help
When you place the cursor insertion point before a method's parameter brackets, you can directly activate the parameter information help for that method.

Advanced Features
When the code editor is open, the Edit > Advanced menu on the toolbar provides a variety of advanced editing functions.

Format the document -- Indent all code in the document uniformly.
Format Selection -- Uniformly indent selected code in the document.
Comment Selection -- Add comment characters to the selected line, or to the current line if no characters are selected.
Uncomment Selection -- Remove comment characters from the selected line or the current line.
Make Uppercase -- Changes all selected characters to uppercase.
Make Lowercase -- Changes all selected characters to lowercase.
Increase Line Indent -- Add a space before the selected line or the current line to increase the indent.
Decrease Line Indent -- Remove whitespace from the front of the selected line or the current line to reduce indentation.
Pasting JSON/XML as...
Your JSON or XML code can be automatically converted into C# Entity Class, C# Struct Type or Protocol Buffer Message by a simple copy and paste in SnapDevelop. To do so, copy your JSON or XML data, and select Edit > Paste Special > Paste JSON As... or Paste XML As... to paste the automatically generated contents to the editor.
For example, if you select Paste JSON as C# Entity Class, you will get a number of classes formatted as below:
  public class Rootobject
        {
            public Logging Logging { get; set; }
            public string AllowedHosts { get; set; }
            public ConnectionStrings ConnectionStrings { get; set; }
        }

   public class Logging
        {
            public LogLevel LogLevel { get; set; }
        }
Creating GUID
SnapDevelop provides a GUID generation tool that allows you to create a GUID in one of the available formats, and copy it to the clipboard.
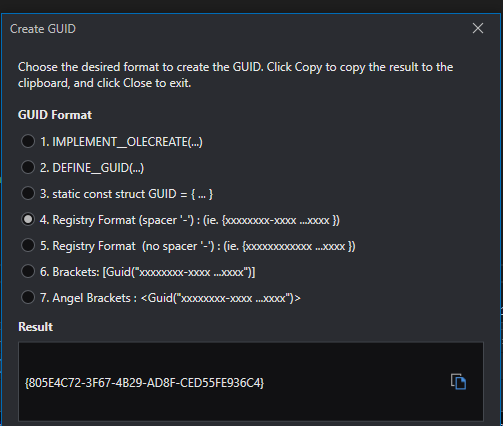
To open the GUID generation tool, go to Tools > Create GUID. In the Create GUID window, you can choose a GUID format, and then Result text box will display the automatically generated GUID.
You can click New GUID to generate a different GUID. Or click the Copy icon in the Results text box to copy the GUID to the clipboard. Or click the Insert button to insert the GUID at the cursor position.
Outlining
You can use the Outlining feature to display the outline of your code the way you want. To use this feature, select Outlining in the right-click context menu. We use the following text code as an example to demonstrate how you can perform the various outlining operations.
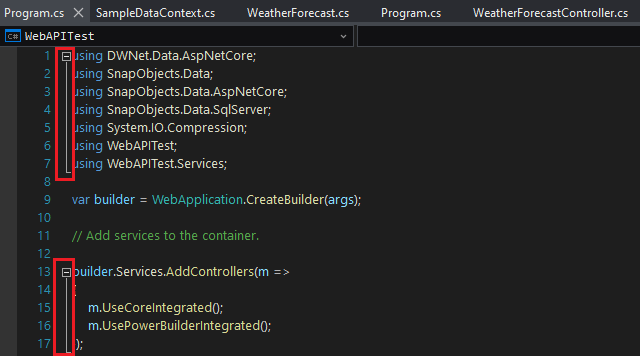
The Outlining feature allows you to:
Apply Default Outlining Expansion, which applies the default outline expansion settings.
Collapse to Definitions, which collapses the members of all types.
Expand All Outlining, which expands the members of all types.
Stop Outlining, which ends the outline of the code.
Toggle All Outlining, which sets all blocks of code to the same state, expanded or collapsed.
Toggle Outlining Expansion, which reverses the current hidden or expanded state of the innermost outlining section when the cursor lies in a nested collapsed section.
Start Automatic Outlining, which automatically sets all blocks of code to the expanded state. Note that this feature can be used only after you have selected the Stop Outlining feature.
Note: You are allowed to copy and paste a collapsed method in the editor.
When the mouse hovers over the outline margin, the current collapsible area is highlighted. This highlight color can be modified (please select the menu Tools > Options, in the Options window, select Text Editor > Fonts and Colors, in the Display Items list box, select Collapsible Region).
Finding and replacing
Finding and replacing text
The SnapDevelop editor allows you to find and replace text by using Find and Replace (Ctrl+F or Ctrl+H). If you select a string in the current file and then press Ctrl+F or Ctrl+H, the Find and Replace control displays in the upper right corner of the code editor, with every matching string in the current file highlighted. The matching highlight color can be modified (please select the menu Tools > Options, in the Options window, select Text Editor > Fonts and Colors, in the Display Items list box, select Find Match Highlight).
You can navigate from one matching string to another by clicking the Find Next button on the search control. If you want to find the previous text, select the Search Up button and then click the Find Next button.

On this search control, you can access replacement options by clicking the button immediately before the Find search box. If you want to replace the matching strings one by one, click the Replace Next button immediately following the Replace text box. If you want to replace all matching strings, click the Replace All button instead.

Please note that there are several other buttons such as Match Case, Match Whole Word, and Use Regular Expressions, which can help you find and replace more accurately, and there is a dropdown list including Current document, All open documents, Current project and Entire Solution , which allows you to specify the scope of the Find and Replace actions. If you want to know how to use regular expressions, please refer to Appendix C: Regular Expression Examples.
Find in files and replace in files
Find/Replace in Files works much like the Find and Replace control. To access the Find/Replace in Files dialog box, please press Ctrl + Shift + F or Ctrl + Shift + H, or select the menu item Edit > Find and replace > Find in Files or Replace in Files.

When you select Find All, the Find Results window opens and lists all matches for your search. If you select a result in the list, the related file displays even if the file is not already active for editing and the match in the file is highlighted.

Find what
If you want to search for a particular string, specify it in the text box. Note that the Find what dropdown list stores 20 searches you've made most recently. If you want to search for any of the stored strings, open the dropdown list and then select the desired string.
Look in
The Look in dropdown list has several options, including Current document, All open documents, Current project, Current directory and Entire Solution , which determine the scope for your searches. Besides, you can click the Choose Search Folders button to select the specified files.
Find options
Find options can be expanded or collapsed. The following options can be enabled or disabled:
Match case: If enabled, a Find Results search will be case-sensitive.
Match whole word: If enabled, the Find Results windows will only return whole word matches.
Replace with
To replace the string in the Find what field with a desired string, enter the replacement string in the Replace with field. If you want to delete the occurrence(s) of the string specified in the Find what field, leave this field blank. The Replace with dropdown list stores the 20 searches you've made most recently. You can open the list to select a particular string if necessary.
Generating and refactoring code
Performing quick actions
Quick Actions allow you to easily generate and refactor code with a single action, and Quick Actions can be performed using the light bulb or screwdriver icons that appear when you put your cursor on a line of code for which an action is available.
Icons
The icon that displays when a quick action is available indicates the type of fix or refactoring. The light bulb icon indicates that you should perform an available action to improve your code. The screwdriver icon indicates that you can perform an available action to change the code, but you shouldn't necessarily perform the action.
Using light bulb or screwdriver icons to perform quick actions
In the following situations, the light bulb or screwdriver icons appear:
You hover your mouse over an error and there is an error prompt;

To show potential fixes, select the down arrow next to the light bulb. Then, you will see a list of possible Quick Actions.

Right click in the code and then select Quick Actions and Refactorings...
What quick actions would be provided depends on where the cursor is when the quick action is triggered. Common quick actions include the following:
- Generation method
- Generate fields/properties/local
- Generate comparison operators for IComparable
- Generate destructor
- Generate IEquatable operators for structs
- Add 'DebuggerDisplay' attribute
- Add explicit cast
- Add parameters to the method
- Generate parameters
- Generate alternatives
- Generate Equals and GetHashCode method overrides
- Generate using
- Implement abstract classes
- Implement the interface
- Introduce local variables
Removing unnecessary usings
The Remove and Sort Usings command removes all unused using directives in the current file. When you select this command from the right-click context menu, unused namespace imports are removed. And the remaining Usings are sorted by alphabetical order.

Refactoring code
This feature allows you to reconstruct your existing code without changing its external behavior.
Common refactoring operations include the following:
- Convert anonymous type to class
- Convert anonymous type to tuple
- Convert between automatic properties and full properties
- Convert between for loops and foreach statements
- Convert between getter methods and properties
- Convert between strings and verbatim string literals
- Convert local functions to methods
- Convert the foreach loop to LINQ
- Convert IF statement to Switch statement or Switch expression
- Convert LINQ query to foreach statement
- Convert Typeof to Nameof
- Convert Switch statements to Switch expressions
- Perform DateTime and TimeSpan
- Encapsulate fields
- Extract interface
- Inline method
- Inline temporary variables
- Use CodeAssist to complete unimported types and extension methods
- Conditional expressions and logic computation
- Abstract the class
- Set a member as static
- Move the declaration near the reference
- Move types to matching files
- Move types to namespace
- Pull members
- Completion of regular expressions via CodeAssist
- Remove inaccessible codes
- Rename
- Simplify conditional expressions
- Simplify LINQ expressions
- Simplify string interpolation
- Sort Using
- Split or merge if statement
- Static local function refactoring option
- Sync type and filename
- Use explicit types
- Use a lambda expression or block body
- Use new()
- Use pattern matching
- Unused value assignments, variables and parameters
- Word wrap, indent and alignment refactorings
Rename
Allows you to rename identifiers for code symbols, such as namespaces, local variables, types, methods and properties. You can use this feature when you want to safely rename something without having to find all instances, and copy/paste the new name.
To use this feature, place your insertion point at an element and then select Rename in the right-click context menu.

Extract interface
Allows you to create an interface using existing members from an interface, struct, or class. You can use this feature when you have members in a class, struct, or interface that could be inherited by other classes, structs, or interfaces.
To use this feature,
Step 1: Put your cursor in the class name.

Step 2: Select Quick Actions and Refactorings... > Extract Interface on the right-click context menu.
Step 3: Enter the necessary information in the popup Extract Interface dialog box.

Step 4: Select OK.

Set bookmarks in code
You can use bookmarks to mark lines of code in the editor so you can quickly navigate to a line of code or jump between lines of code. You can insert/delete bookmarks or jump between multiple bookmarks through the bookmark toolbar.
To add a bookmark, place the cursor on the line of code you want to bookmark and select the Toggle Bookmark icon from the toolbar. Bookmark is inserted. A bookmark icon will appear in the left margin bar. If you select the Toggle Bookmark icon again at this point, the bookmark will be deleted.

When you have inserted multiple bookmarks, you can quickly jump between bookmarks through the previous bookmark and next bookmark icons on the toolbar. When you no longer need these bookmarks, you can delete all bookmarks via the Clear All Bookmarks icon in the toolbar.
Moving around in your code
Navigating backward and forward
You can move the insertion point to the previous locations by pressing Ctrl+-, or return to a more recent location from the previous location by pressing Ctrl+Shift+-. The maximum number of forward/backward movements is 20.
Using the navigation bar
The navigation bar, which appears when you begin to edit code in a code base, allows you to navigate to code in the code base.
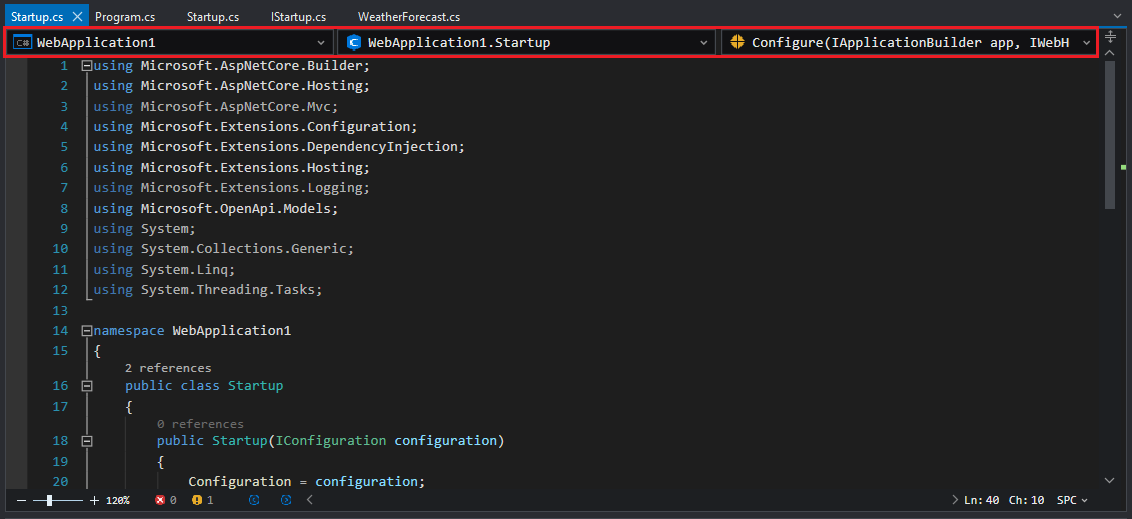
You will find that there are several dropdown boxes on the navigation bar. You can use the dropdown boxes to navigate in various ways.
- The left dropdown allows you to navigate to another project that hosts the current file.
- The middle dropdown allows you to navigate to a class/type in the current file.
- The right dropdown allows you to navigate directly to a procedure or other member of a class.
- You can press Tab to shift focus between the dropdown boxes on the navigation bar.
Finding all references
Find All References allows you to see where specific elements are referenced in the code base. To find all references for a particular element, select the element, and then press Shift+F12 or select Find All References from the right-click context menu.
A tool window named 'element' references appears (element being the name of the selected item), with the references displayed in a list.
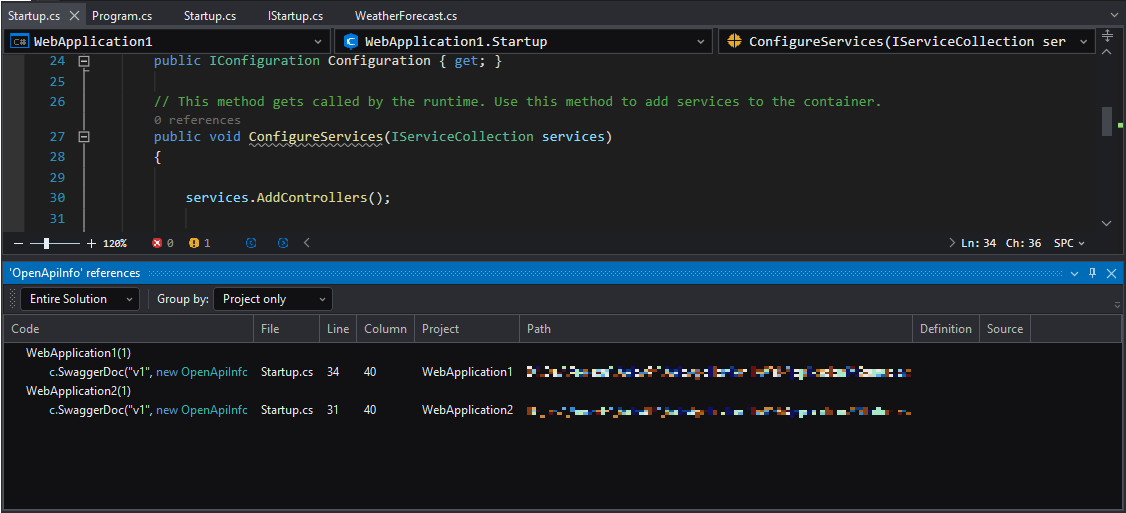
A toolbar is provided in the tool window at the top, enabling you to:
- Change the search scope in the drop-down list box. You can choose to view only the changed documents up to the entire solution.
Finding code using Go To commands
To go to a definition,
Step 1: Place the insertion point at a particular symbol (type or member).

Step 2: Right-click and then select Go To Definition.

To go to an implementation,
Step 1: Place the insertion point inside a symbol (type or member).

Step 2: Select Go To Implementation from the right-click context menu.

If more than one implementations exist, a tool window named 'element' implementations appears (element being the name of the selected item), with the implementations displayed in a list.
A toolbar is available in the tool window at the top and enables you to:
- Change the scope of the search in a drop-down list box. You can choose to look only in changed documents all the way up to the entire solution.
To go to the base class,
Step 1: Place the insertion point inside a symbol (type or member).
Step 2: Select Go To Base from the right-click context menu. The Go To Base window will show the base classes for the selected symbol.
Reference highlighting
When you click on a code element in the code editor, all instances of that element are highlighted. The reference highlight color can be modified (Select the menu Tools > Options, in the Options window, select Text Editor > Fonts and Colors, in the Display items list box, select Delimiter Matching).
Improving your code
After you have finished editing your code in SnapDevelop, you need to figure out whether your code works properly. SnapDevelop offers an integrated set of project building, debugging, and testing tools that can be used to detect problems in your code.
Like most other IDEs, SnapDevelop tests your code in two separate phases:
- During the development stage, it catches and fixes project build and compilation errors.
- At runtime, it detects the runtime errors.
Building your code
SnapDevelop supports two basic types of build configuration: Debug and Release, and uses Debug as the default build configuration.
To build your entire solution, select Build > Build Solution.

To build some project in the solution, select Set as Startup Project from the right-click context menu of the project, and then select Build > Build Project (Project is the actual project name).
You can watch the build process in the Output pane and view errors and warnings in the Error List pane. If any error occurs or the number of warnings exceed the specified level, your build fails. In this case, you need to click on the errors and warnings to go to the corresponding lines, resolve the errors, and then rebuild your solution/project.

Checking the error list
When you build your solution/project, you may encounter a variety of errors and warnings. To view these errors and warnings, navigate to the the bottom of the Output pane, and select the Error List tab.

Double-click on the error line in the Error List pane to go to the corresponding line in your code. You will notice that the error is marked with a red squiggly underscore. Hover your mouse over it for error details, and resolve the error according to the detailed information.
Fixing or refactoring code using quick actions
You can use Quick Actions to resolve errors. For details about how to fix and refactor code using Quick Actions, refer to Generating and Refactoring Code.
Debugging
Refer to Debugging Your Code for details on how to debug your code in SnapDevelop.
Running unit tests
Refer to Unit Testing for details on how you can run unit tests in SnapDevelop.
Using AI Coding Assistant
SnapDevelop has a built-in AI coding assistant, which will process your requests and provide corresponding programming assistance through API keys and configured AI drivers. Here are the steps to set up and use the AI coding assistant.
Preparation
Since the AI coding assistant relies on OpenAI drivers, you need to register and log in on the OpenAI platform to obtain an API key.
Register and Login
Visit https://www.openai.com, register and log in on the OpenAI platform. If you are already a registered user, please log in directly.
Get API Key
In order to use the AI coding assistant, you need to get an API key. Please follow the steps below to get an API key:
Log in to your account
Go to Settings or similar page
Create a new API key in the API Access or Key Management section
Copy the generated API key and save it in a safe place
Configure AI provider
Here are the steps to configure the AI provider:
In the SnapDevelop IDE, select menu item Tools > AI-Assist;
Go to the Settings page;
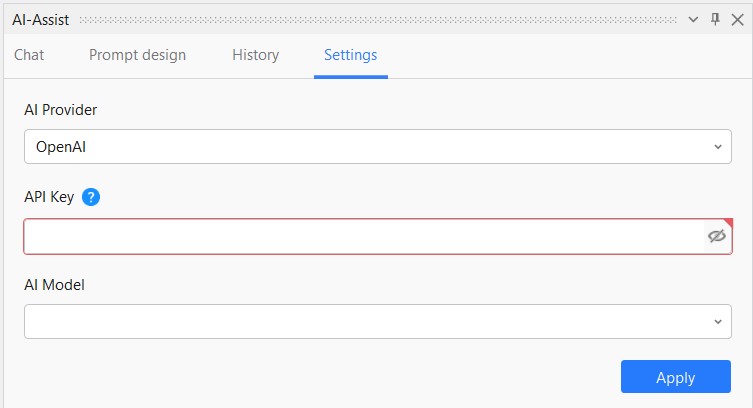
Enter the key you got from OpenAI into the API Key field.
Select the AI Model you want to use: gpt-4, or gpt-3.5.
Click the Apply button to complete the setup.
Configure and use prompts
AI prompt design is an important skill. Through prompts, you can provide context for the conversation and quickly get a satisfactory answer. For prompt design tips, please refer to the relevant documents of OpenAI or ChatGPT.
The following are the steps to configure prompts in the AI coding assistant:
In AI-Assist, select the Prompt design page.

You can see that Default prompts are built into AI-assist. These default prompts provide context for standard C# and Vue program development. You can continue to improve them based on your experience and development needs.

Edit the default prompts, or click Add to create a new prompt.
The prompt editing window contains the following basic contents.
Name - Provide a name for the prompt.
Introduction - Provide an introduction to the prompt.
Example - Enter the case of the prompt and the expected response. When you are talking to the AI-assist, if you select the current prompt, the example in the prompt will be used as the context of the AI-assist.

Here are the steps on how to use prompts in the AI coding assistant:
In AI-assist, select the Chat page.

Click the drop-down button in the New chat button and select Select prompt and create a new chat.

In the Select prompt window that pops up, select the prompt you set in advance, and then click the OK button.

Return to the Chat page, where you can start a chat with the AI assistant based on the preset prompts.

Chat with AI-assist
Now that you have completed the settings, you can start using the AI coding assistant. Here are the steps to start a chat with the AI coding assistant:
In AI-assist, select the Chat page.

Enter your programming question or request in the input box.
Press the Enter key to submit the entered question or request. You can also click the Submit button next to the input box (
 );
);Adjust your question or request according to the actual situation until you get a satisfactory answer.
Access AI-assist through right-click menus
The right-click menu of the code editor provides a shortcut to access the AI coding assistant. You can select a section of code, or place the cursor in a suitable position, and then right click to see the options of the AI coding assistant.
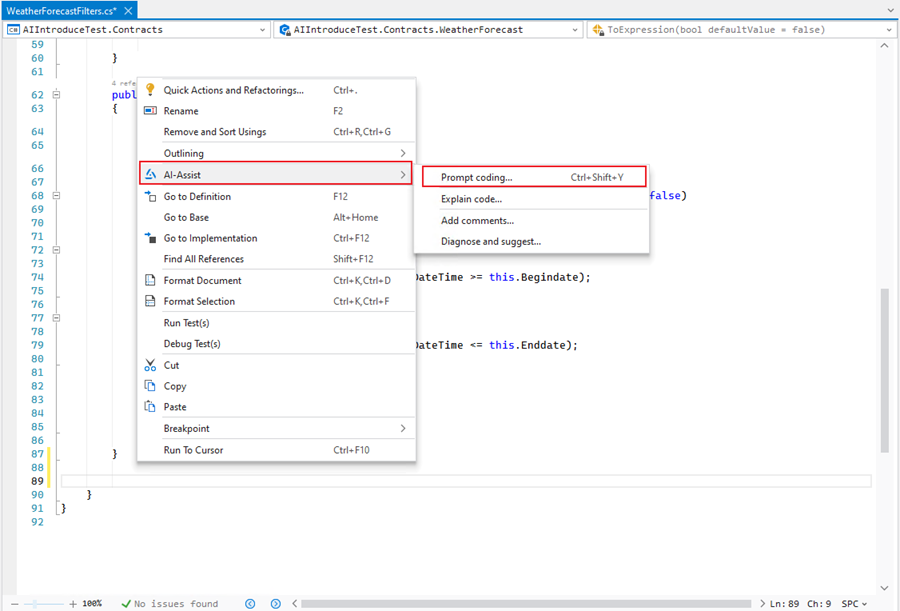
Prompt coding
It is recommended that you place the cursor in a suitable position and then right-click to select the AI-assist > Prompt coding... function. You can enter specific coding requirements in the pop-up prompt box, and the AI coding assistant will provide you with corresponding code suggestions based on the context.
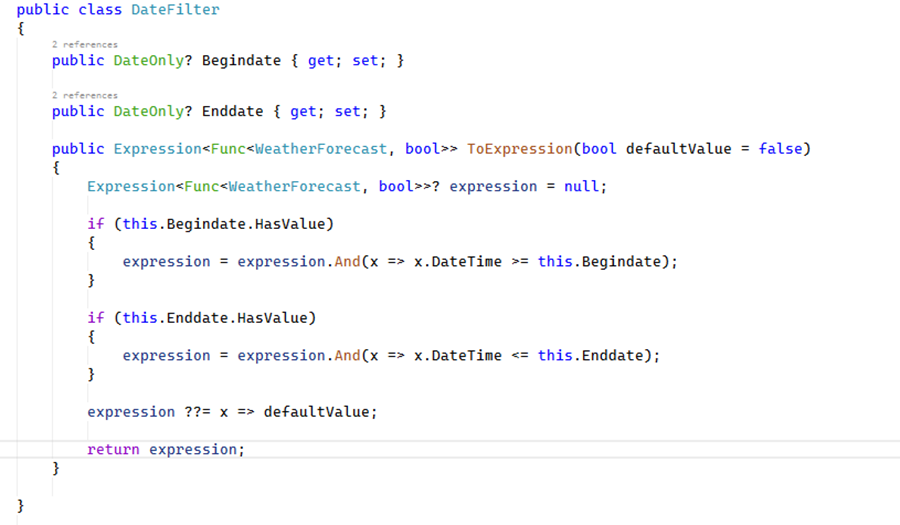
For example, you enter the following coding requirements in the prompt box:

The AI coding assistant will insert the following code snippet to the cursor position. To ensure the correctness of the code, please be sure to check and make necessary adjustments.
Explain the code
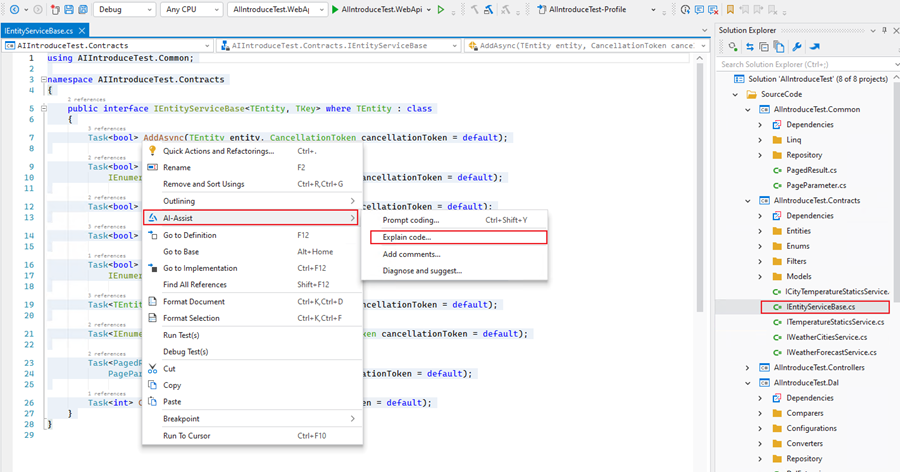
The AI coding assistant can explain the functionality of the code as required, for example, explain the purpose of each function in the selected code and the meaning of each parameter. Please understand that the explanation provided by the AI coding assistant is for reference only. Please make judgments and adjustments based on the actual project situation and personal experience.
You can select a code segment, right-click and select AI-assist > Explain code..., and the AI coding assistant will provide the corresponding explanation in the dialog box.
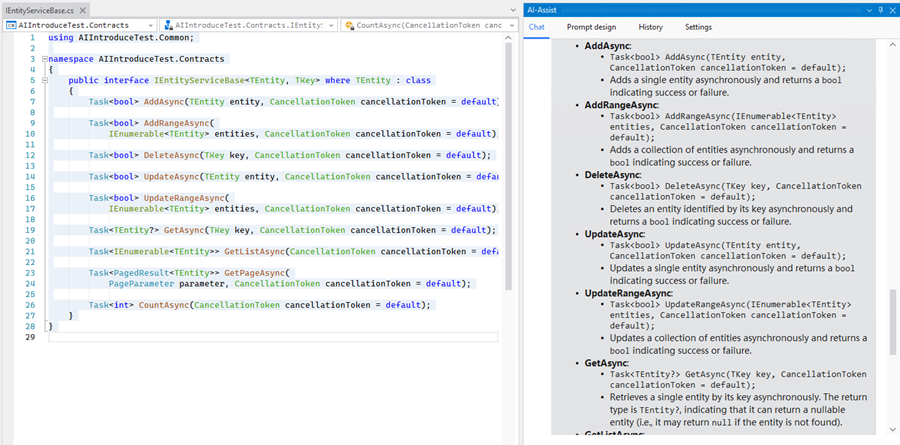
Add code comments
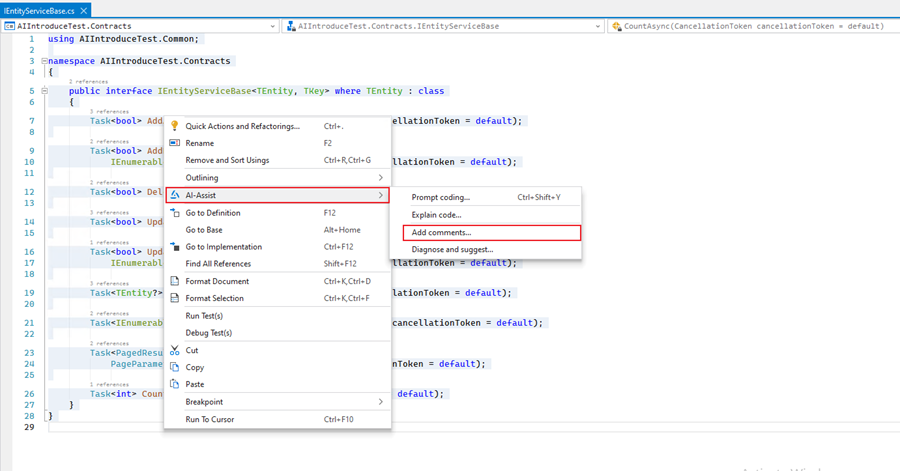
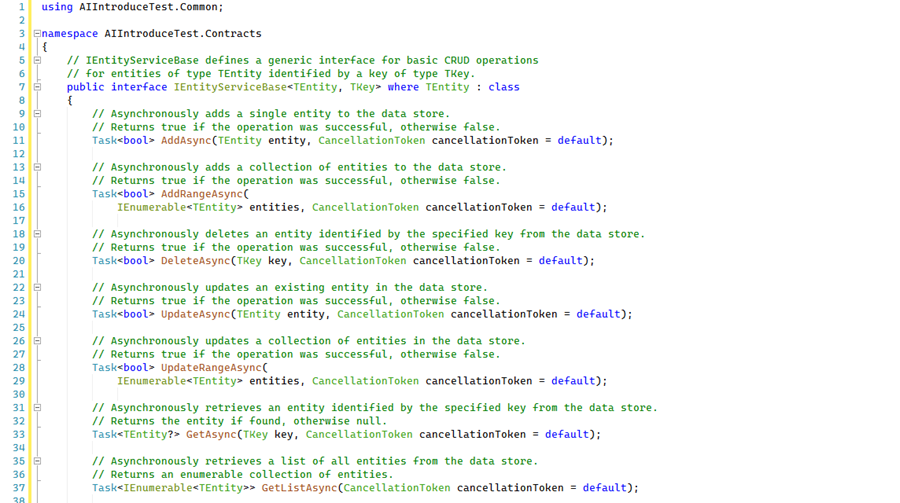
The AI coding assistant can automatically generate comments based on the code, including function descriptions, parameter descriptions, return value descriptions, etc., to help you better maintain the code. You can select a section of code, right-click and select AI-assist > Add comments..., as shown below:
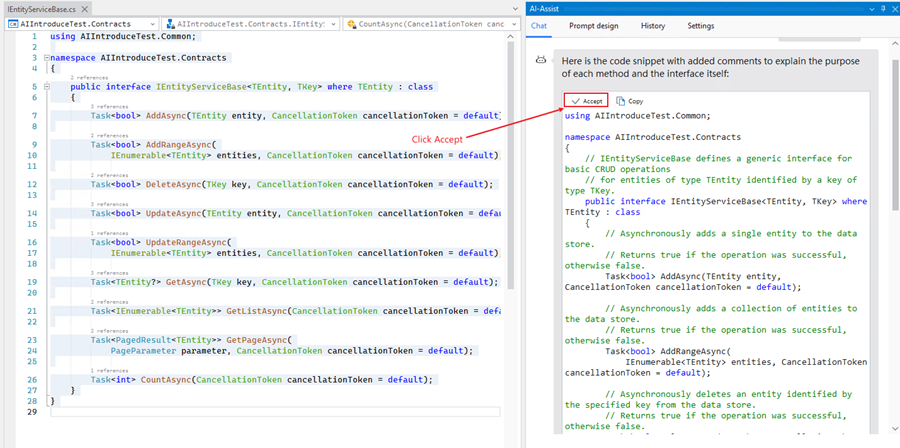
The AI coding assistant will provide the code snippet with the comments in the dialog box. If the added comments meet the requirements, you can click the Accept button above the snippet to replace the original code with the commented code.
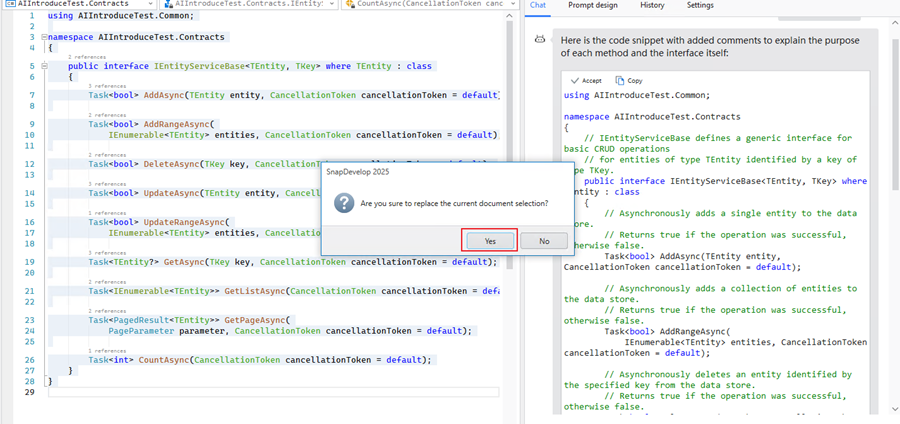
Diagnosis and suggestions
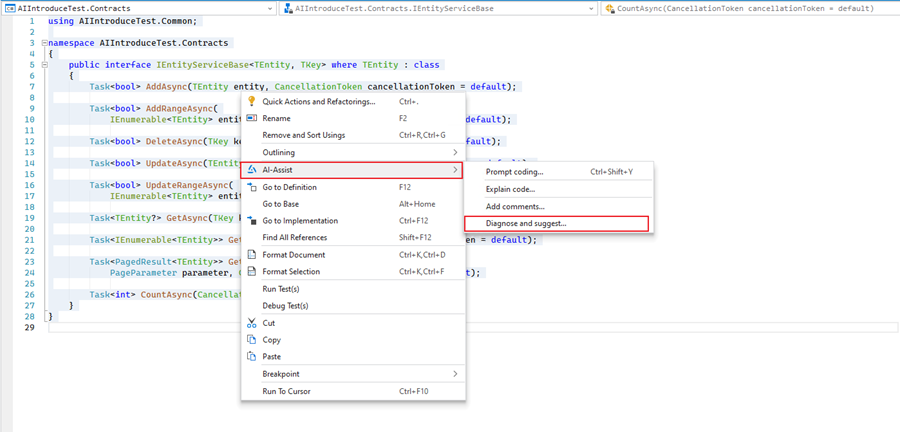
The AI coding assistant can detect errors in the code, including syntax errors, logic errors, potential runtime errors, etc., and provide repair suggestions. You can select a section of code, right-click and select AI-assist > Diagnose and suggest..., as shown below:
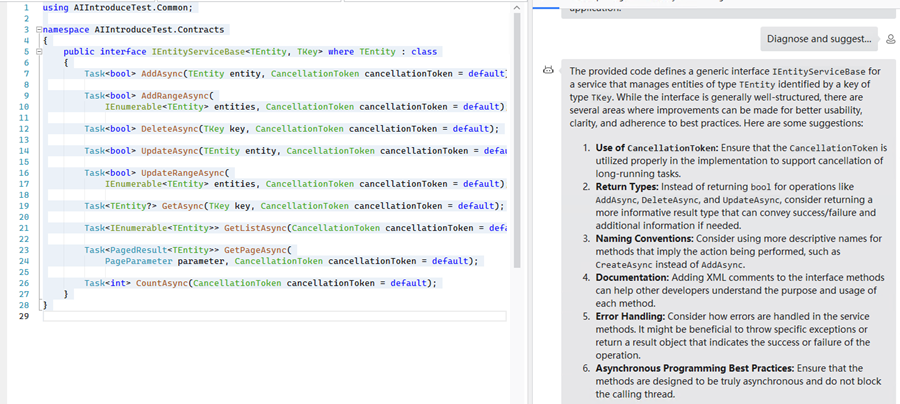
The AI coding assistant will provide the following diagnostic suggestions for your reference:
Manage chat history
You can manage the chats between you and the AI coding assistant on the AI-assist > History page. A Delete ( ) button is provided on the right side of all chat records. By clicking this button, you can delete the corresponding session record.