Working with solutions and projects
Introducing basic concepts
Project
A project contains all the source code files, data files, etc. that are compiled into a library or executable, and also includes compiler settings and other configuration files that might be used by a variety of services or components that your program works with.
Clicking on the menu File > New > New Project will open the New Project window where you can choose from the following project types:
Designer-developed
Designer-developed projects refer to projects created in a low-code manner using visual designers. Each designer-developed project contains a project file identifiable from the file extension (.sdproj).
- Web API Project
- Library Project
- Vue Web App
- Vue Web App (Empty)
Manually-code project
Manually-coded projects refer to projects created through traditional manual coding practices. Each C# project contains a project file identifiable from the file extension (.csproj).
- ASP.NET Core Web API
- Console App
- Class Library
- Vue.js
- xUnit Test
- Worker Service
- ASP.NET Core gRPC Service
Library projects
- Class Library
- ASP.NET Core Class Library
Solution
A solution is a container for projects that are related in some way. It contains build information, SnapDevelop window settings, and any miscellaneous files that are not directly related to a particular project. A solution is defined by a text file with the .sln extension that integrates projects, project items and solution items in the solution.
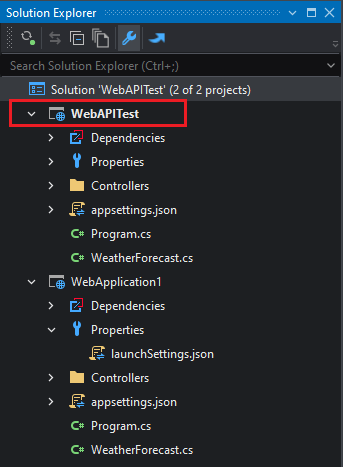
Solution Explorer
After you create a new project, you can use Solution Explorer to view and manage the project and solution and their related items.
A variety of menu commands, such as building/rebuilding a project, managing/restoring NuGet packages, adding a reference, renaming a file and adding Docker Support, are offered by right-clicking on various items in Solution Explorer.
The toolbar at the top of Solution Explorer currently provides 6 options:
- Refresh Status button, which refreshes the status of code management of all the nodes inside Solution Explorer.
- Sync with Active Document button, which allows you to locate the currently open file in the code editor inside Solution Explorer.
- Collapse All button, which collapses all nodes in Solution Explorer.
- Show All Files button, which shows all files including the hidden files in the selected project.
- Properties button, which allows you to set the various properties of the project/solution.
- Preview Selected Items button, which previews a selected file or component with one click in the code editor.
Creating solutions and projects
Creating a new project
To create a new project, take the following steps:
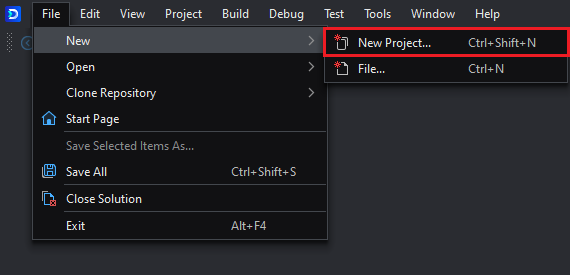
Step 1: Select New > New Project... from the File menu.
Step 2: The New Project page will pop up.
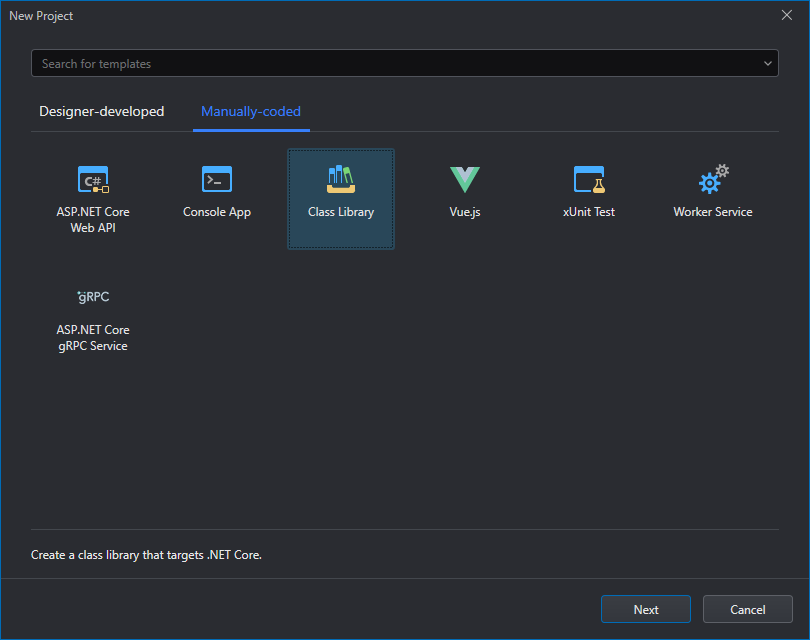
Step 3: On the New Project page, select a project template from the available project templates options.
Step 4: Specify a name for the project, select where you want the project to be created, and specify the solution name.
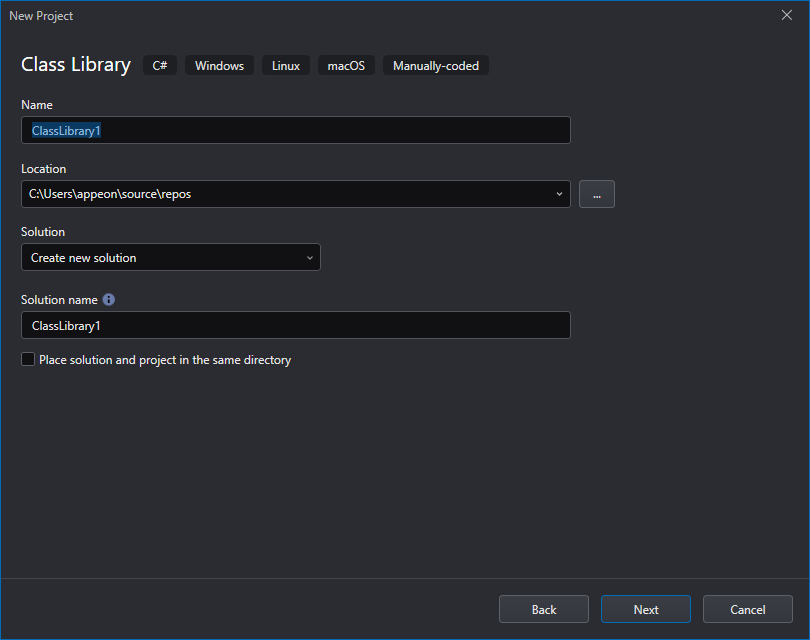
The fields required in each template are different. Please follow the guidance in the screen to specify all the necessary information, and then click Next to go to the next screen, until you see the Create button in the screen.
Step 5: Click Create to generate the project. The project is then opened by SnapDevelop so that you can start to develop.
Setting a startup project
You can view your solutions and projects in the Solution Explorer tool window, in which you will see that a project is marked in bold. Such a project is called the startup project, which refers to the project that launches when you run the application.
The startup project can be changed to another by right-clicking on the node of the intended project and then selecting Set as Startup Project. For a library project, you must add an executable project to the solution and set the executable project as the startup project.
Adding items to a solution
As described earlier, a project contains all items required to build an application in SnapDevelop. When you create a new project, SnapDevelop creates a solution to accommodate the project. When the solution is created, you can also add existing and/or new projects/items to the solution. The newly added items do not necessarily belong to any individual project.
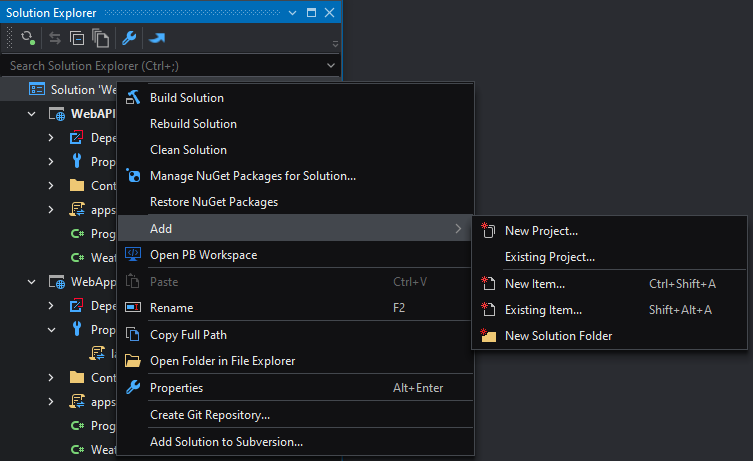
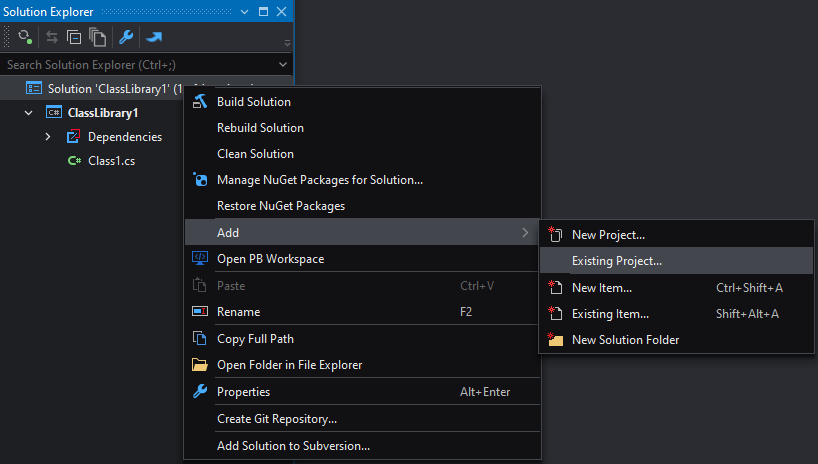
Sometimes, multiple projects in your solution share a file, such as the readme file for the solution, and some files belong at the solution level instead of the project level. In such cases, you can add the files to the solution itself. To do so, right-click on the solution node in Solution Explorer and then select Add > New Item, or Add > Existing Item.
Deleting a solution, project or item
You can use the SnapDevelop IDE or File Explorer to delete a solution, project or item. The difference is that deleting items within the SnapDevelop IDE only removes them from the current project or solution while deleting items in File Explorer removes them permanently. Before you delete items in File Explorer, however, it is recommended that you back up the items in case you need to use them later.
To delete an item within the SnapDevelop IDE, select the item and then select Delete from the right-click context menu.
To permanently remove an item,
Step 1: Right-click on the node of the solution/project/item you want to delete in Solution Explorer and then select Open Folder in File Explorer. Step 2: Navigate up one level in File Explorer. Step 3: Select the folder that contains the solution and then press the Delete key.
Project properties and solution properties
When you right-click on a project (or solution) in Solution Explorer and select Properties, the Properties Settings window will pop up. You can configure properties about the project (or solution) in this window. For a detailed description of each property, please refer to Configuring project properties.
Scaffolding
SnapDevelop provides the following scaffolding functions for .NET projects loaded in the Solution Explorer:
- Creating entities from an existing database
- Generating services and APIs from an entity
- Generating APIs
Create entities from an existing database
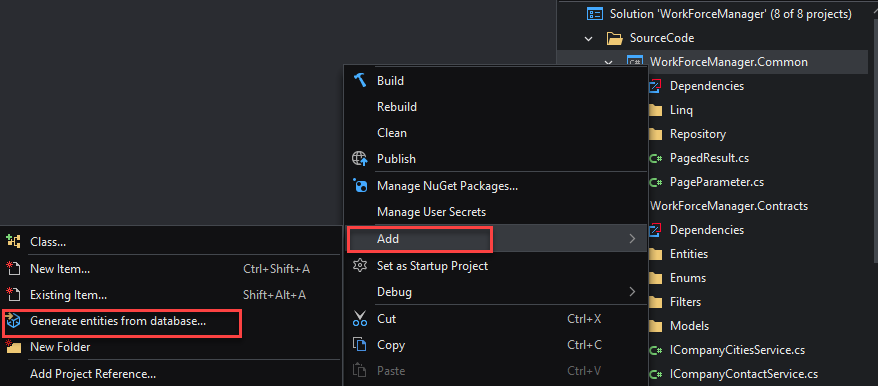
Step 1: Launch the functionality
To access this functionality:
- Right click the project and select Add > Generate entities from database....
Step 2: Connect to the database
Right click the project and select Add > Generate entities from database....
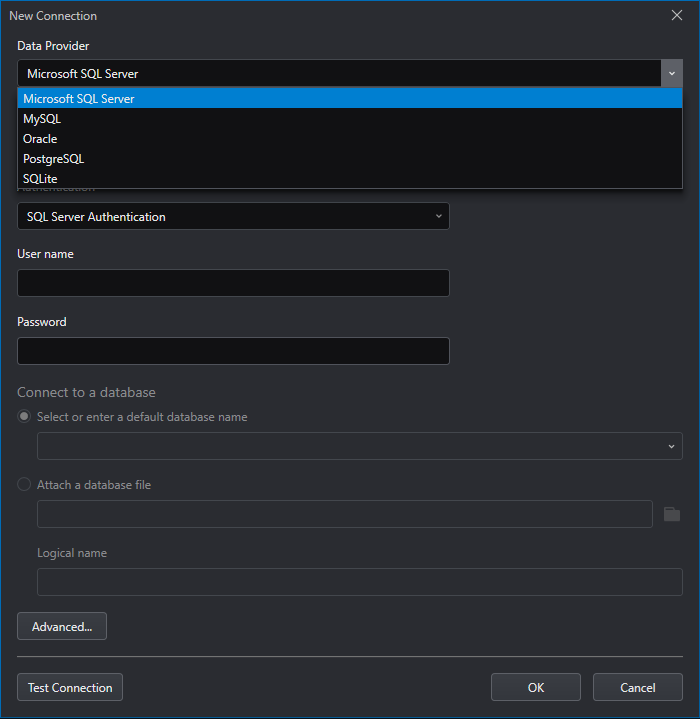
Click New to create a new database connection.
In the Connection Properties dialog that displays, specify the connection information for the database.
The following takes SQL Server database as an example. For more information about connecting to the SQL Server database, refer to https://learn.microsoft.com/en-us/visualstudio/data-tools/add-new-connections?view=vs-2022.
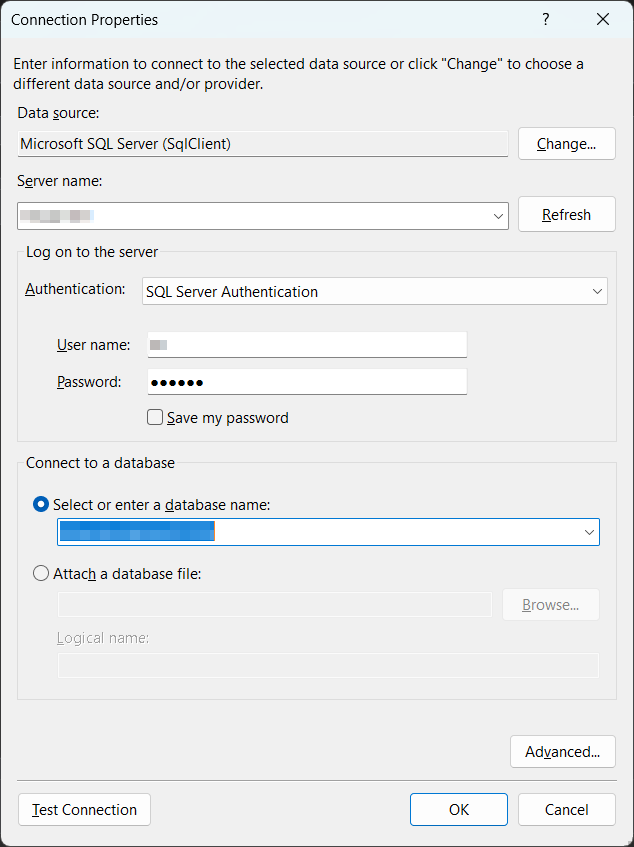
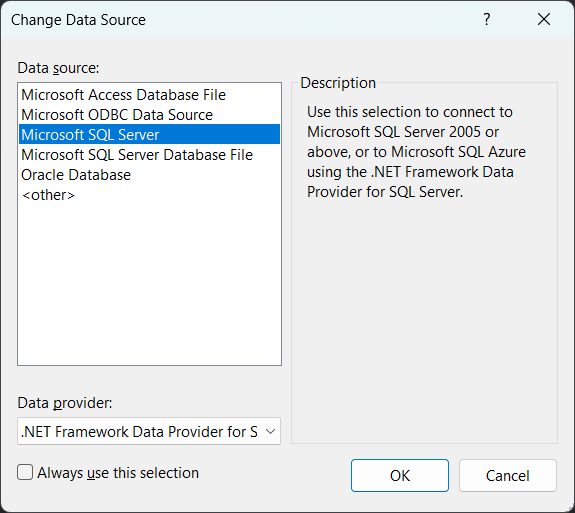
The Data source field indicates the database type and the data provider to be used for the connection. You can change this by clicking the Change button and then selecting a different data source and data provider. You will need to install the data provider beforehand.
After you specify the connection properties in the Connection Properties dialog, click Test Connection to make sure the database connection is successful.
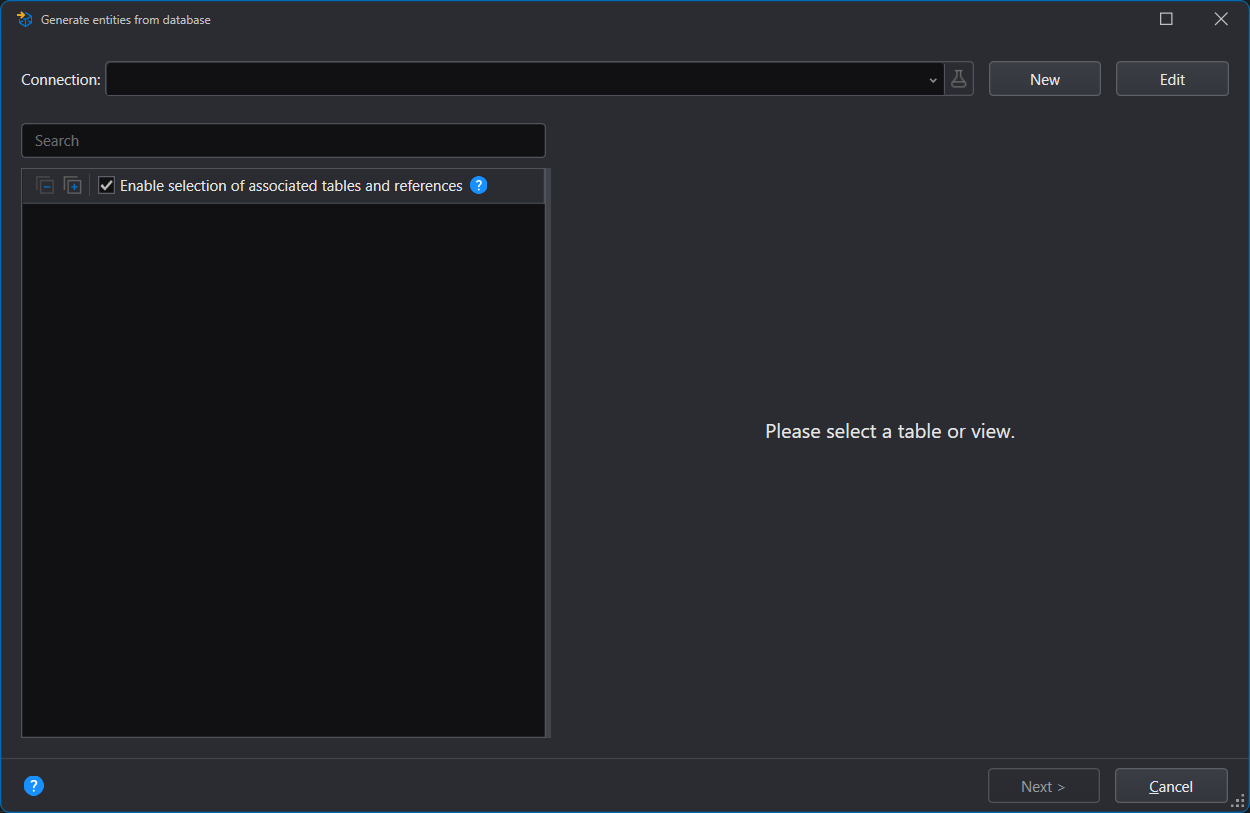
Step 3: Select tables, views, or functions
After creating the database connection, you can select it in the Generate entities from database window, and then you can select one or more items (tables, views, functions, and/or stored procedures) from the database (①). If the list is long, you can search for the name of the item. If you have created entities before from the same database connection, the last selected items will be still selected for easy selection.
The Enable selection of associated tables and references option (②) is selected by default, so when you select a table, the tables that are referenced by the selected table (so called referenced tables) will be automatically selected and the reference relationship will be displayed in the DataType and Mapping Type columns (⑥).
The tables that make references to the selected table (so called referencing tables) are not selected. When the Enable selection of associated tables and references option is selected, the referencing columns will be visible in the References section (③), if you manually select the referencing columns in the References section, the corresponding referencing tables (and the referenced tables of these tables) will be automatically selected.
You can change the default name for the entity and/or property (④) when necessary.
You can view the data type of each field (⑤), and the relationship of tables (⑥).
Click Next to proceed.

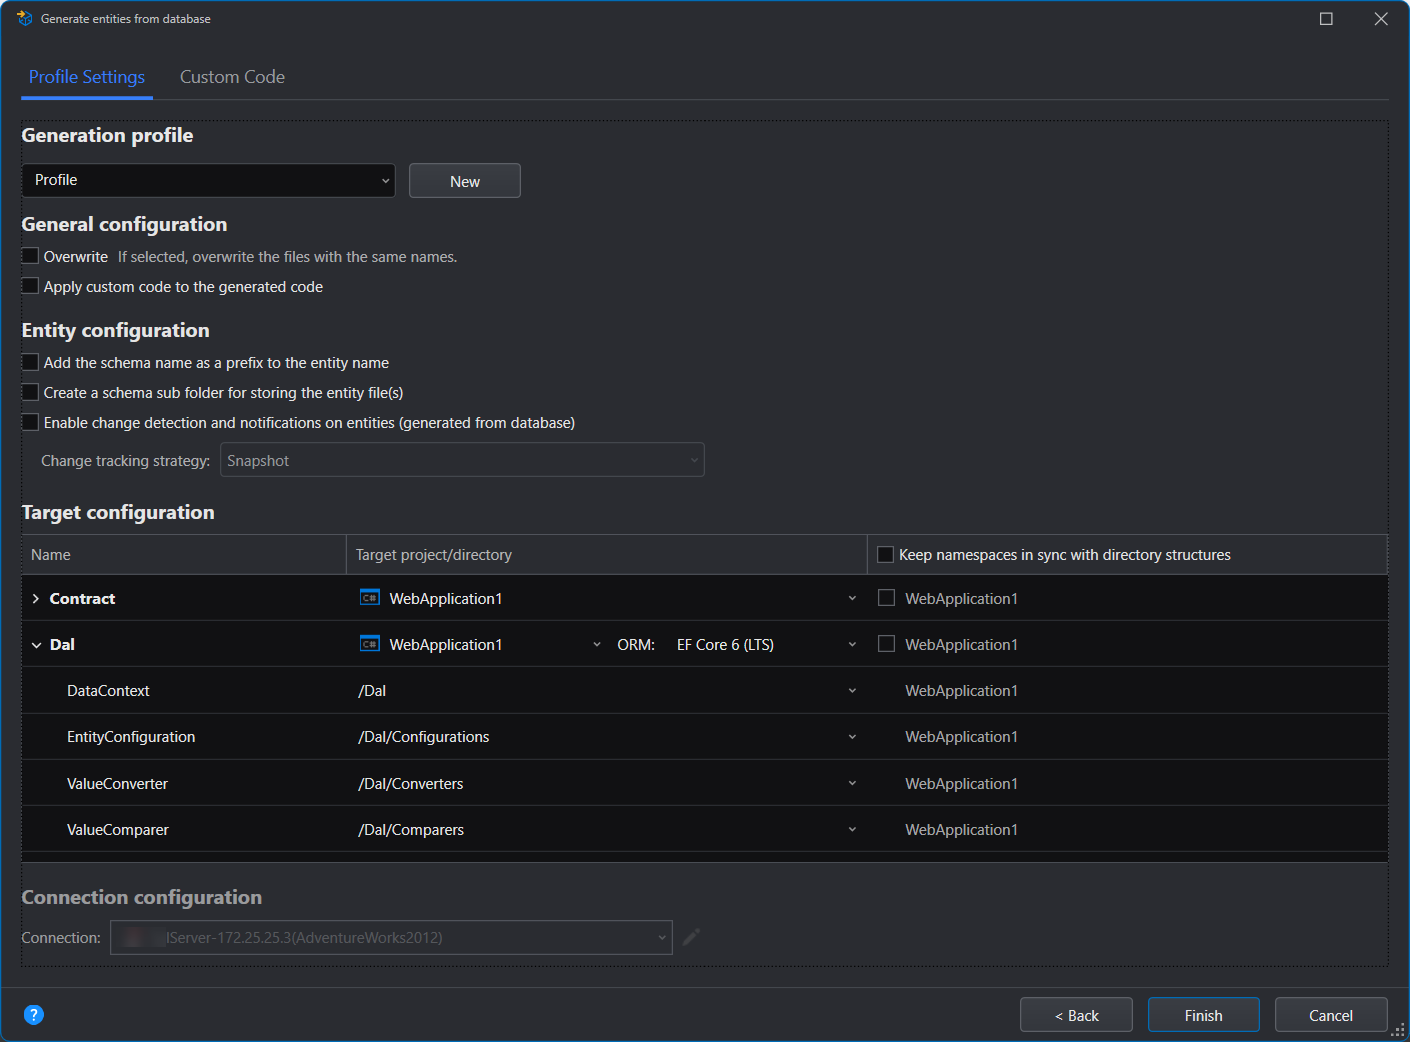
Step 4: Specify the generation settings
After you select the tables, views, and/or functions, you can specify settings for the entity generation and the custom code.
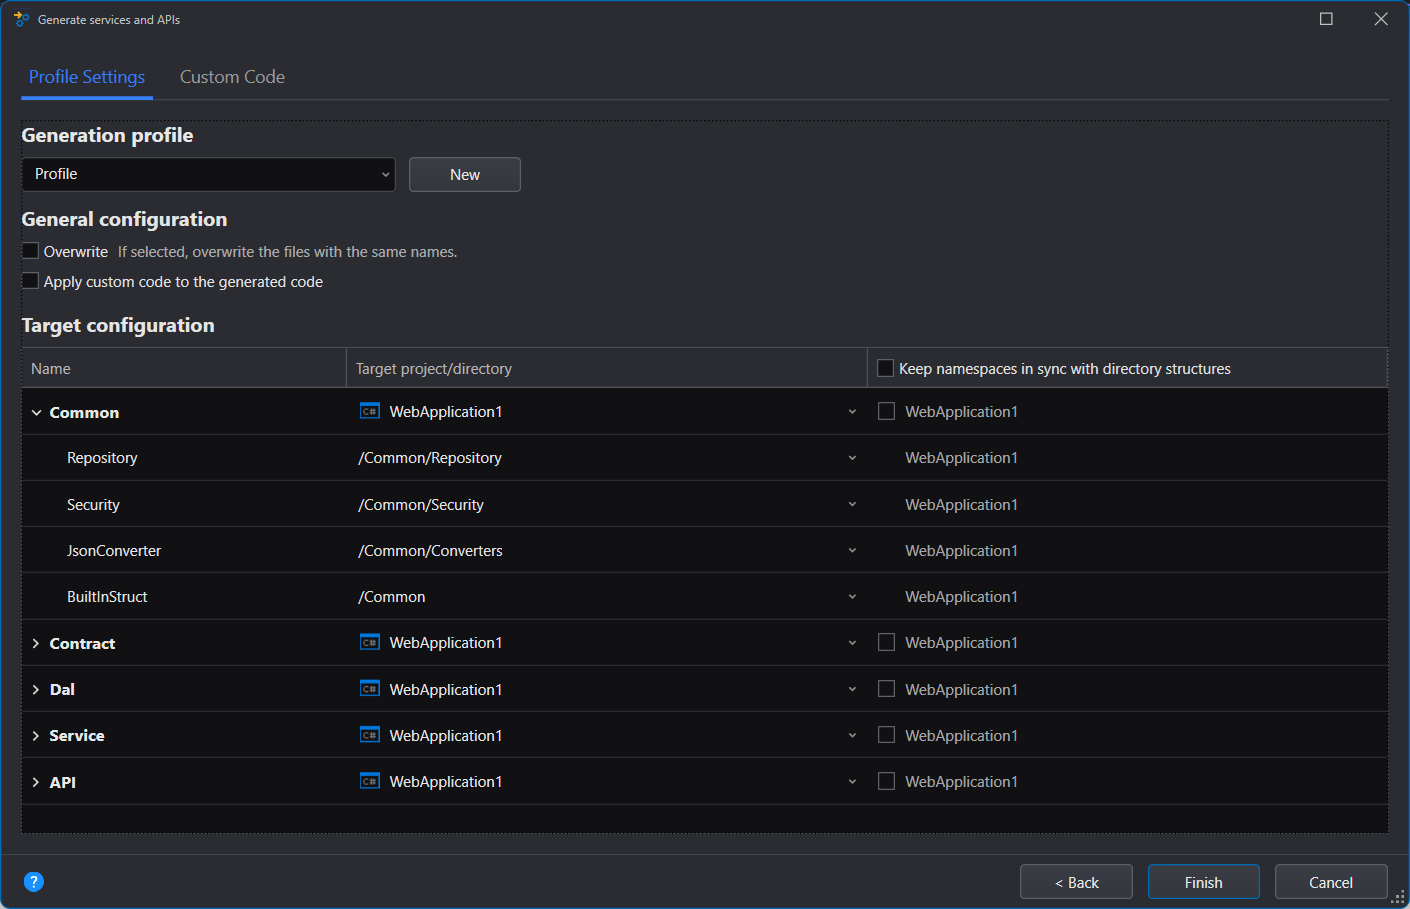
Profile Settings
In the Profile Settings tab, you can select an existing generation profile or click New to create a new profile.
General configuration
- Overwrite: Overwrites the existing files with the same file names.
- Apply custom code to the generated code: When this option is selected, you can configure and add the custom code in the Custom Code tab.
Entity configuration
Add the schema name as a prefix to the entity name: The name of the schema will be added as the prefix of the entity file name. For example, dbo_cur_emp.cs contains a schema prefix "dbo_" and cur_emp.cs contains no schema prefix.
Create a schema sub folder for storing the entity file(s): A folder will be created using the name of the schema and the entities will be stored in this folder.
Enable change detection and notifications on entities (generated from database): Able to track changes made to entities generated from database tables, by using the following change tracking strategy:
SnapShot
ChangedNotifications
ChangingAndChangedNotifications
ChangingAndChangedNotificationsWithOriginalValues
For differences about these strategies, refer to https://learn.microsoft.com/en-us/ef/core/change-tracking/change-detection.
Target configuration
You can specify where the files will be generated, and which namespace will be used.
You can modify the relative output path where the files will be generated.
For Dal (data access layer), you can also specify the ORM.
Step 5: Generate entities
Click Next to generate the entity files.
After entities are generated successfully, you will need to copy the scripts from the screen to inject the database context in Program.cs and add connection string in appsettings.json file respectively. Modify the connection string according to your database information.
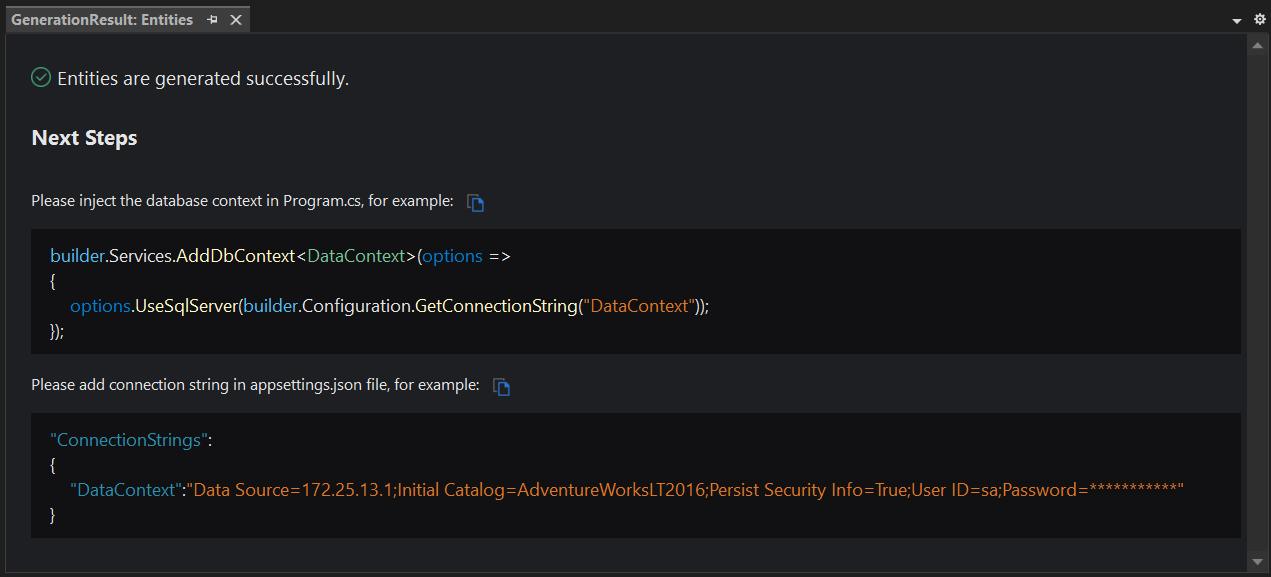
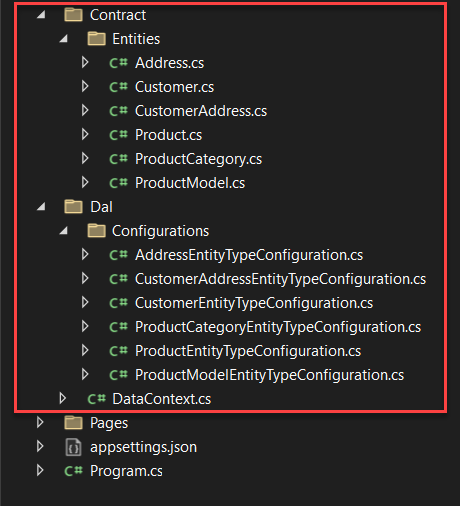
After the files are generated successfully, they will be listed under the project.
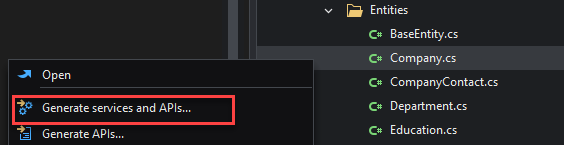
Generate services and APIs from an entity
After the entity files are generated successfully, you can generate services and APIs from the entity.
Step 1: Launch the functionality
To access this functionality:
- Select an entity CS files and then right click and select Generate services and APIs.
Step 2: Configure the services and APIs
Select APIs
Select one or more entities and then right click and select Generate services and APIs.
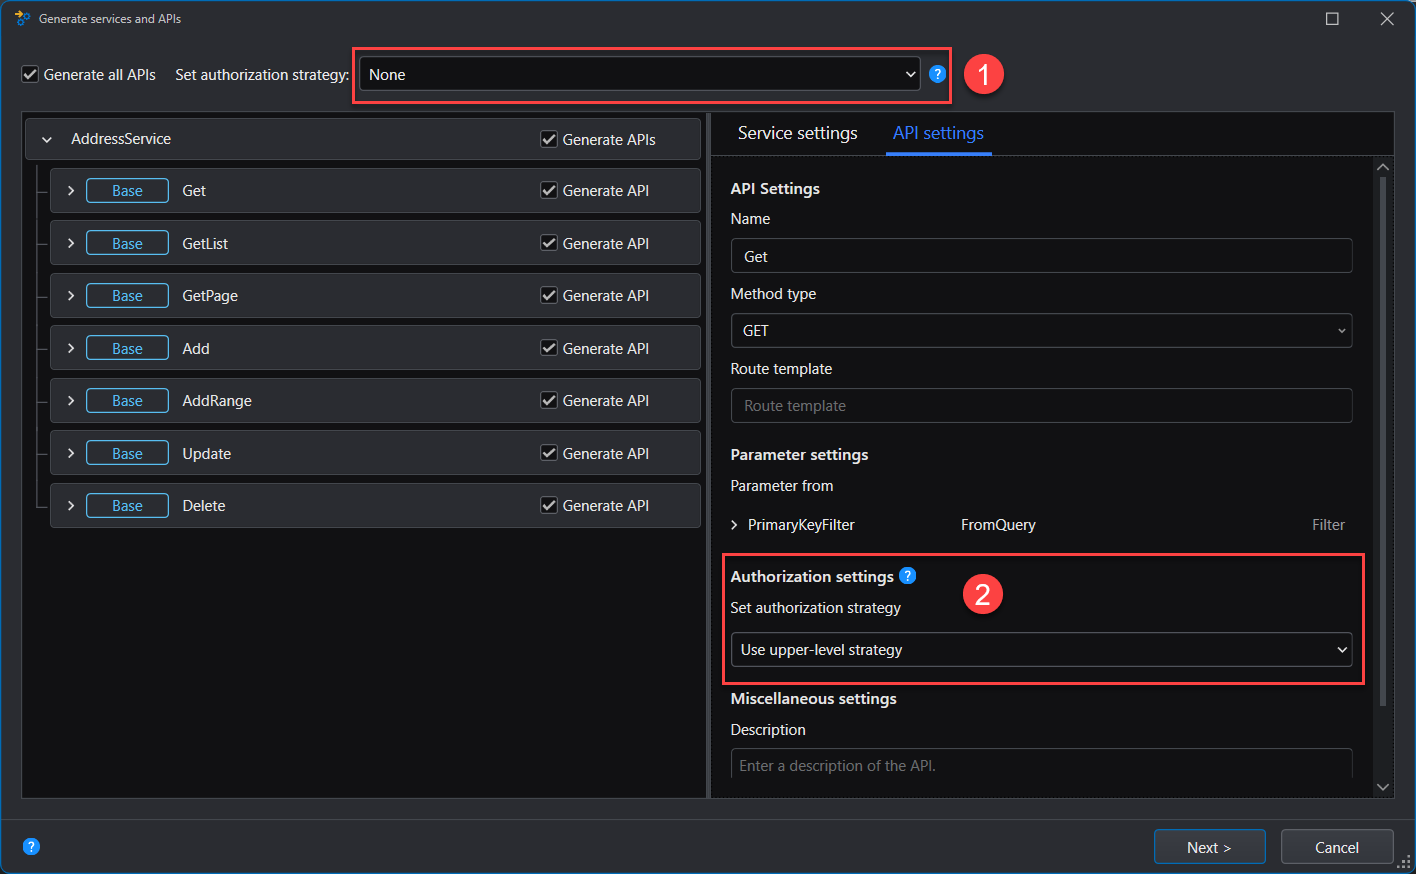
In the Generate services and APIs window, Generate all APIs (①) is selected by default which means APIs will be generated for all base services. You can also select Generate API (②) to generate API for the particular service(s) only.
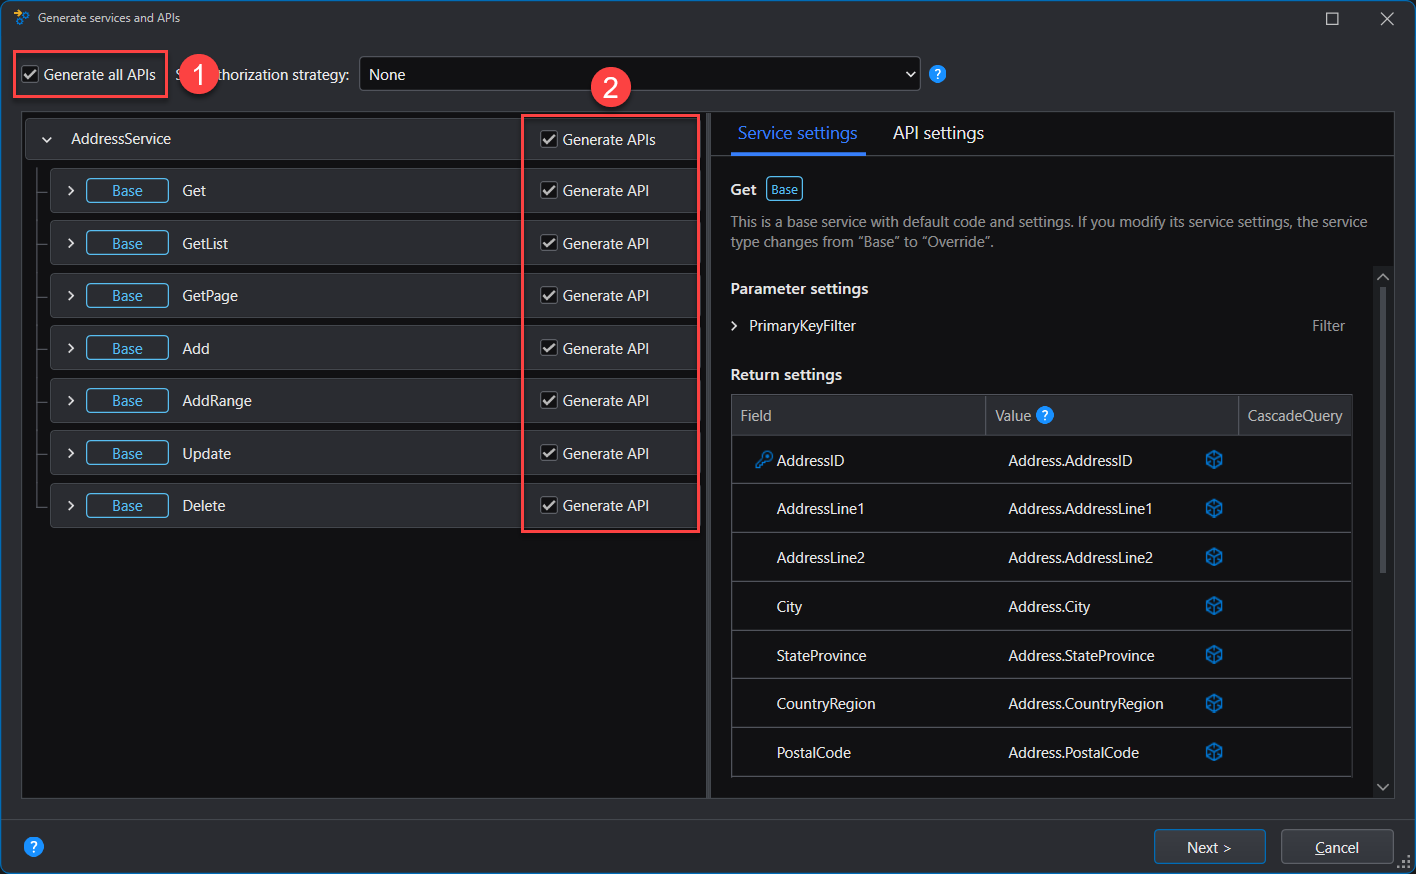
Configure authorization
You can select the authorization strategy for the controller (①) (the upper-level of API), so all APIs will by default use this strategy. You can also select different strategy for each API in the API Settings page (②).
For controller, you can select one of the following basic authorization strategies: None, Use application default strategy, Use anonymous strategy, or use other custom policies.
None: Use no authorization strategy:
Use application default strategy: Uses the default strategy configured for the application.
Use anonymous strategy: Uses the anonymous access strategy. Anonymous access allows requests to go through without authentication.
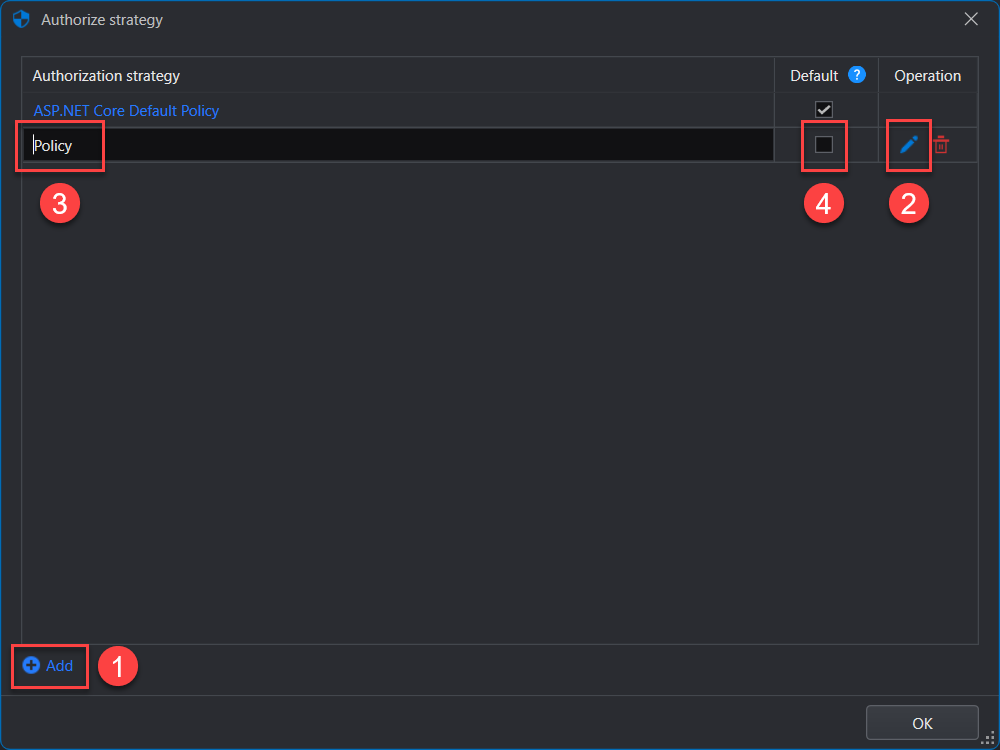
To add a new custom policy, you will need to write codes and implement the policy first, and then add the policy here, by selecting New Strategy at the bottom of the strategy list box.
In the Authorize strategy dialog box, click Add (①) to add a policy and then click the Rename icon (②) to change the default name to the actual policy name (③), or select it as the default policy (④).
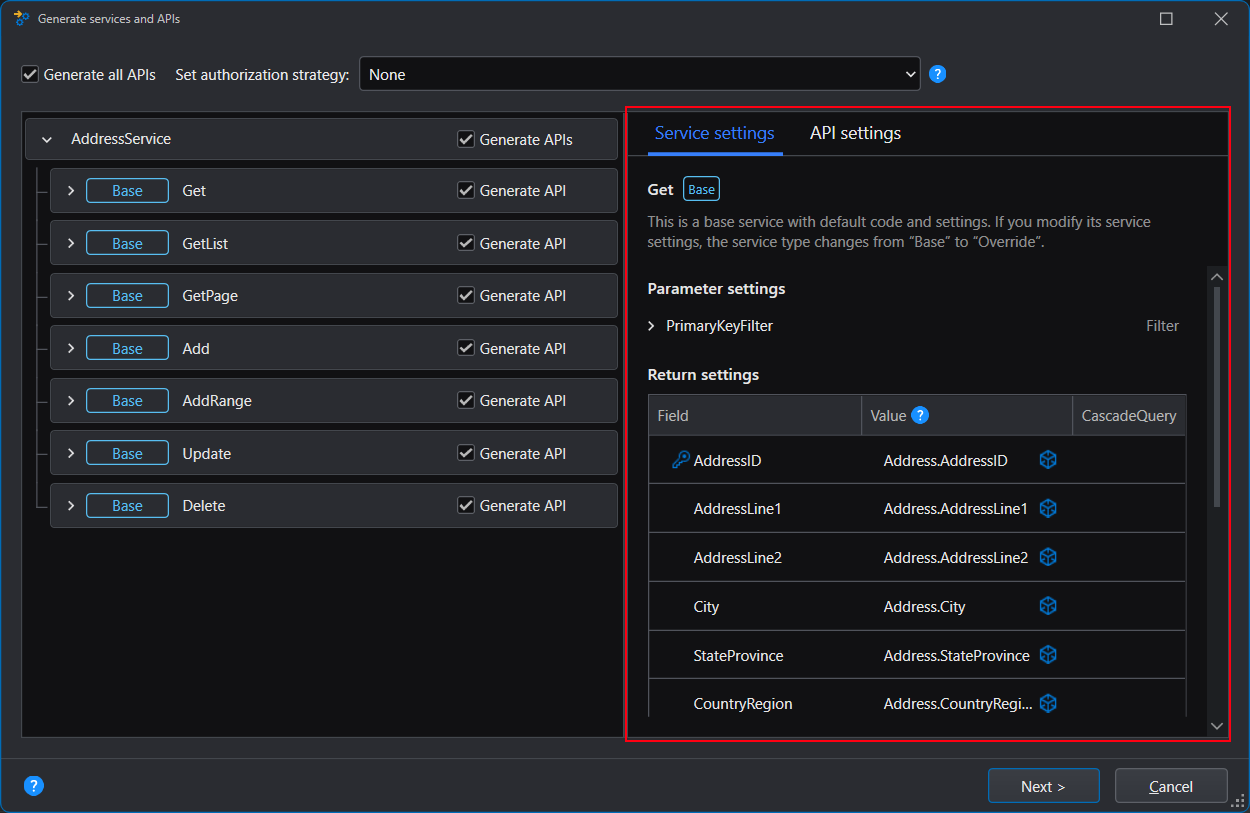
Configure service
You can configure the settings for each service in the Service settings tab.
Parameter settings
Lists the request parameters of the service.
Sort settings
(For GetList and GetPage) Click Add sort option to sort the data in the database. You can select a field or input an expression and then specify to sort by ascending or descending order.
Assignment settings
(For Add, AddRange, and Update) You can set values for fields. You can select a field or input a value or expression.
Return settings
(For Get, GetList and GetPage) Specify the return value of each response field of the service. You can select a field or input a value or expression.
(For Add, AddRange, Update, and Delete) List the return value of the service.
Sorting the return data
(For GetList and GetPage) Click Sort sources to select an entity and then click Add sort option to select a field or input an expression to sort the data.
Description: The description of the service.
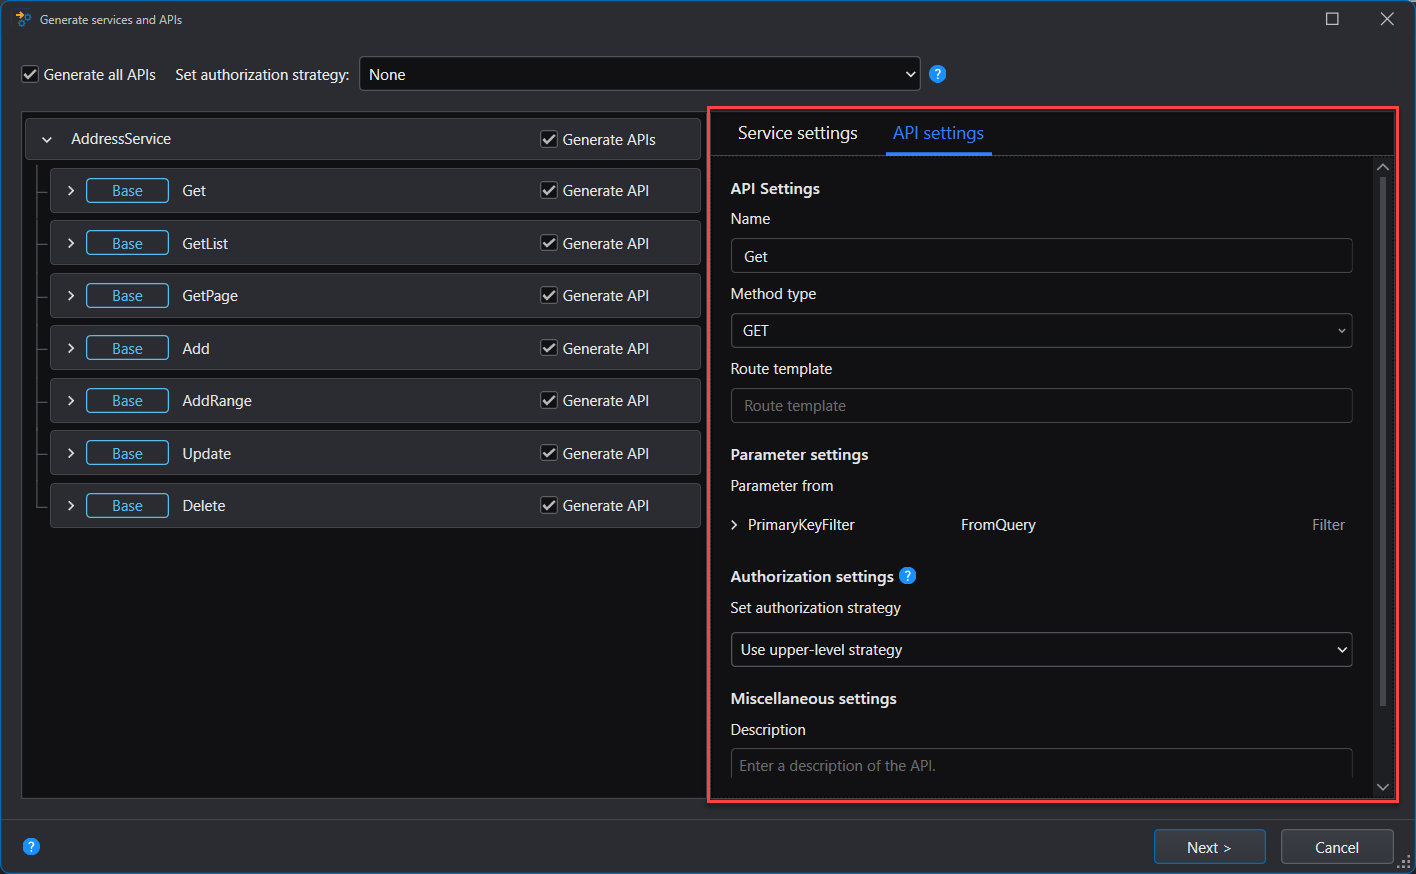
Configure API
You can configure the setting for each API in the API settings tab.
Name: The name of the API.
Method type: The default method type of the API.
Route template: Specify the route template, for example, api/[controller]/[action].
Parameter settings
You can select to get parameters from the following: FromQuery, FromRoute, FromForm, FromBody, or FromHeader.
FromQuery: Binds parameters from the query string.
FromRoute: Binds parameters from the request route.
FromForm: Binds parameters from the form data in the request body.
FromBody: Binds parameters from the request body.
FromHeader: Binds parameters from the request header.
Authorization settings: For the current API, you can select one of the following basic authorization strategies: Use upper-level strategy, Use application default strategy, Use anonymous strategy, or use other custom policies.
Use upper-level strategy: Uses the upper-level strategy. For an API, the upper-level is controller. By default the API will use the strategy that is selected for the controller.
Use application default strategy: Uses the default strategy configured for the application.
Use anonymous strategy: Uses the anonymous access strategy. Anonymous access allows requests to go through without authentication.
Description: The description of the API.
Click Next to proceed.
Step 3: Specify the generation settings
Profile Settings
In the Profile Settings tab, specify settings for the services and APIs generation. You can select an existing generation profile or click New to create a new profile.
General configuration
- Overwrite: Overwrites the existing files with the same file names.
- Apply custom code to the generated code: When this option is selected, you can configure and add the custom code in the Custom Code tab.
Target configuration
- You can specify where the files will be generated, and which namespace will be used.
- You can modify the relative output path where the files will be generated.
Custom Code
For more, refer to Custom Code.
Step 4: Generate services and APIs
Click Next to generate the files.
After services and APIs are generated successfully, you will need to copy the scripts from the screen to inject the repository and service in Program.cs respectively.
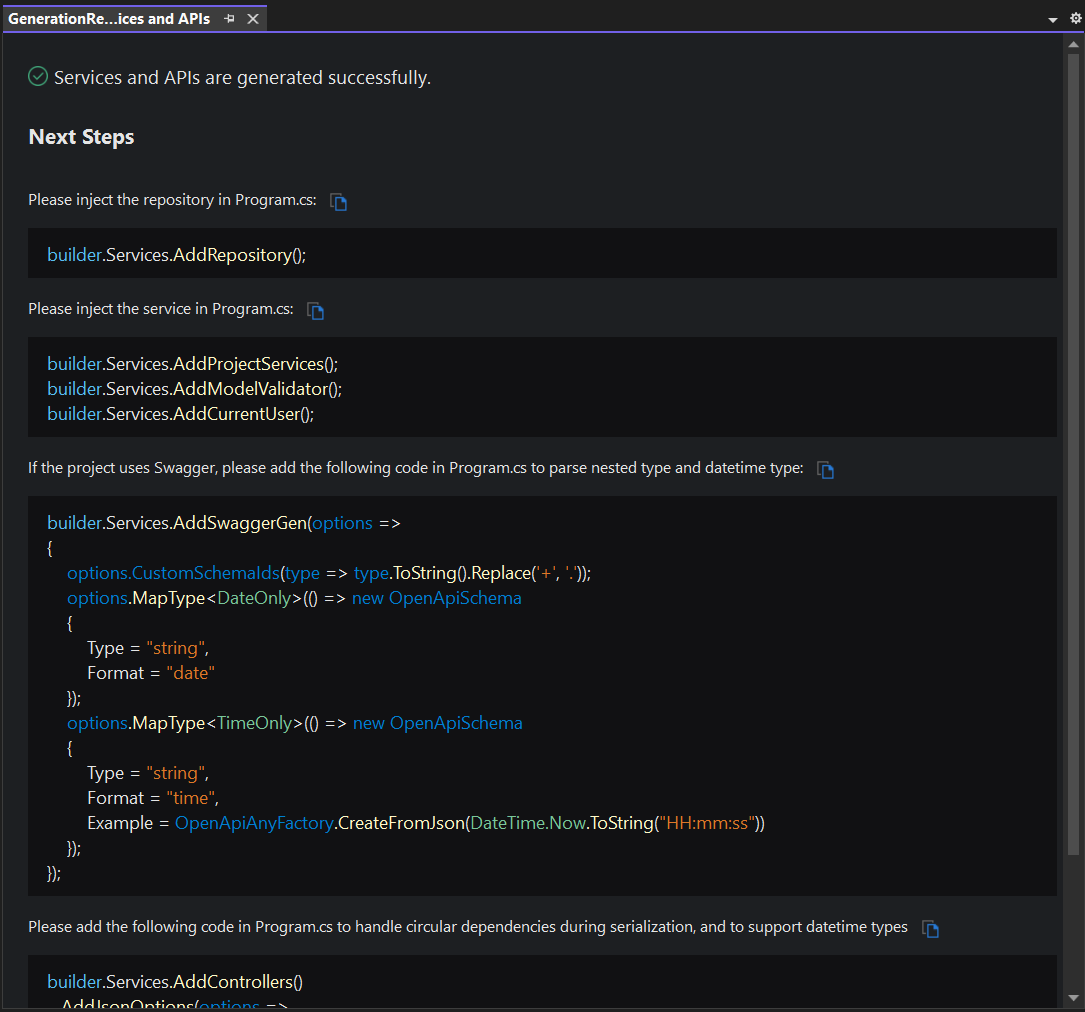
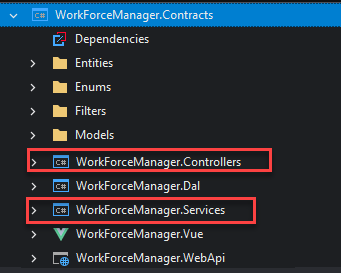
After the files are generated successfully, they will be listed under the project.
Generate APIs
You can also generate APIs only from the controller, implementation, or interface.
To access this functionality:
- Select an entity CS files and then right click and select Generate APIs.
Follow the instructions in Configure authorization and Configure API to configure and generate the APIs.
Managing project references
Three available referencing methods
SnapDevelop currently supports three referencing methods, which are:
- Project-to-project Reference
- Shared Project Reference
- COM Reference
- File Reference
Adding or removing references using the reference manager
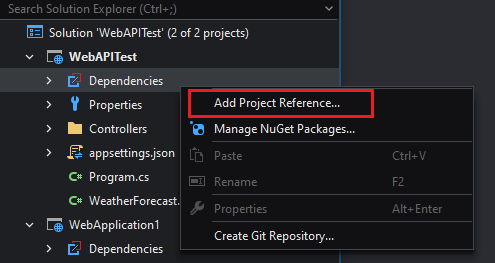
To add a reference, right-click on the project node and then select Add > Reference, or right-click on the Dependencies node in Solution Explorer and then select Add Project Reference.
The Reference Manager dialog box appears and lists the available references by group.
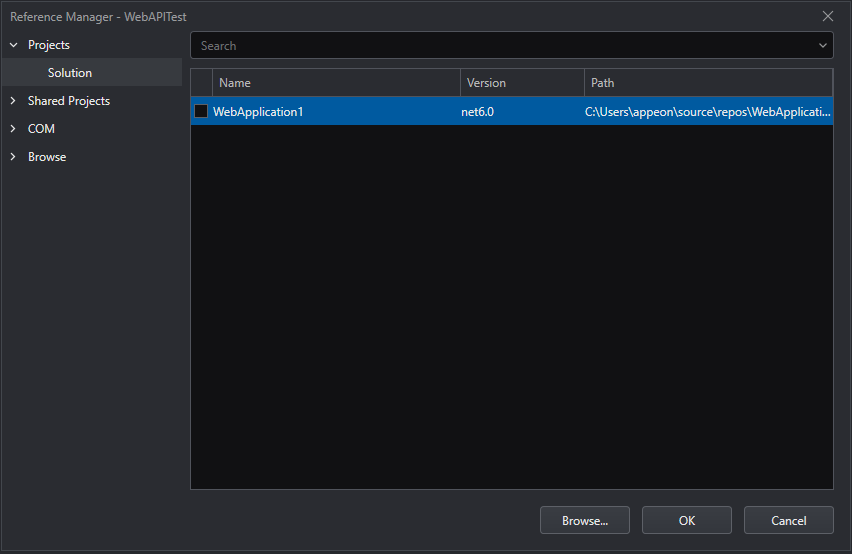
In the Reference Manager dialog box, there are four tabs:
- Projects, which lists all compatible projects within the current solution.
- Shared Projects, which allows you to write common code that can be referenced by various application projects.
- COM, which lists all COM components available for reference.
- Browse, which allows you to browse for a file in the file system. This tab contains the Recent node, which lists the components newly added to projects.
Note that there is a search bar in the Reference Manager dialog box that can be used to filter items under the tab that is in focus.
Troubleshooting reference-related exceptions
If your application cannot find a referenced component, an exception will be thrown. There are several scenarios in which an exception will be thrown.
- Network failure;
- The file being referenced has been deleted;
- The file being referenced has been renamed.
If any such exception occurs, you need to handle it in order to use the references properly.
Network failure
Fix the network connection problems until you have access to the required resources.
The file being referenced has been deleted
Delete the reference, or read it from another location if the reference exists elsewhere on your computer.
The file being referenced has been renamed
Delete the reference, and then add a reference to the renamed file.
Application settings
Managing application settings
Application settings allow you to save various application-related information, such as application URL, launch URL, and database connection strings.
The project system automatically stores application settings into two JSON files (launchSettings.json and appsettings.json) when you create an application in SnapDevelop.
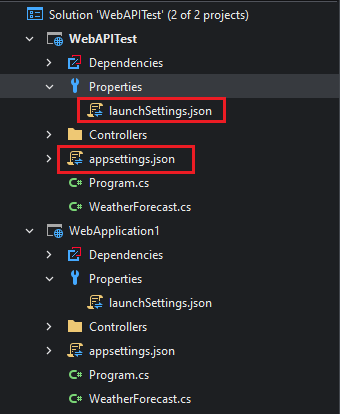
launchSettings.json
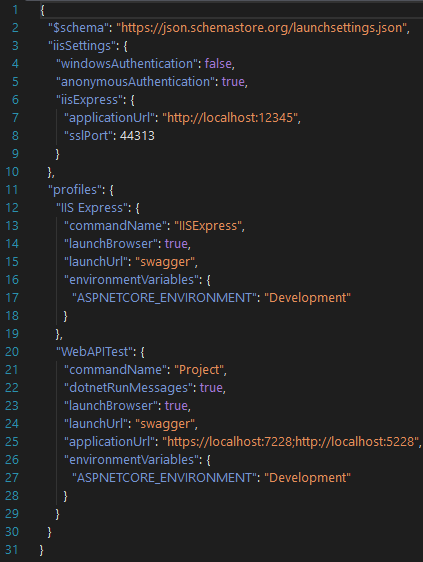
In the file:
- applicationURL: The URL where you can launch any application on your local computer from the browser.
- launchBrowser: Whether to launch the browser when you run your application.
- launchURL: The URL to launch on your local computer.
- environmentVariables: Variables that ASP.NET Core reads at app startup and that ASP.NET Core uses to configure app behaviors.
appsettings.json
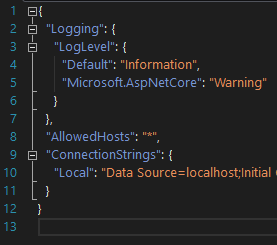
In the file:
- LogLevel: Indicates the minimum level to log for selected categories.
- AllowedHosts: The hosts headers that are allowed to access this site.
- ConnectionStrings: Strings that specify information about a data source and the way of accessing it.
Note: There are two configuration files that manage the Web app at runtime. The default application configuration is stored in the appsettings.json file. However, you can use the appsettings.Development.json file to override these settings.
Managing database connections
To create a database connection:
Step 1: Select Connect to Database... from the Tools menu.
Step 2: In the Choose Connection dialog, click New to configure the database connection.
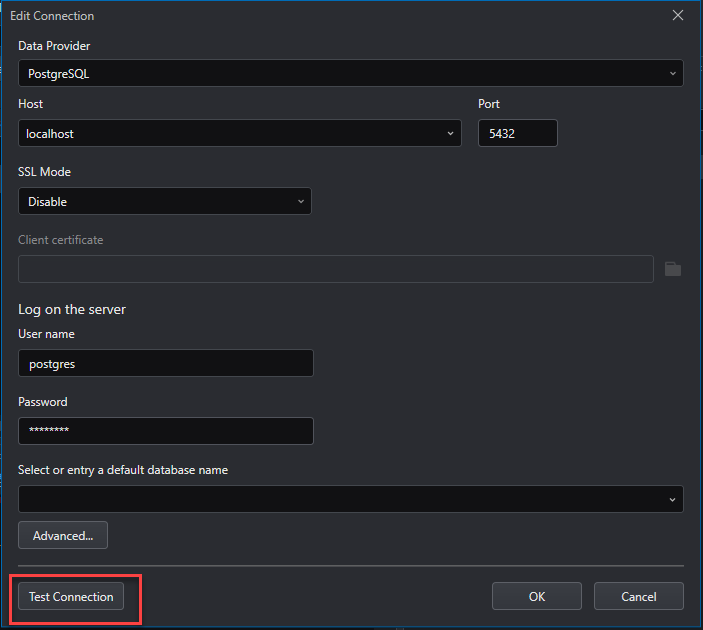
You can directly use the existing connection by selecting it from the list of Connections, or click Edit to modify the settings.
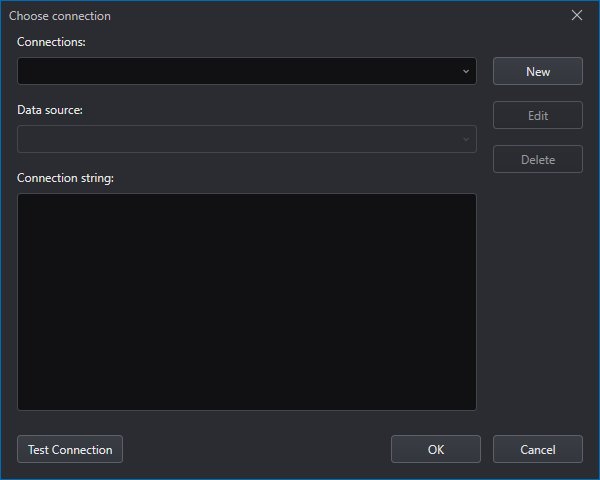
Step 3: Select a data source from the Data Provider list.
Step 4: Configure the basic and advanced connection settings for the selected data source.
Refer to Appendix D: Database Connection Settings for the settings to configure for each data source.
Step 5: Click Test Connection to check the connection state.
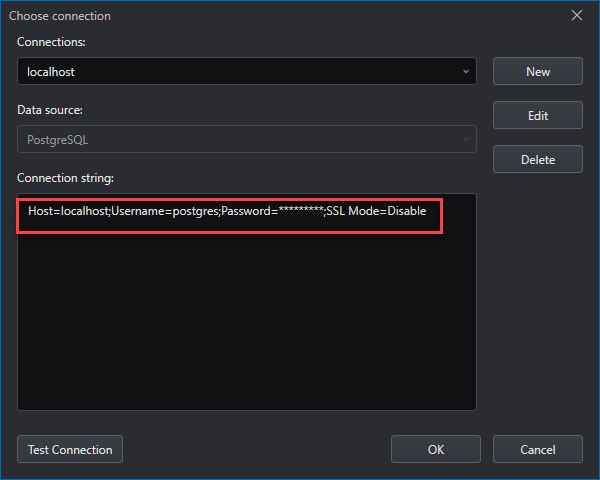
Step 6: Check the connection string in the Choose Connection dialog to make sure the properties are configured as expected. You may also copy the connection string to use it elsewhere.
Targeting a framework
SnapDevelop allows you to specify the .NET version that you want your project to target. If a .NET application is to run on another computer, it is necessary that the .NET version that the application targets should be compatible with the .NET version installed on the computer.
SnapDevelop supports long-term supported .NET versions as well as the latest .NET versions.
A SnapDevelop solution can contain projects that target different .NET versions.
Changing the target framework
When you create a .NET Core project, you have no option to select the target .NET Core version. The latest .NET Core version is selected by default. However, you can change the target .NET Core version if you want to.
To change the target framework:
Step 1: Select the project you want to change in Solution Explorer, and then select Properties from the right-click context menu.
Step 2: In the Properties window, select the Application tab.
Step 3: In the Target framework list, select the intended version.
Managing project and item templates
A variety of predefined project and item templates are automatically installed when you install SnapDevelop. These templates provide a basic set of pre-generated code and structure based on which developers just need to add some other code and resources to the project/item, thus reducing a lot of repetitive work during development.
When you create a new project/item, all project or item templates, including the default templates and custom ones, share the following items:
The files to be created when the template is used. These files include source code files, embedded resources, project files, etc.
A .template file, which contains the metadata needed to create a project or item from the template and to display the template in the New Project and New Item dialog boxes.
When these files are compressed into a .zip file and put in the correct folder:
Project templates appear in the New Project dialog box.
Item templates appear in the New Item dialog box.
Managing NuGet packages
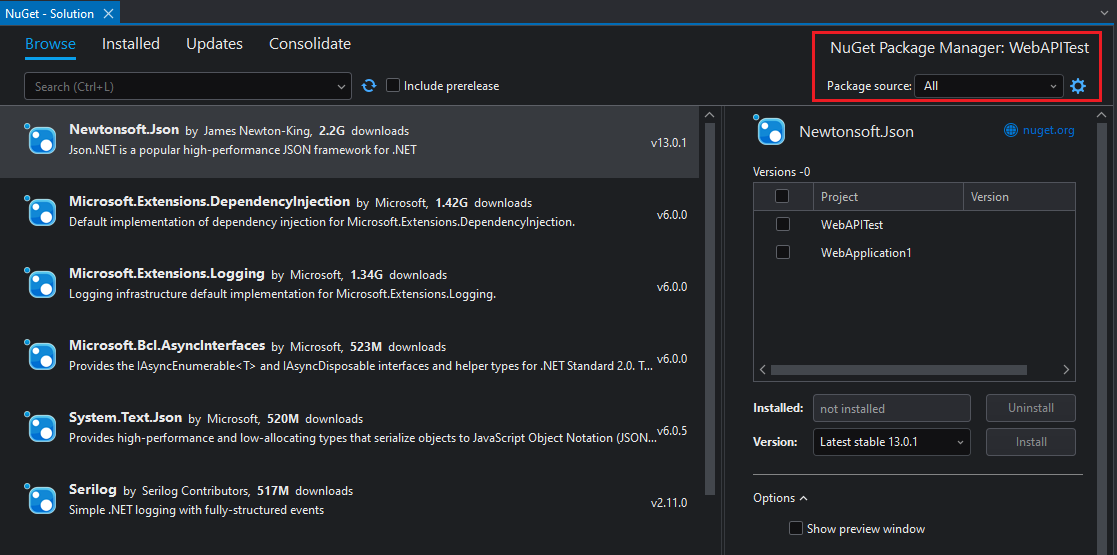
The NuGet Package Manager in SnapDevelop allows you to install, uninstall, and update NuGet packages for your projects and solutions. It contains the following tabs, and each tab displays a list of related packages on the left side of the manager and details about the selected package on the right side.
Browse, which displays packages to install. If a package is already installed, the Install button on the right side changes to Uninstall.
Installed, which displays all installed and loaded packages. A green down arrow next to a package indicates that the package is already loaded. The red X icon to the right of a package or the Uninstall button on the right side of the manager can be used to uninstall the package. A blue up arrow to the right of a package can be used to update the package if a newer version of the installed package is available.
Updates, which displays packages that have available updates from the currently selected package source.
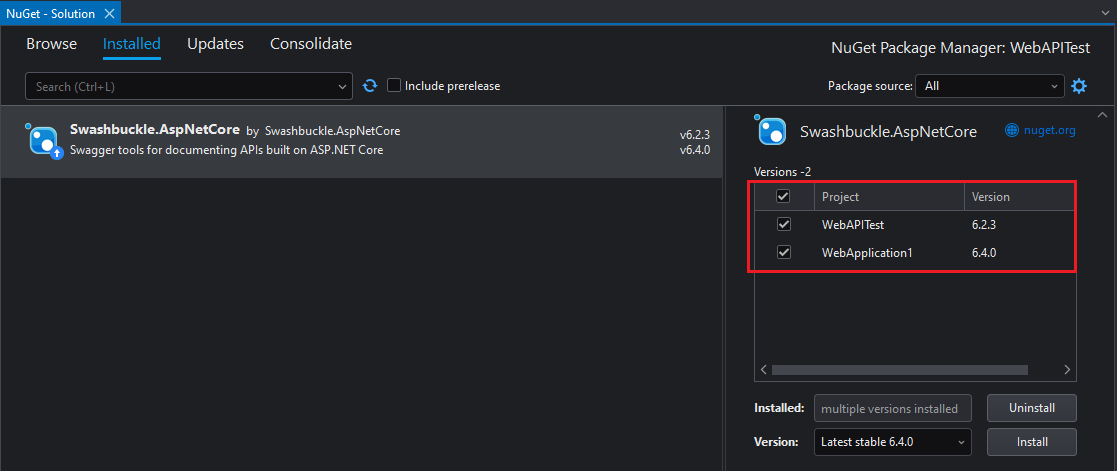
Consolidate, which displays packages that have been installed in multiple versions. You can consolidate the different versions to the one you specified.
The NuGet Package Manager remembers the following settings you configure for a single project or an entire solution, and restores your settings next time you open the NuGet Package Manager on the project or solution:
- Package source
- Include prerelease
- Show preview window
Managing packages for a single project
Finding and installing a package
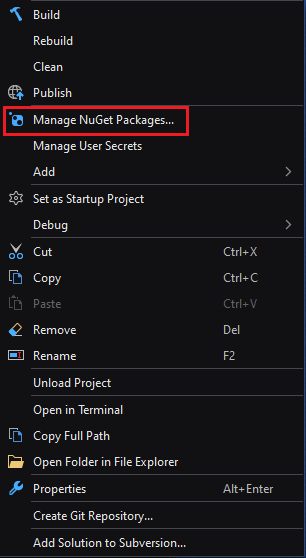
Step 1: In Solution Explorer, select either a project node or Dependencies node and then select Manage NuGet Packages... from the right-click context menu.
Step 2: Select the Browse tab to display packages from the currently enabled package source. Search for the desired package using the search box on the upper left side of the package manager and select the package to view its detailed information.
Note
To include prerelease versions in the search, and to make prerelease versions available in the Version drop-down, select the Include prerelease option.
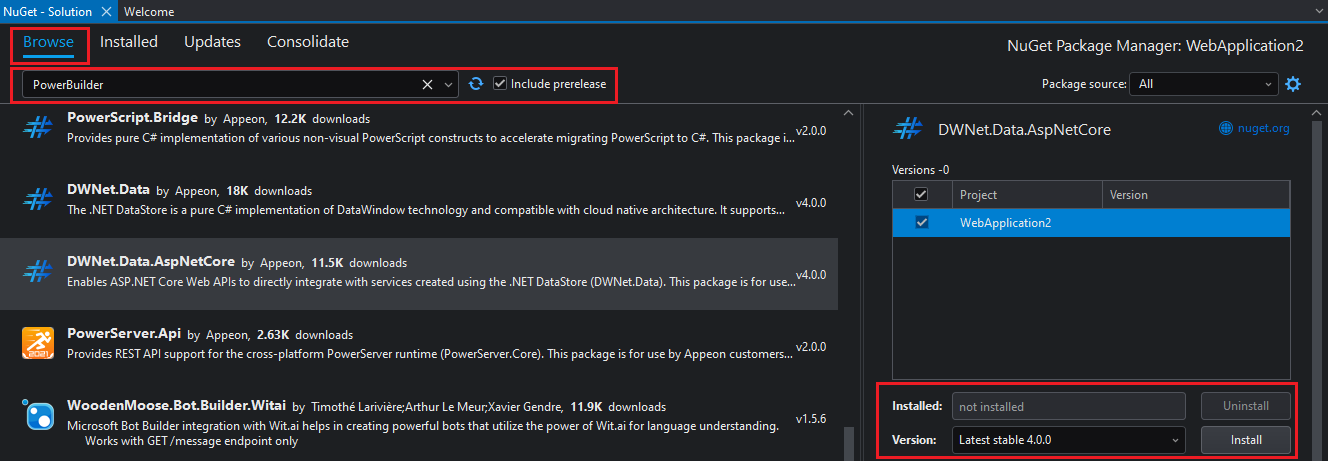
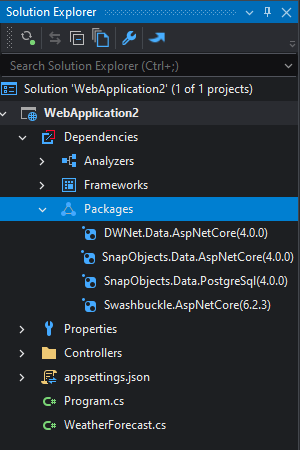
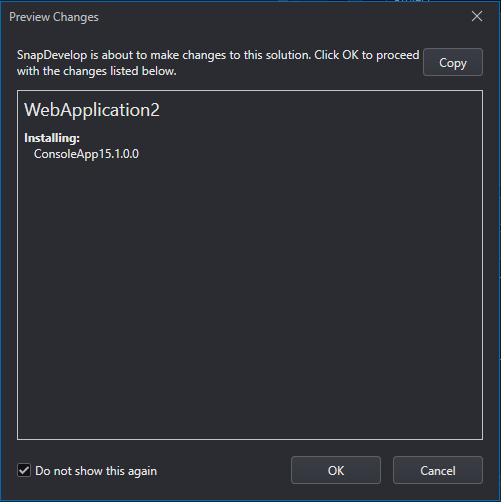
Step 3: Select the desired version from the Version drop-down and select Install. SnapDevelop installs the package and its dependencies into the project. You may be asked to accept license terms. When installation is complete, the installed package appears under the Installed tab and in the Dependencies node in Solution Explorer, indicating that you can use the using directives to refer to them in your project.
Uninstalling a package
Step 1: In Solution Explorer, select either the desired project node or Dependencies node and then select Manage NuGet Packages from the right-click context menu.
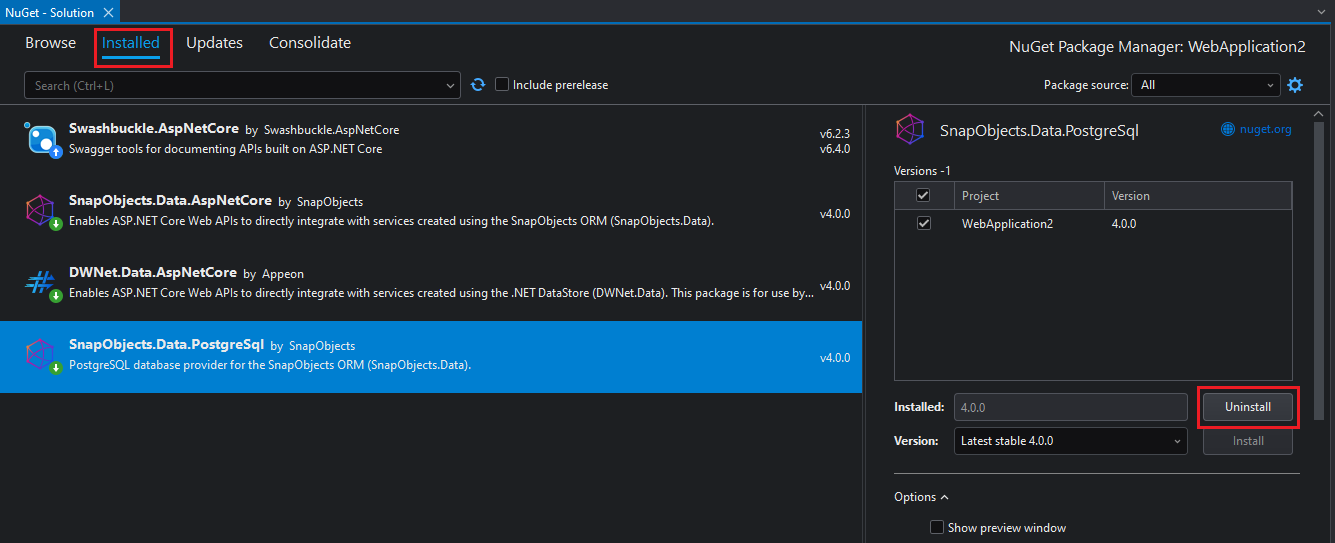
Step 2: Select the Installed tab to display all installed packages.
Step 3: Select the package to uninstall and select Uninstall.
Updating a package
Step 1: In Solution Explorer, select either the desired project node or Dependencies node, and then select Manage NuGet Packages from the right-click context menu.
Step 2: Select the Update tab to display packages that have available updates from the enabled package source. Select Include prerelease to include prerelease packages in the update list.
Step 3: Select the package to update, select the desired version from the Version drop-down list, and select Update.
To update multiple packages to their latest versions, select them individually in the list or enable the Select all packages option and select the Update button above the list.
Managing packages for solution
If you want to manage NuGet packages for multiple projects simultaneously, it is recommended that you manage packages for the entire solution. Compared with the package manager for single projects, the package manager for solution has a Consolidate tab, in addition to the three tabs.
To manage packages for solution, you:
Step 1: Select the solution and Manage NuGet Packages for Solution from the right-click context menu. Alternatively, select Tools > NuGet Package Manager > Manage NuGet Packages for Solution....

Step 2: When you are managing packages for the entire solution, you are required to select the affected project(s).
Consolidating package versions
It is uncommon to use different versions of the same NuGet package across different projects in the same solution. When you manage NuGet packages for solution, you will see a Consolidate tab, which allows you to easily see where packages with distinct version numbers are used by different projects in the solution.
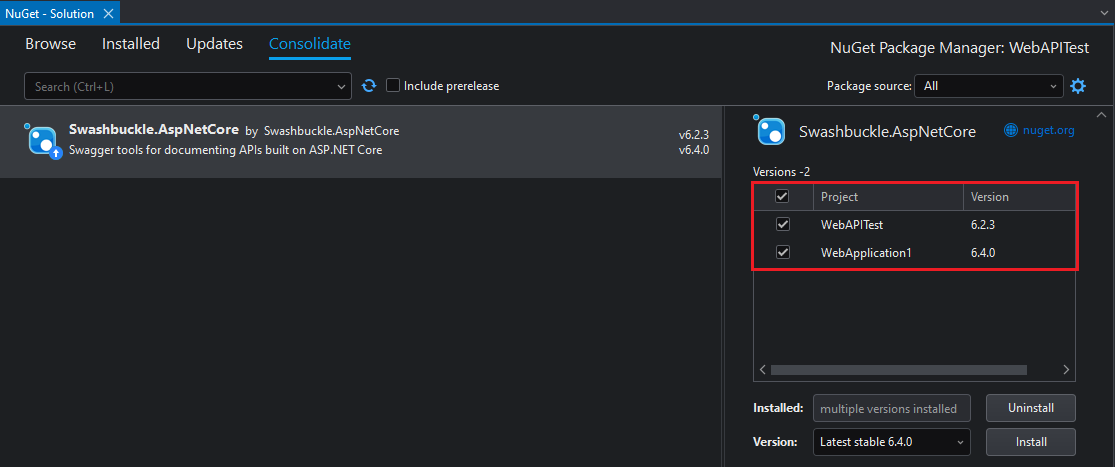
To consolidate package versions, you:
Step 1: Select the project(s) to update in the project list.
Step 2: Select the version to use in all those projects from the Version dropdown.
Step 3: Select Install.
The Package Manager installs the selected package version into all selected projects. Then, the package disappears from the list under the Consolidate tab.
Specifying package sources
To change the source from which SnapDevelop obtains packages, select the desired one from the Package source dropdown list:
For information on how to manage package sources, refer to Package Sources.
Understanding the package manager options
When you select a package, you will see an expandable Options control below the version selector. For some project types (for example, .NET Core projects), only the Show preview window option is provided.
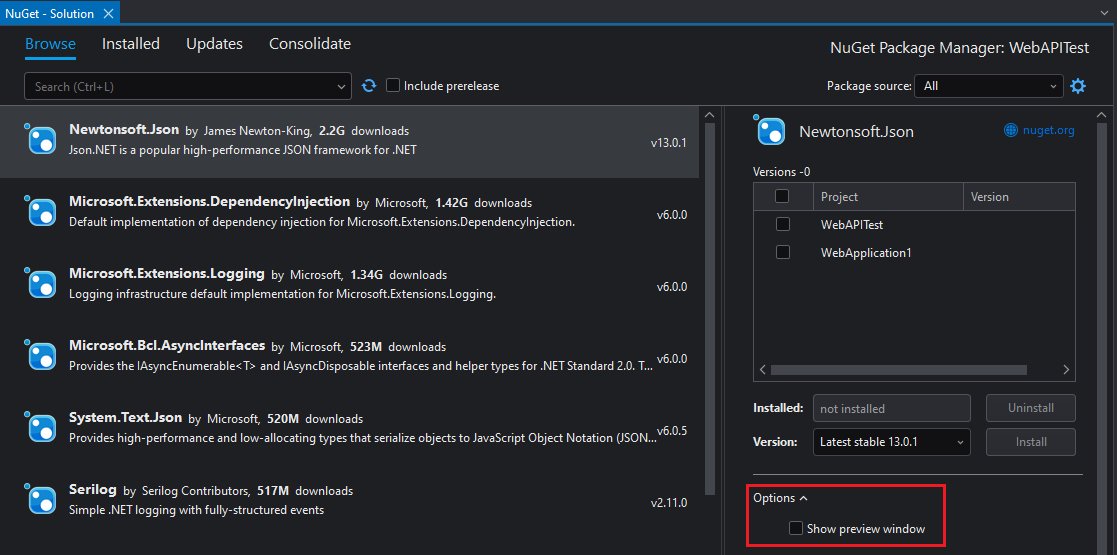
Showing preview window
If you enable the Show preview window option, a window shows the dependencies of a selected package before the package is installed.
Install and update options
Dependency behavior specifies how NuGet selects the version of dependency packages to install.
| Option | Description |
|---|---|
| Ignore Dependencies | Does not install any dependencies. |
| Lowest | Installs the dependency with the minimum version number that meets the requirements of the primary selected package. It is the default option. |
| Highest Patch | Installs the version with the same major and minor version numbers but the highest patch number. If version 3.2.2 is specified, for instance, the highest version starting with 3.2 will be installed. |
| Highest Minor | Installs the version with the same major version number but the highest minor number and patch number. If version 3.2.2 is specified, for instance, the highest version starting with 3 will be installed. |
| Highest | Installs the highest available version of the package. |
File conflict action specifies how NuGet deals with packages existing in the project or local machine.
| Option | Description |
|---|---|
| Prompt | Requires NuGet to ask whether to retain or overwrite existing packages. |
| Ignore All | Requires NuGet to skip overwriting any existing packages. |
| Overwrite All | Requires NuGet to overwrite any existing packages. |
Uninstall options
| Option | Description |
|---|---|
| Remove dependencies | Removes any dependency packages not referenced elsewhere in the project. |
| Force uninstall, even if there are dependencies on it | Uninstalls a package even if it is still being referenced in the project. This option is often used together with Remove dependencies to remove a package. However, applying this option may lead to broken references in the project. |
Managing Node packages
The Node Package Manager (NPM) in SnapDevelop allows you to install, uninstall and update Node packages in projects and solutions. Projects that can use NPM are mainly JavaScript/TypeScript projects (for example, web applications, Angular projects, Vue projects, etc.).
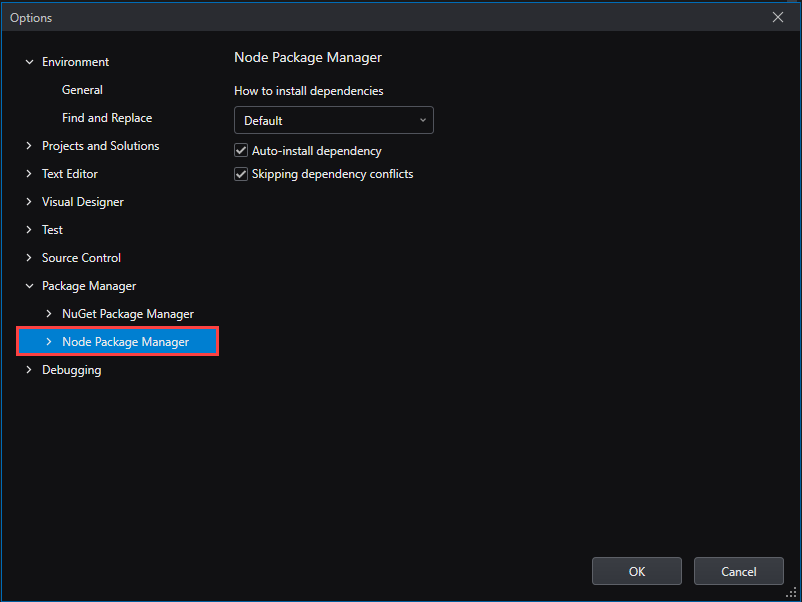
Options
To access the general settings for the Node Package Manager, select menu Tools > Options in SnapDevelop IDE to open the Options window and then navigate to Node Package Manager. For detailed information about the options, refer to Node Package Manager.
Package Source
The Node Package Manager can be configured to fetch packages from different locations. By default these locations are included:
NPM -- The largest and most popular repository for JavaScript packages.
Yarn -- Yarn is an alternative package manager for Node.js projects. It offers the same main features as NPM but has some other additional ones such as parallel downloads. Using this package source requires Yarn to be installed (can be installed with
npm install -g yarn).
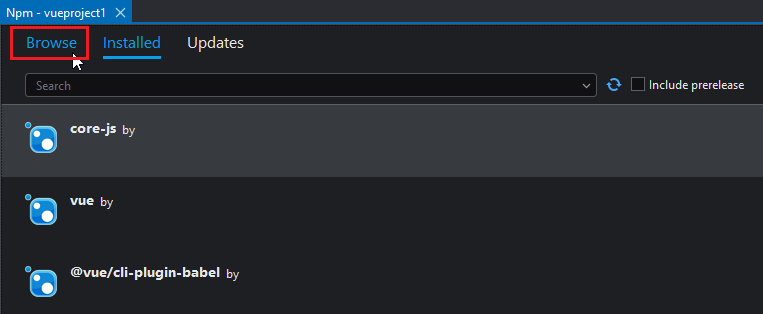
Package Manager Tabs
Same as the NuGet Package Manager, the Node Package Manager is mainly composed of three tabs:
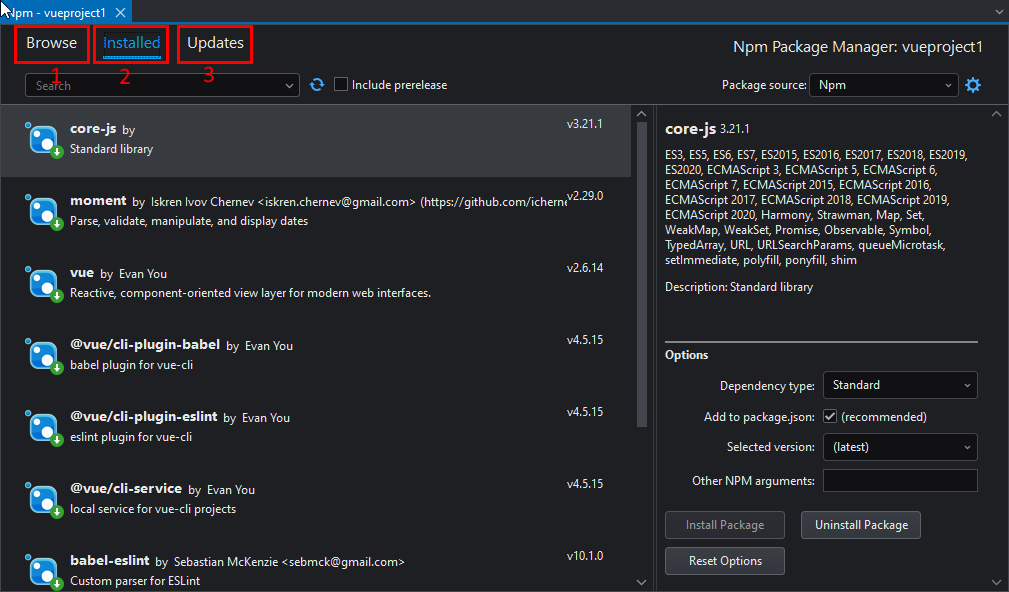
Browse -- The Browse tab allows you to search for packages showing you a list of matches based on your search terms.
Installed -- The Installed tab shows the packages installed in the current project. The icon shows a green down arrow if the package is up to date or a blue up arrow if there are updates available.
Updates -- The Updates tab displays only those packages that are outdated (packages that have an update available).
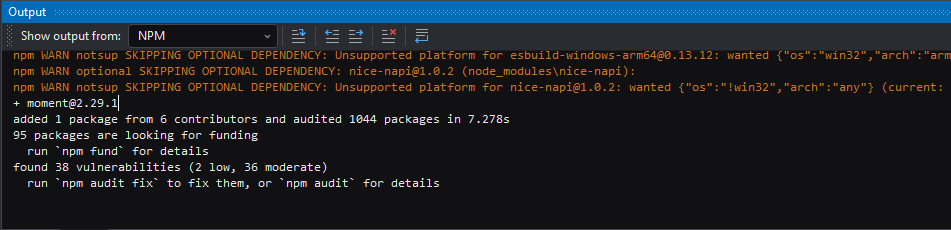
Output
The execution result of the Node Package Manager commands will be displayed in the Output panel. You will need to select NPM from the Show output from list in order to show the result.
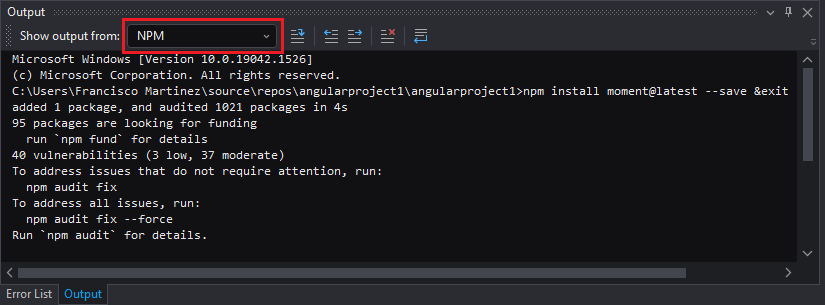
When you execute a command, the output will show the command that was executed, how many packages were installed, and any other additional information relevant to your particular installation.
Using the Node Package Manager
Alongside the newly added project-types, SnapDevelop includes a Graphical User Interface (GUI) frontend for Node's Package Manager (NPM). The main operations (install, update, remove) will be explained in this section.
Before following the steps below, make sure you have a Vue or Angular project open in the Solution Explorer.
Opening the Node Package Manager
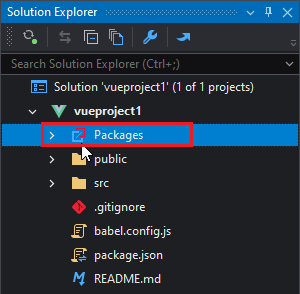
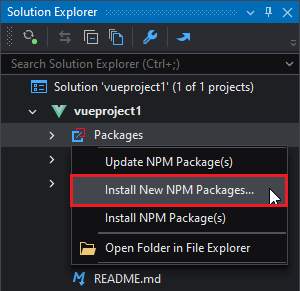
To open the Node Package Manager, right click on the Packages entry of the Vue or Angular project in the Solution Explorer and then select the Install New Node Packages option from the popup menu.
Installing packages
To install the package using the Node Package Manager,
Step 1: Open the Node Package Manager (as described above).
Step 2: Select the Browse tab in the Node Package Manager.
Step 3: Search for the package you want to install using the search field.
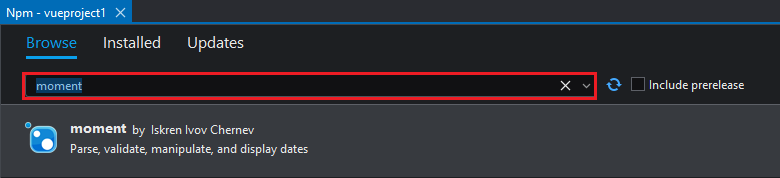
Step 4: On the details panel, click the Install Package button.
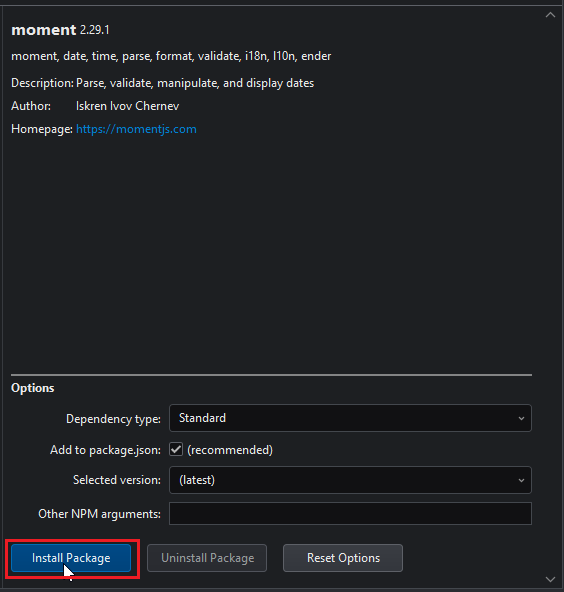
Step 5: Make sure the installation is successful. The installation result can be viewed in the Output panel.
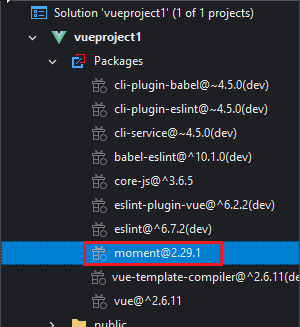
Step 6: Expand the Packages entry of the project node and make sure the package has been installed correctly.
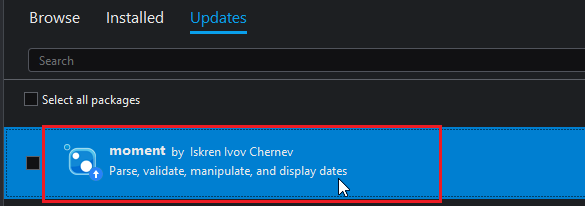
Updating packages
To update the Node package,
Step 1: Open the Node Package Manager.
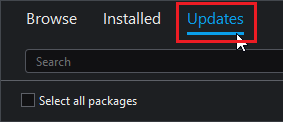
Step 2: Select the Updates tab.
Step 3: Select the package you want to update.
Step 4: In the details panel, select the version you want to update to. You can select (latest) to have the latest version be automatically selected.
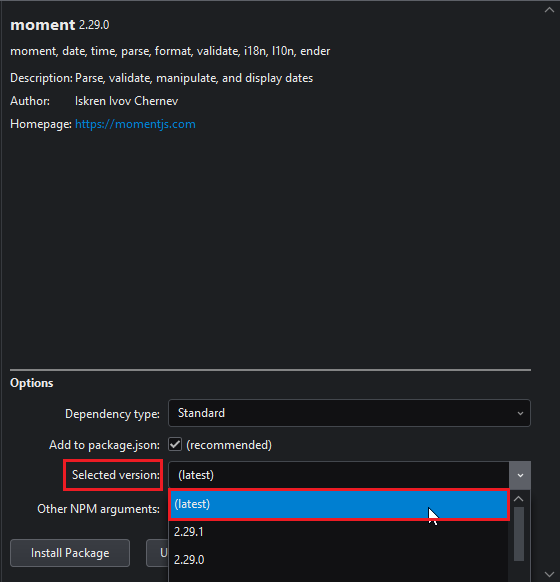
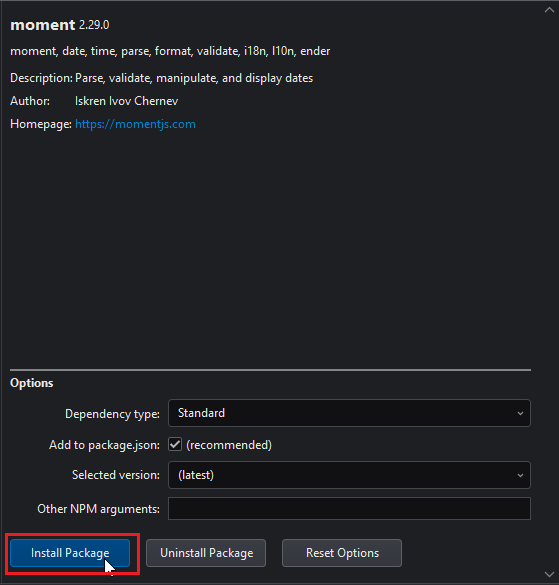
Step 5: Click the Install Package button.
Removing packages
To remove the NPM package,
Step 1: Open the Node Package Manager.
Step 2: Select the Installed tab.
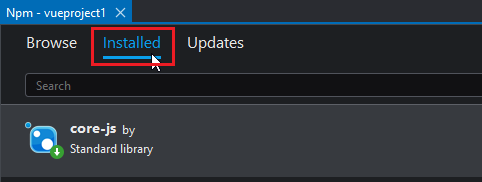
Step 3: In the package list, select the package you want to remove.
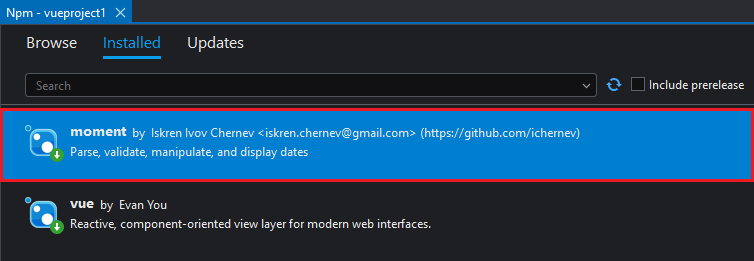
Step 4: In the package details panel, click the Uninstall Package button.
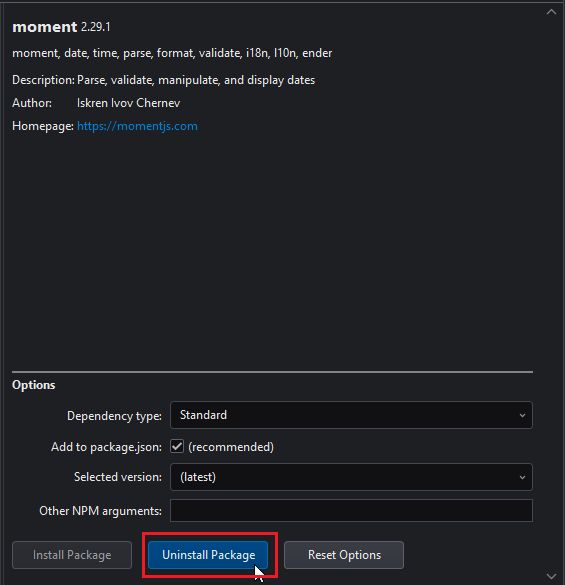
Options Panel
You can configure the following settings for each individual package that is to be installed:
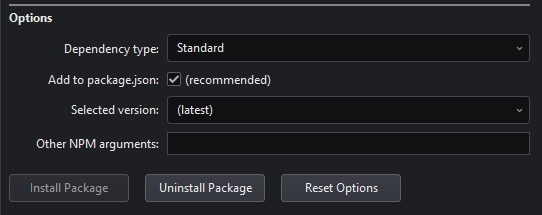
Dependency Type -- The type of dependency the current package is. Options are:
- Standard -- Packages that are required for the proper function of the project and will be included when the project is published.
- Development -- Packages that are only required during development and are not to be included when publishing.
- Optional -- Optional packages not required for the function of the project. Failing to install this type of dependencies will not stop the installation process.
Add to packages.json -- Add the installed dependency package to the package.json file in the project.
Selected version -- The version of the package to install.
Other NPM arguments -- Any other arguments to pass to the CLI.
Using the Terminal CLI
The following demonstrates the alternative ways to install and maintain packages using Node's integrated CLI. The following commands require NPM to exist and be accessible through the system's PATH environment variable. This should be already done by default (through the Node installation).
Searching Packages
To search for packages in the default NPM Package Source, use the search command.
For example:
npm search moment
Outputs:
NAME                      | DESCRIPTION          | AUTHOR          | DATE       | VERSION  | KEYWORDS
moment                    | Parse, validate,…    | =ichernev…      | 2020-10-06 | 2.29.1   | moment date time parse form
dayjs                     | 2KB immutable date…  | =iamkun         | 2021-09-10 | 1.10.7   | dayjs date time immutable m
moment-timezone           | Parse and display…   | =ichernev…      | 2021-11-10 | 0.5.34   | moment date time timezone o
react-moment-proptypes    | React proptype for…  | =calebmorris…   | 2021-03-24 | 1.8.1    | moment react props proptype
react-moment              | React component for… | =web-headzoo    | 2020-12-19 | 1.1.1    | date moment react react-com
fecha                     | Date formatting and… | =taylorhakes    | 2021-04-05 | 4.2.1    | date parse moment format fe
moment-jalaali            | Jalaali (Jalali,…    | =behrang…       | 2021-11-29 | 0.9.4    | jalaali jalali persian khor
vue-moment                | Handy Moment.js…     | =brockpetrie…   | 2019-12-22 | 4.1.0    | vue custom date time filter
react-day-picker          | Flexible date…       | =gpbl           | 2021-03-19 | 7.4.10   | react react-component compo
moment-duration-format    | A moment.js plugin…  | =jsmreese       | 2019-06-05 | 2.3.2    | moment duration format
relative-time-parser      | A moment.js plugin…  | =cmaurer        | 2021-10-23 | 1.0.15   | moment moment.js date graph
moment-business-days      | MomentJS plugin to…  | =ianaya89…      | 2020-04-16 | 1.2.0    | moment momentjs business da
ember-moment              | Moment.js template…  | =knownasilya…   | 2022-01-21 | 10.0.0   | ember-addon moment momentjs
moment-business           | Methods to work…     | =jmeas          | 2016-09-16 | 3.0.1    | moment momentjs moment.js b
@momentum-ui/core         | Cisco Momentum UI…   | =pauljeter…     | 2021-12-17 | 19.15.16 | Momentum Design Cisco Webex
moment-jdateformatparser  | Translates the…      | =herom =madmg   | 2018-06-26 | 1.2.1    | moment java date format jav
moment-immutable          | Make moment.js…      | =smartin85      | 2021-02-14 | 1.0.9    | momentjs date immutable rea
@ladjs/moment             | Parse, validate,…    | =shadowgate15…  | 2019-06-19 | 2.24.0   | moment date time parse form
jalali-moment             | Manipulate and…      | =fingerpich     | 2022-01-31 | 3.3.11   | manipulate validate jalali
moment-business-time      | Query and…           | =lennym         | 2022-01-13 | 2.0.0    | moment working time working
To view details of a specific package, use the view command.
For example:
npm view moment
Outputs:
moment@2.29.1 | MIT | deps: none | versions: 71
Parse, validate, manipulate, and display dates
https://momentjs.com

keywords: moment, date, time, parse, format, validate, i18n, l10n, ender

dist
.tarball: https://registry.npmjs.org/moment/-/moment-2.29.1.tgz
.shasum: b2be769fa31940be9eeea6469c075e35006fa3d3
.integrity: sha512-kHmoybcPV8Sqy59DwNDY3Jefr64lK/by/da0ViFcuA4DH0vQg5Q6Ze5VimxkfQNSC+Mls/Kx53s7TjP1RhFEDQ==
.unpackedSize: 4.2 MB

maintainers:
- ichernev <iskren.chernev@gmail.com>
- timrwood <washwithcare@gmail.com>
- mj1856 <mj1856@hotmail.com>
- maggiepint <maggiepint@gmail.com>
- marwahaha <marwahaha@berkeley.edu>

dist-tags:
latest: 2.29.1

published a year ago by marwahaha <marwahaha@berkeley.edu>
Installing Packages
To install the package, use the following command:
npm install {<options>} <package name>
For example:
npm install --save moment to install the Moment package for deployment
or
npm install --save-dev to install the Moment package for development
The --save and --save-dev switches add the package to the package.json's dependencies or devDependencies sections respectively.
Please note that the --save switch is optional since NPM 5.0.
Packages in the devDependencies are meant to be used only in development. They will not be included when the application is published.
Installing packages this way will always install the latest version available (respecting the version constraints specified in the package.json file).
Installing different versions
To install other versions of packages, include the version in the package name as follows:
npm install <package>@<version>
For example:
npm install moment@2.29.0
To view the available versions of a specific package, use the following command:
npm view <package> versions
Refer to this link for detailed documentation on the npm install command.
Listing Packages
To view a list of the packages currently installed on the project, use the npm list command.
Passing the switch --depth <n> shows the installed packages and their dependencies up to n levels deep. When n = 0, it only shows direct dependencies (packages listed in the dependencies and devDependencies fields of the package.json). The value is 0 by default.
For example:
npm list
Outputs:
angularproject1@0.0.0 C:\<project path>\angularproject1
+-- @angular-devkit/build-angular@13.2.3
+-- @angular/animations@13.0.3
+-- @angular/cli@13.0.4
+-- @angular/common@13.0.3
+-- @angular/compiler-cli@13.0.3
+-- @angular/compiler@13.0.3
+-- @angular/core@13.0.3
+-- @angular/forms@13.0.3
+-- @angular/platform-browser-dynamic@13.0.3
+-- @angular/platform-browser@13.0.3
+-- @angular/router@13.0.3
+-- @types/jasmine@3.10.3
+-- @types/node@12.20.45
+-- jasmine-core@3.99.0
+-- karma-chrome-launcher@3.1.0
+-- karma-coverage@2.2.0
+-- karma-jasmine-html-reporter@1.7.0
+-- karma-jasmine@4.0.1
+-- karma@6.3.16
+-- moment@2.29.1
+-- rxjs@7.4.0
+-- tslib@2.3.1
+-- typescript@4.4.4
`-- zone.js@0.11.4
Updating Packages
To update individual packages or all packages in the project, use the update command:
npm update <package>
For example:
npm update moment
This will update
If no
Refer to this link for detailed documentation on the npm update command.
Removing Packages
To remove packages from the local project, use the npm uninstall command:
npm uninstall <package>
For example:
npm uninstall moment
This will remove the moment package and all packages installed on its behalf (that are not marked as dependencies for other packages).
Refer to this link for detailed documentation on the npm uninstall command.