Creating a Vue.js application
Last updated: September 2024
In the SnapDevelop IDE, you can create a Vue.js front-end web application.
Prerequisites
Installing components
SnapDevelop installer will automatically install the jobs/components required for the Vue.js front-end web application project.
Configuring the network environment
To create a project through the Vue CLI tool, please ensure that the current machine can be connected to the Internet so that 1) the Vue CLI tool can be successfully downloaded and installed; 2) the dependency package can be successfully downloaded from the NPM site.
If you are connecting to the Internet through a proxy, first make sure that the proxy is working properly and that the NPM site is not excluded from the exceptions list. Then set the proxy IP and port via the NPM command, for example: npm config set proxy="http://[ProxyIP]:[Port]/".
If the network connection is normal, but the error "Failed to get response from https://registry.npmjs.org/vue-cli-version-marker ..." is still displayed, please restart the SnapDevelop IDE and then try again.
Setting script execution permission
When running the Live Server, the current user's ExecutionPolicy is required to be RemoteSigned. If the current user is not an administrator, please contact the administrator to help set the current user's ExecutionPolicy to RemoteSigned, otherwise the following error will occur when running the Live Server:

Checking Node.js version
Creating a Vue project in SnapDevelop requires Node.js versions v20.11.1.
SnapDevelop Installer installs Node.js v20.11.1 by default.
But if you have reinstalled or upgraded the Node.js version on your machine, make sure the Node.js version is within the compatible version range above. You can enter the command in a terminal window: node -v to see the version of Node.js that is currently installed.
Creating a project
You can create three types of Vue.js web application projects:
Vue2 (Default template) -- Uses the default Vue2 project template that comes with SnapDevelop to generate the project. The advantage is that it is fast and controllable; the disadvantage is that there may be incompatibility issues.
Vue3 (Default template) -- Uses the default Vue3 project template that comes with SnapDevelop to generate the project. The advantage is that it is fast and controllable; the disadvantage is that there may be incompatibility issues.
Vue CLI -- Uses the Vue CLI to generate the project. The advantage is strong compatibility; the disadvantage is that the generation process is slower. Note: 1) If the Vue CLI tool is not installed on the machine, you will be prompted to install it when you select Vue CLI to create a Vue project, 2) Please make sure that the current machine can be connected to the Internet so that you can successfully download and install Vue CLI and the latest dependency packages from the NPM site.
Creating a Vue2/Vue3 project
To create a Vue2 or Vue3 project:
Step 1: In the SnapDevelop IDE, select the menu File > New > New Project.
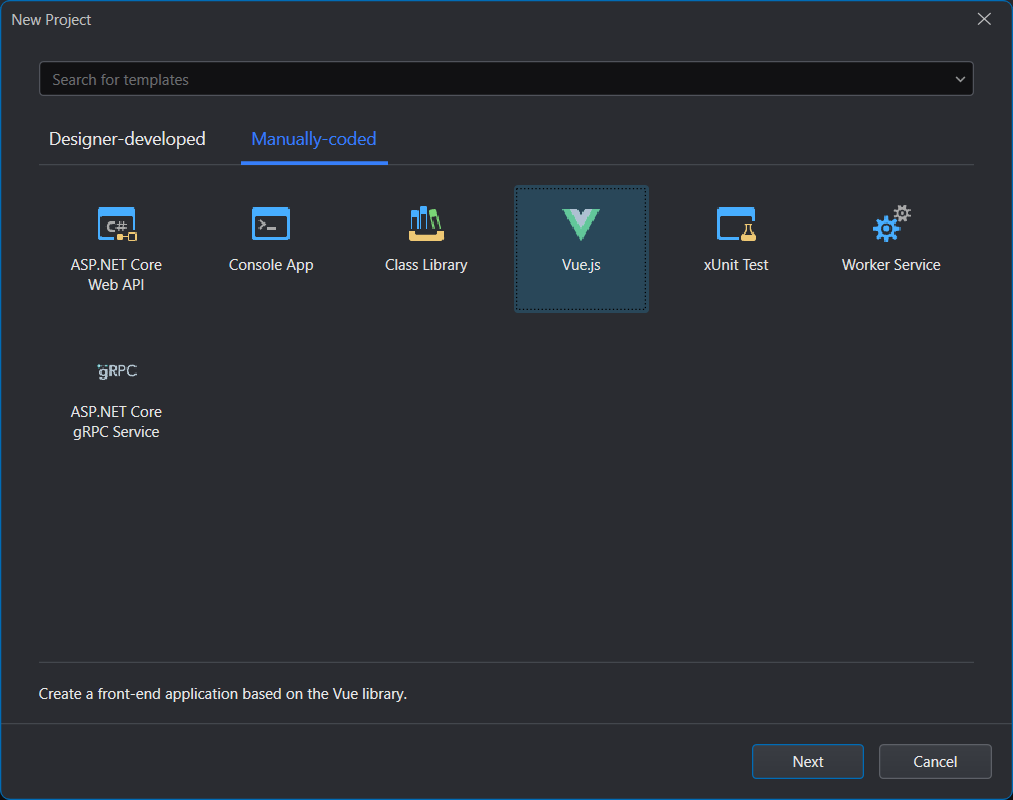
Step 2: In the New Project window, select the Manually-coded tab and then select Vue.js and click Next.
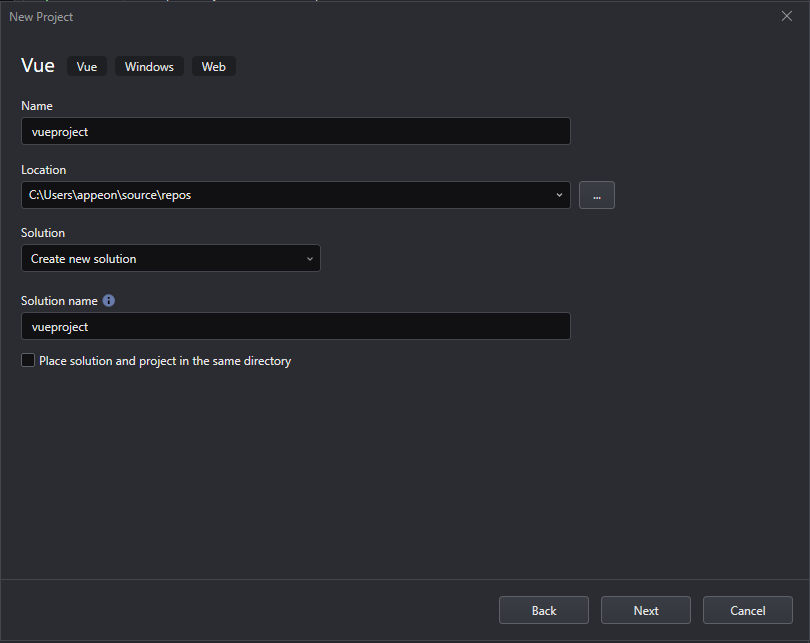
Step 3: Specify a name and location for the project. Click Next.
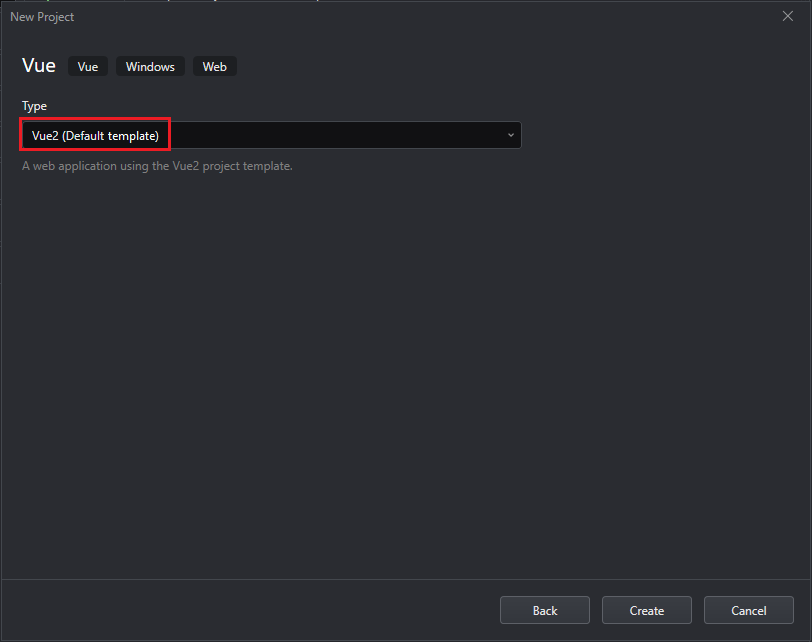
Step 4: Select Vue2 (Default template) or Vue3 (Default template) from the Type drop-down list. Then click Create.
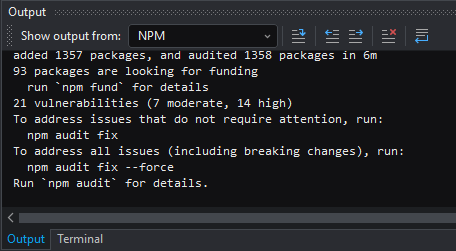
You can view the installation progress in the Output window.
The Vue project will be created and displayed in the solution explorer. The entire process may take a few minutes. Please wait patiently until all package icons under the Packages node in the Vue project turn red (![]() ), indicating that the installation is complete; if the icon is gray (
), indicating that the installation is complete; if the icon is gray (![]() ) , it means that the package is not installed or not installed successfully.
) , it means that the package is not installed or not installed successfully.
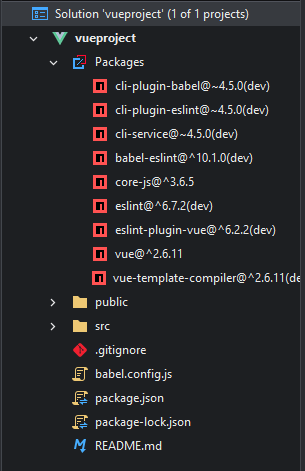
Note: When creating a project, the Node packages are installed by default. You can choose not to automatically install the packages by unchecking the Auto-install dependency check box in Tools > Options > Package Manager > Node Package Manager > General.
Creating a Vue CLI project
To create a Vue CLI project:
Step 1: In the SnapDevelop IDE, select the menu File > New > New Project.
Step 2: In the New Project window, select the Manually-coded tab and then select Vue.js and click Next.
Step 3: Specify a name and location for the project and select whether to create a new solution or add to an existing solution. Click Next.
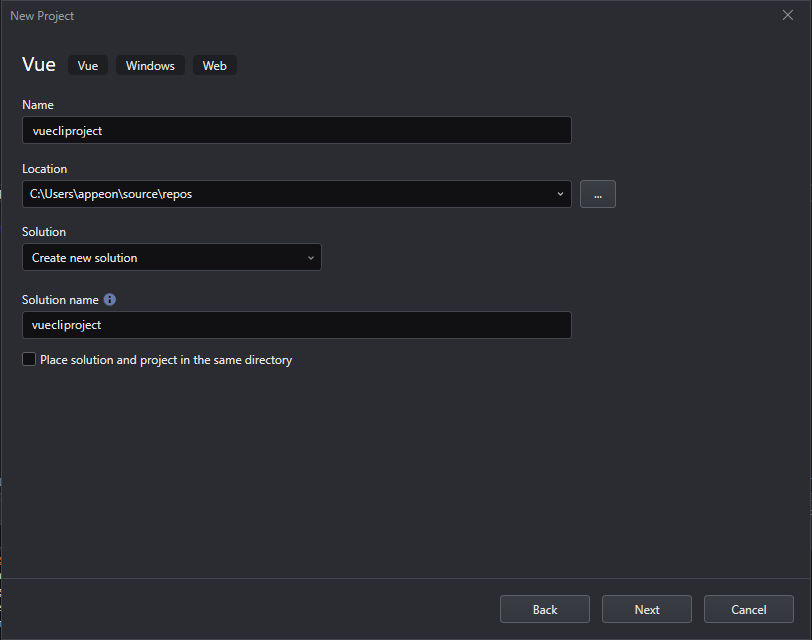
Step 4: Select Vue CLI from the Type drop-down list. Then click Create.
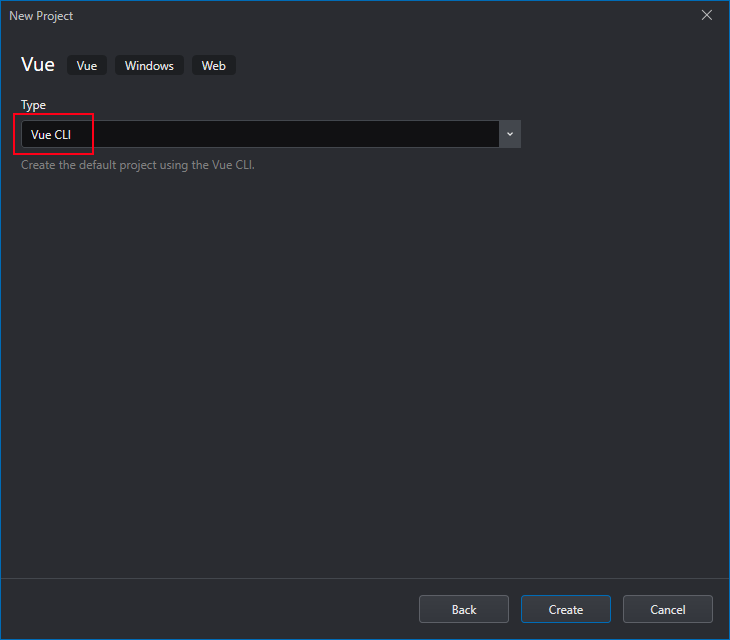
If the Vue CLI tool is not installed on your machine, you will be prompted to install the Vue CLI tool. Please click Confirm to install the Vue CLI tool. This will execute the npm install @vue/cli command to install the CLI tool. Please confirm that the current machine can connect to the Internet, and wait patiently for the Vue CLI tool to be installed.
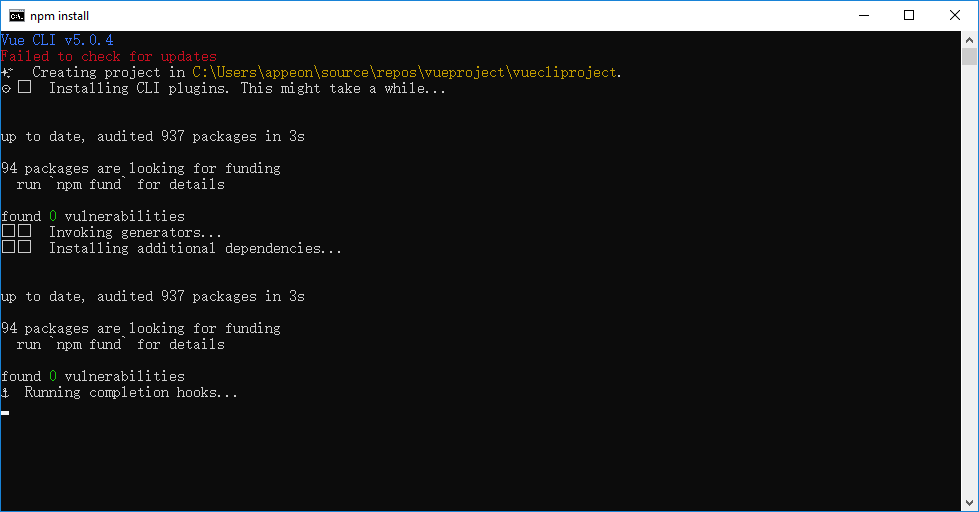
Step 5: After the Vue CLI tool is installed, the Vue CLI window will open. Please use the up and down arrows to select the Vue2 or Vue3 template and press Enter.
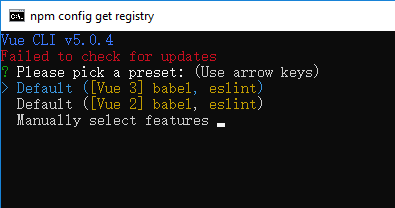
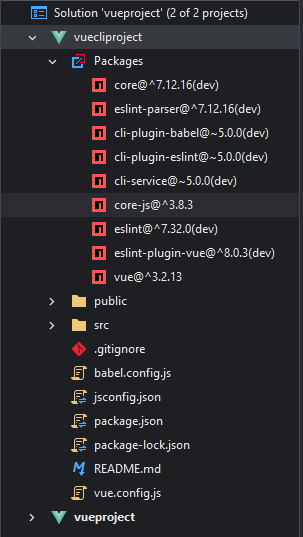
The Vue CLI will create the project and download the latest packages from the NPM site. The Vue project will appear in the solution explorer after created. The entire process may take a few minutes. Please wait patiently until all package icons under the Packages node in the Vue project turn red (![]() ), indicating that the installation is complete; if the icon is gray (
), indicating that the installation is complete; if the icon is gray (![]() ) , the package is not installed or not installed successfully.
) , the package is not installed or not installed successfully.
Importing a project
You can also import Vue apps created in the third-party development tool into SnapDevelop.
In Solution Explorer, right-click the solution node and select Add > Import Web Project from Folder. The project will be imported according to the file directory structure of the Vue application. You can then right-click on the project folder and select to save it as a project, which will automatically generate SnapDevelop's Vue project and solution files. You can continue to develop the app in the third-party development tool or SnapDevelop.
Installing Node packages
Under the Packages node in the project in Solution Explorer, you can see the dependency packages of the current project, and can install, uninstall, and update these packages.
A red icon (![]() ) in front of a dependency package item indicates that the item has been installed, and a gray icon (
) in front of a dependency package item indicates that the item has been installed, and a gray icon (![]() ) indicates that the item has not been installed or has not been installed successfully.
) indicates that the item has not been installed or has not been installed successfully.
If you right-click on the Packages node in your project and select Install New Node Package(s), the Node Package Manager will open.
The Node package manager provides a visual package management solution. You can find/install/uninstall/update the packages you need on the interface without needing to log in to the website of NPM or other package source sites. You can also switch package sources via the top right corner. For instructions on using the Node Package Manager, please refer to Using Node Package Manager.
Previewing a project
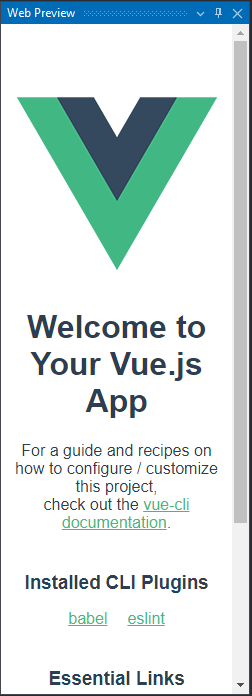
To preview the entire Vue application, you can right-click the project node in Solution Explorer and select Web Preview Window.
An Integrated Web Browser page will open in the Terminal window at the bottom of the IDE. On this page you can view the execution process and results (including starting the development server and compiling the project). At the same time the Web Preview window will open. Until the compilation is complete, the Web Preview window will not be able to preview the page and will display an access error. Only when the compilation is complete, the Web Preview window will automatically refresh and display the page of the project.
If you need to preview a web page, you must first compile the project and then preview the web page in the dist directory. You can expand the dist directory after compiling, right-click the page you want to preview, and select Open with Live Server.
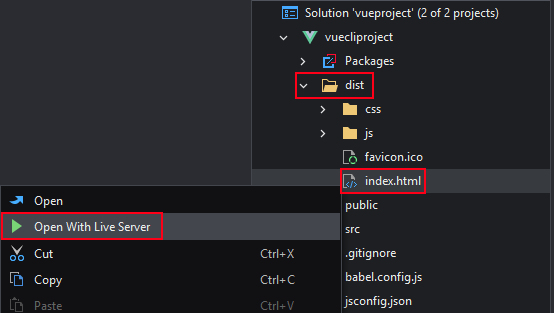
If the Live Server tool is not installed on your machine, you will be prompted to install it. Please click Confirm to install. Please confirm that the current machine can connect to the Internet and wait patiently for the installation of the Live Server tool to complete.
After the installation of Live Server is complete, a live-server page will open in the Terminal window, where you can see whether the local service of Live Server is started. If the service starts, the web page will open in the default web browser.
Building a project
To compile a Vue.js web application project, select the menu Build > Build Solution to compile all projects in the current solution. Or in Solution Explorer, right-click the solution node and select Build Solution.
In the Output window at the bottom of the IDE you can view the compilation progress and results.
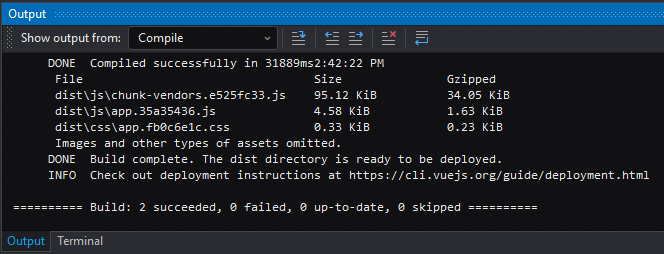
After the compilation is complete, a dist directory will be added to the project, containing all the compiled web application files. You need to deploy the application manually.
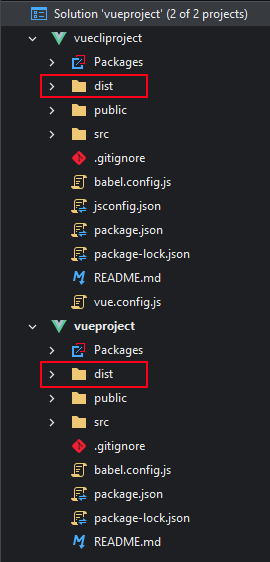
Right-click on the project and select Properties, you can configure the startup method and compilation properties of the Vue application, please refer to Configuring JavaScript/TypeScript Project Properties.
Debugging a project
This version does not support debugging the Vue projects.
Running a project
Running the Vue2/Vue3 project
Select the project you want to run in the toolbar, then click the drop-down icon of the start button to select the startup method.
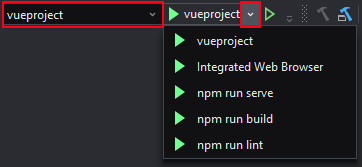
Integrated Web Browser – Executes the
vue-cli-service servecommand (including starting the development server and compiling the application package for the development environment), automatically launches the built-in browser and visits the application URL. This command is the same as the command in Previewing a project. With this command, you can see any changes you make in your Vue script in real time.npm run serve – Executes the
vue-cli-service serve --opencommand, including starting the development server, compiling the application package for the development environment, opening the default web browser and accessing the application URL. With this command, you can see any changes you make in your Vue script in real time.npm run build – Executes the
vue-cli-service buildcommand, including compiling the application package for production environment. This command does not start the server and deploy the application. You need to deploy the application manually. This command is the same as the command in Building a project.npm run lint – Executes the
vue-cli-service lintcommand, including checking whether the entire project conforms to the eslint syntax specification. If you want to see all warnings and errors for your project, it is recommended to execute thelintcommand. If you do not executelint, directly executebuildorserve. Thebuildorservecommand has its own eslint syntax repair function, but it will only detect the newly modified page, not all project files.
When you choose any of the above startup methods, a corresponding page will open in the Terminal window at the bottom of the IDE. In this page you will see the execution process and result of the command. The names and commands of the above startup methods can be configured in the package.json file of the project (for details, please refer to Modifying the package.json file) or in the project properties page (for details, please refer to Modifying project properties).
The following figure shows the running result of the Vue2 application when the npm run serve startup method is selected.

Running the Vue CLI project
Select the project you want to run in the toolbar, then click the drop-down icon of the start button to select the startup method.
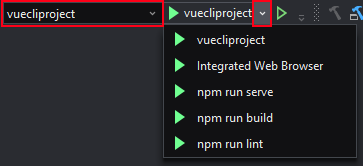
Integrated Web Browser – Executes the
vue-cli-service servecommand (including starting the development server and compiling the application package for the development environment), automatically launches the built-in browser and visits the application URL. This command is the same as the command in Previewing a project. With this command, you can see any changes you make in your Vue script in real time.npm run serve – Executes the
vue-cli-service servecommand, including starting the development server and compiling the application package for the development environment. After executing the command, you can open the browser and input the application URL to view the application. With this command, you can see any changes you make in your Vue script live in real time.npm run build – Executes the
vue-cli-service buildcommand, including compiling the application package for production environment. This command does not start the server and deploy the application. You need to deploy the application manually. This command is the same as the command in Building a project.npm run lint – Executes the
vue-cli-service lintcommand, including checking whether the entire project conforms to the eslint syntax specification. If you want to see all warnings and errors for your project, it is recommended to execute thelintcommand. If you do not executelint, directly executebuildorserve. Thebuildorservecommand has its own eslint syntax repair function, but it will only detect the newly modified page, not all project files.
When you choose any of the above startup methods, a corresponding page will open in the Terminal window at the bottom of the IDE. In this page you will see the execution process and result of the command. The names and commands of the above startup methods can be configured in the package.json file of the project (for details, please refer to Modifying the package.json file) or in the project properties page (for details, please refer to Modifying project properties).
Note: After selecting the npm run serve startup method in the Vue CLI project, you need to manually open the browser to run the application URL to see the following running results.

Configuring the startup commands
You can configure and modify the name and command of the startup method in two ways: 1) in the package.json file in the project; 2) in the project properties page.
Modifying the package.json file
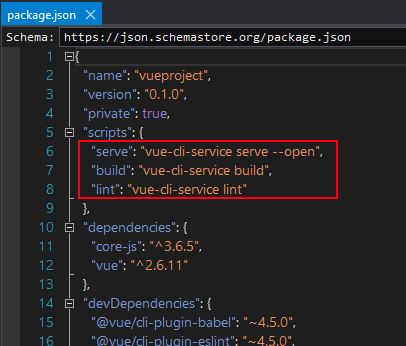
The name and command of the Vue application startup method, such as: serve, build, lint, etc. can be configured and modified in the package.json file in the project.
The following figure shows the default script of the package.json file of the Vue2 type:
The following figure shows the default script of the package.json file of the Vue CLI type:
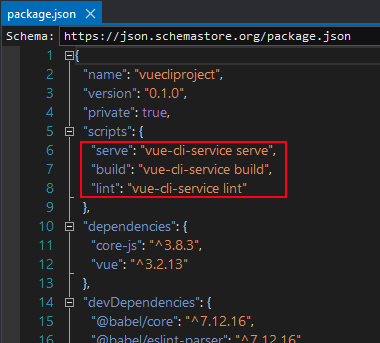
For example: you can change the Vue CLI type default script "serve": "vue-cli-service serve",
to "serve": "vue-cli-service serve --open",
to automatically open the default browser and run the application URL after the serve command is executed.
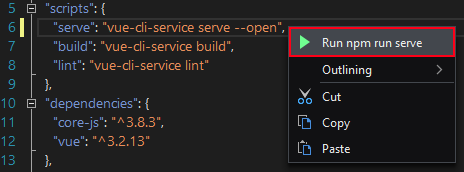
Once the modification is complete, you can right-click the command directly in the package.json file and select the run option.
Modifying project properties
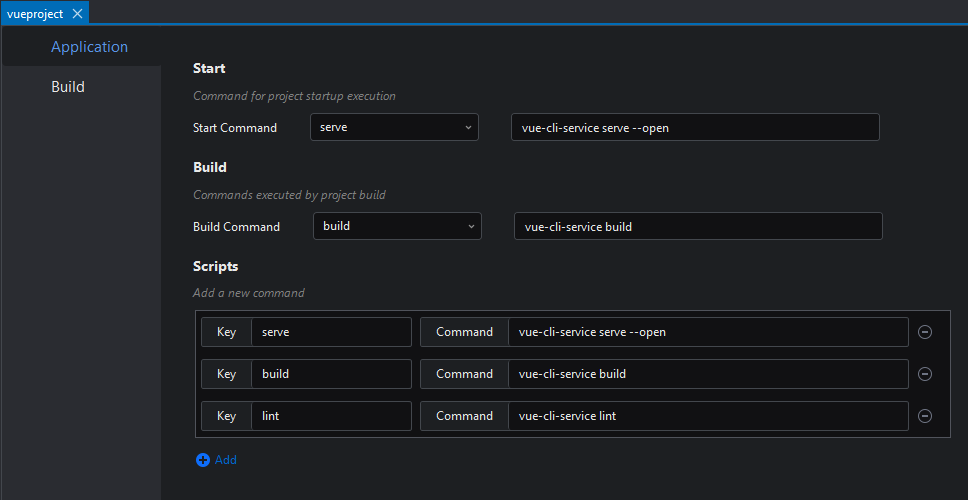
The name and command for how the Vue application is launched can also be configured and modified in the project properties page.
Right-click the project node and select Properties. In the Application tab, modify or add script commands.
Running via terminal
You can also run a project by entering commands in a terminal window.
In Solution Explorer, right-click the project node and select the following menu:
Open in Terminal -- Opens a Windows PowerShell window in the terminal window at the bottom of the IDE. You can enter commands in this window to run the project.
Open Command Prompt Here -- Opens a separate Windows Command window. You can enter commands in this window to run the project.
Publishing a project
To publish a Vue.js web application project, right-click the project and select Publish.
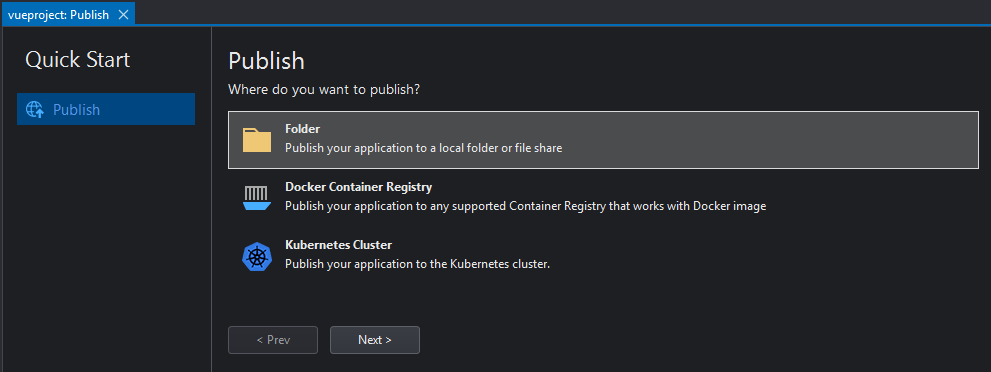
You can choose from the following three publishing methods:
- Folder -- Publish the application to a local folder or a shared folder.
- Docker Container Registry -- Publish the application to the container registry as a Docker image.
- Kubernetes Cluster -- Publish the application to the Kubernetes cluster.
For the specific instructions of each publishing method, please refer to Publishing and Hosting Apps.
Related topics
For the user manual of the Web API project, please refer to Creating an ASP.NET Core Web API Project.