EF Core Sidekick Advanced Topics Guide
Introduction
EF Core Sidekick is a tool that can accelerate Web API Development thanks to its automatic reverse engineering and scaffolding tools, which free up the developer from having to manually type all the repetitive boilerplate code for each entity/service/controller so he can instead focus on the important parts of the Web API development, such as the business logic and custom behavior.
This tutorial will go into some of the more advanced topics for EF Core Sidekick, taking the EF Core Sidekick Quick Start Guide as a base and aims to explain the code generation's resulting entities' architecture and structure, how to customize it and what the best approaches are for its long-term maintenance.
Target audience
- Developers who already understand C# and EF Core fundamentals but want to streamline the Web API creation process.
- Developers who are already familiar with Web API creation on EF Core Sidekick.
- Developers who want to get better acquainted with the EF Core Sidekick process and resulting object layout and want to continue using it during the maintenance lifecycle of a real project.
Prerequisites
Familiarity with C# and EF Core
Visual Studio 2022 installed
SQL Server
Microsoft's School Sample Database
Project to start the tutorial – Download here
(Optional) Final project after completing the tutorial – Download here
Understanding the Generated Code Structure
Below are the resulting files from generating the different types of entities from database objects:
Note: this is assuming the default generation profile is used
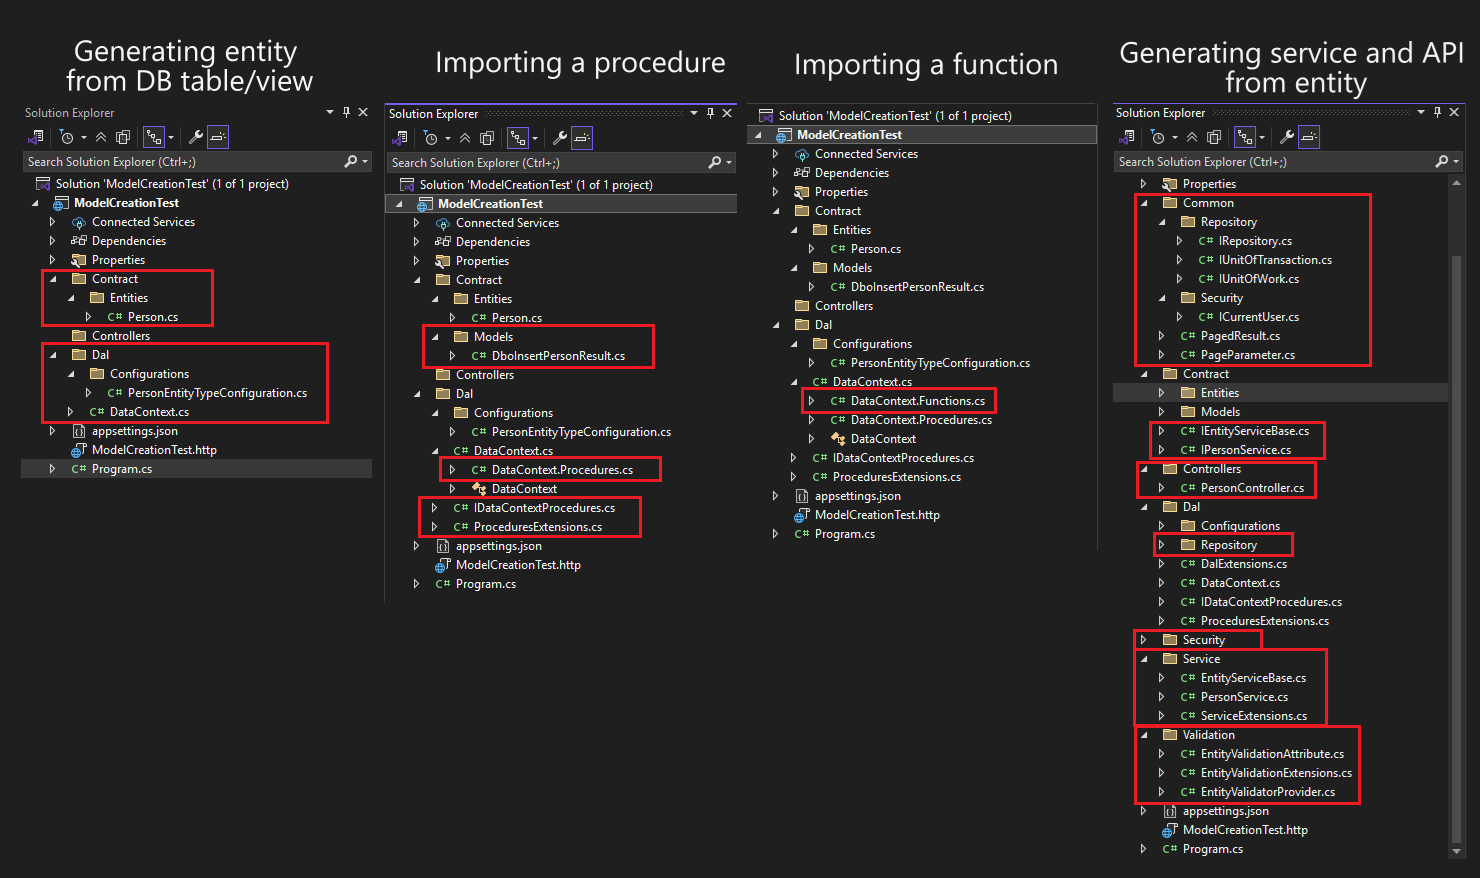
Generating an Entity from a Database Table/View
- Contract: Contains the entity model definitions
- Dal (Data Access Layer): Classes that map the models to the database, including both the DataContext and the classes that configure the Entities with EF Core.
Importing a stored procedure
- Contract>Models: Models that describe the result from the procedure execution.
- Dal>IDataContextProcedures: Defines de signature of the imported procedures in an interface.
- Dal>DataContext.Procedures: Implements the procedure-calling code and adds it to the DataContext code (through a partial class).
- Dal>ProceduresExtensions: Helper methods used by the procedure-calling code.
Importing a function
- Dal>DataContext.Functions: Contains the method signatures for the function annotated with the appropriately initialized DbFunction attribute.
This results in being able to use the function on LINQ queries.
Generating a Service and API from model
When using the Generate services and APIs command on an entity, the following objects are created:
- Common: Contains helper classes that allow for paged results
- Repository: The interfaces used for the Repository/Unit of Work pattern
- Security: Interface for the user that will be used on request authentication
- Contract:
- IEntityServiceBase: the interface that makes up the base for all services. Defines the data access/update methods.
- IPersonService: the interface of the service for the model we selected.
- Controllers: Contains the Controller classes that respond to the incoming requests with the services. This is where paging is handled.
- Dal>Repository: The implementation for the Repository/Unit of Work pattern defined on Common/Repository.
- Security: Contains a default implementation of the ICurrentUser and an extension method to register that service as a singleton in the pipeline.
- Service: Implementation of the interfaces defined in Contract, and also contains an extension method to register the services in to pipeline.
- Validation: Attribute definition, model validation service and extension method that registers the validation service into the pipeline.
Code generation configuration
When generating code from DB entities, there's configurable settings that can change the way the output objects are generated.
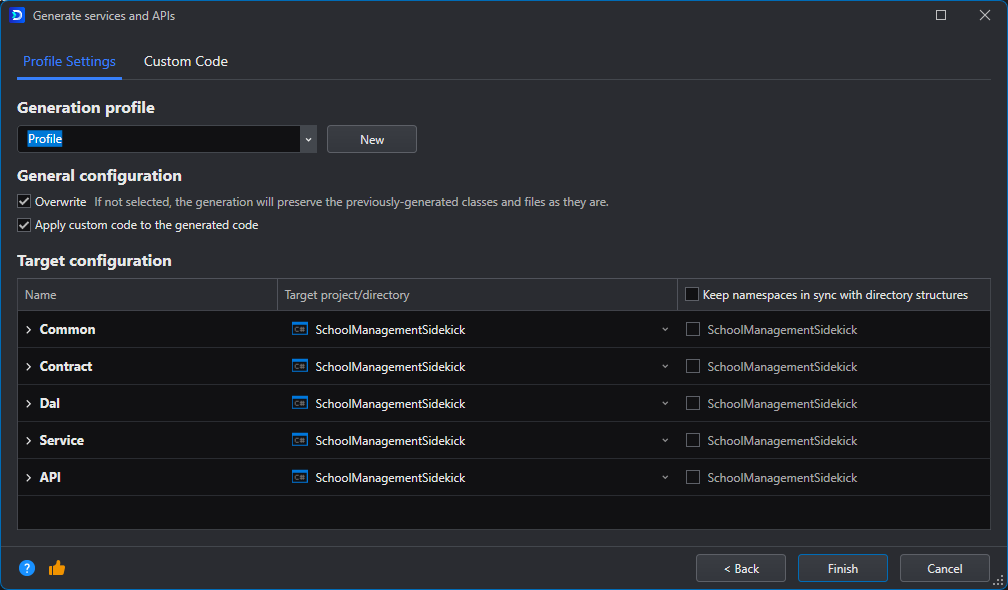
Profile settings
When finalizing the entity generation you're presented with the following window:
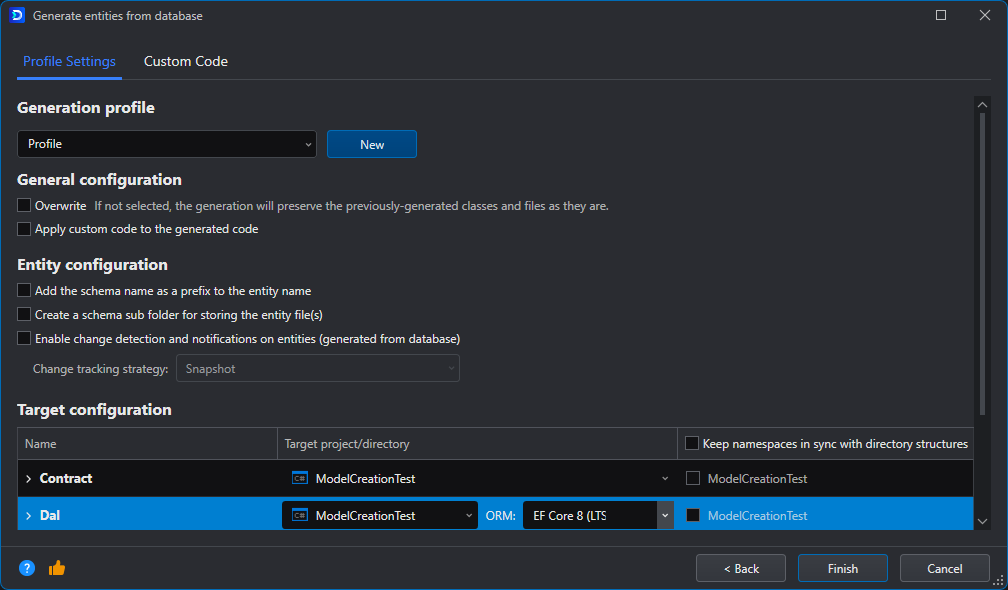
In this window you're able to configure some settings regarding the code output, namely:
| Setting | Function |
|---|---|
| Generation profile | Allows you to select and configure multiple profiles that contain a different set of configuration for this page. |
| Overwrite | Overwrite existing files that have been previously generated. This will result in the loss of any custom code you have written to the generated objects. |
| Apply custom code | Applies the code configured in the Custom Code tab to the output. If this option is not set, the Custom Code will not be reflected in the resulting files. |
| Add the schema name as prefix to the entity name | Prepends the name of the object's schema to the resulting object's name. |
| Create a schema subfolder for storing the entity files | Creates a subfolder with the name of the schema to put the resulting objects into. |
| Enable change detection and notifications on entities | Sets up the entities to track changes made to its properties so that they can be saved back into the database automatically |
| Target configuration | Defines the target directories where the different output components will be placed in. These locations cannot be changed on the default profile. |
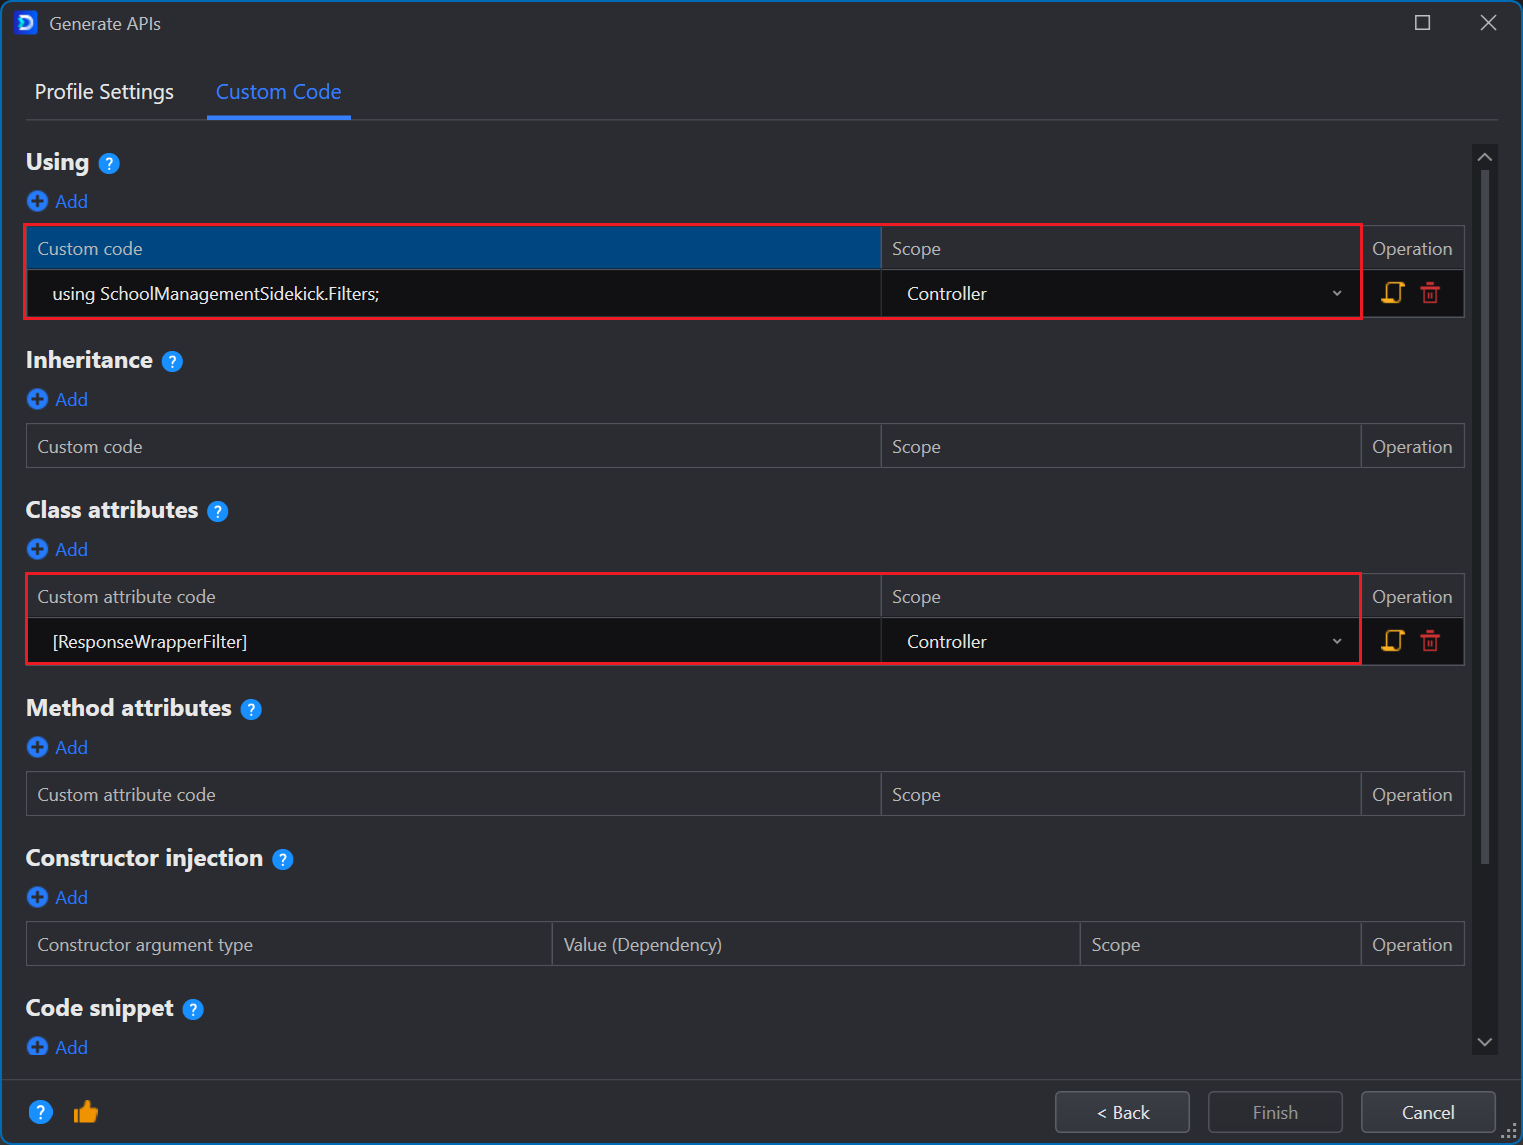
Custom code
The Custom Code is where the segments of custom code and their insert location on the output files is configured:
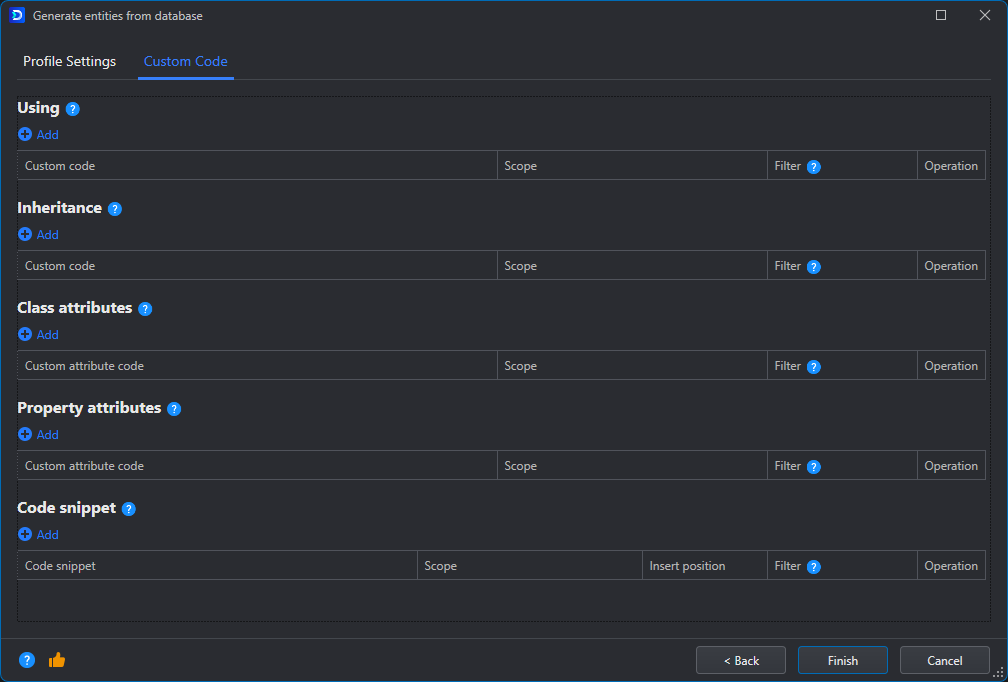
- Using: If the custom code you use relies on classes from other namespaces, this is where they are imported.
- Inheritance: Configure the objects to inherit from these classes. When defining custom behavior on another class, this is where it can be integrated into the output entities.
- Class attributes: Decorate the resulting classes with the attributes defined here.
- Property attributes: Decorate the properties in the resulting classes with the attributes defined here.
- Code snippet: Custom code to add to the resulting objects. The snippets can be inserted at the beginning/end of a file, class, or method.
For all these types of custom code, the Scope can be configured; that is, whether it applies to service interface/implementation, entities or controllers.
Customizing the Generated Code
Working only with the EF Core Sidekick-generated code can only get a project so far. Inevitably, one will need to customize the code to add specialized business logic, or extend the functionality with domain-specific behaviors. This is entirely possible with the output EF Core Sidekick produces, since it's well-structured following a separation of concerns approach to the generation. However, if a change to the database objects were to occur one would be faced with a decision:
a) Implement the changes into the code manually by changing the Entity and the configuration method (without risking losing any code customization)
b) Reimport the entities from the DB objects (no need to manually code the changes, but code changes may all be lost).
For this reason, EF Core Sidekick allows you to configure custom code snippets that get injected into the generated objects every time they are generated. By using this approach, one can efficiently address changes in the database objects without risking the loss of custom code.
Managing Custom Code While Regenerating Models
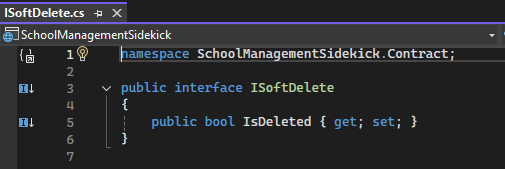
To enable soft delete on our entity, we will add a new interface into the Contract folder called ISoftDelete with the following contents:
Then, open the Generate entities from database window like we did previously, then select only the Person entity again and click Next.
In the next window, change to the Custom Code tab and configure the following entries:
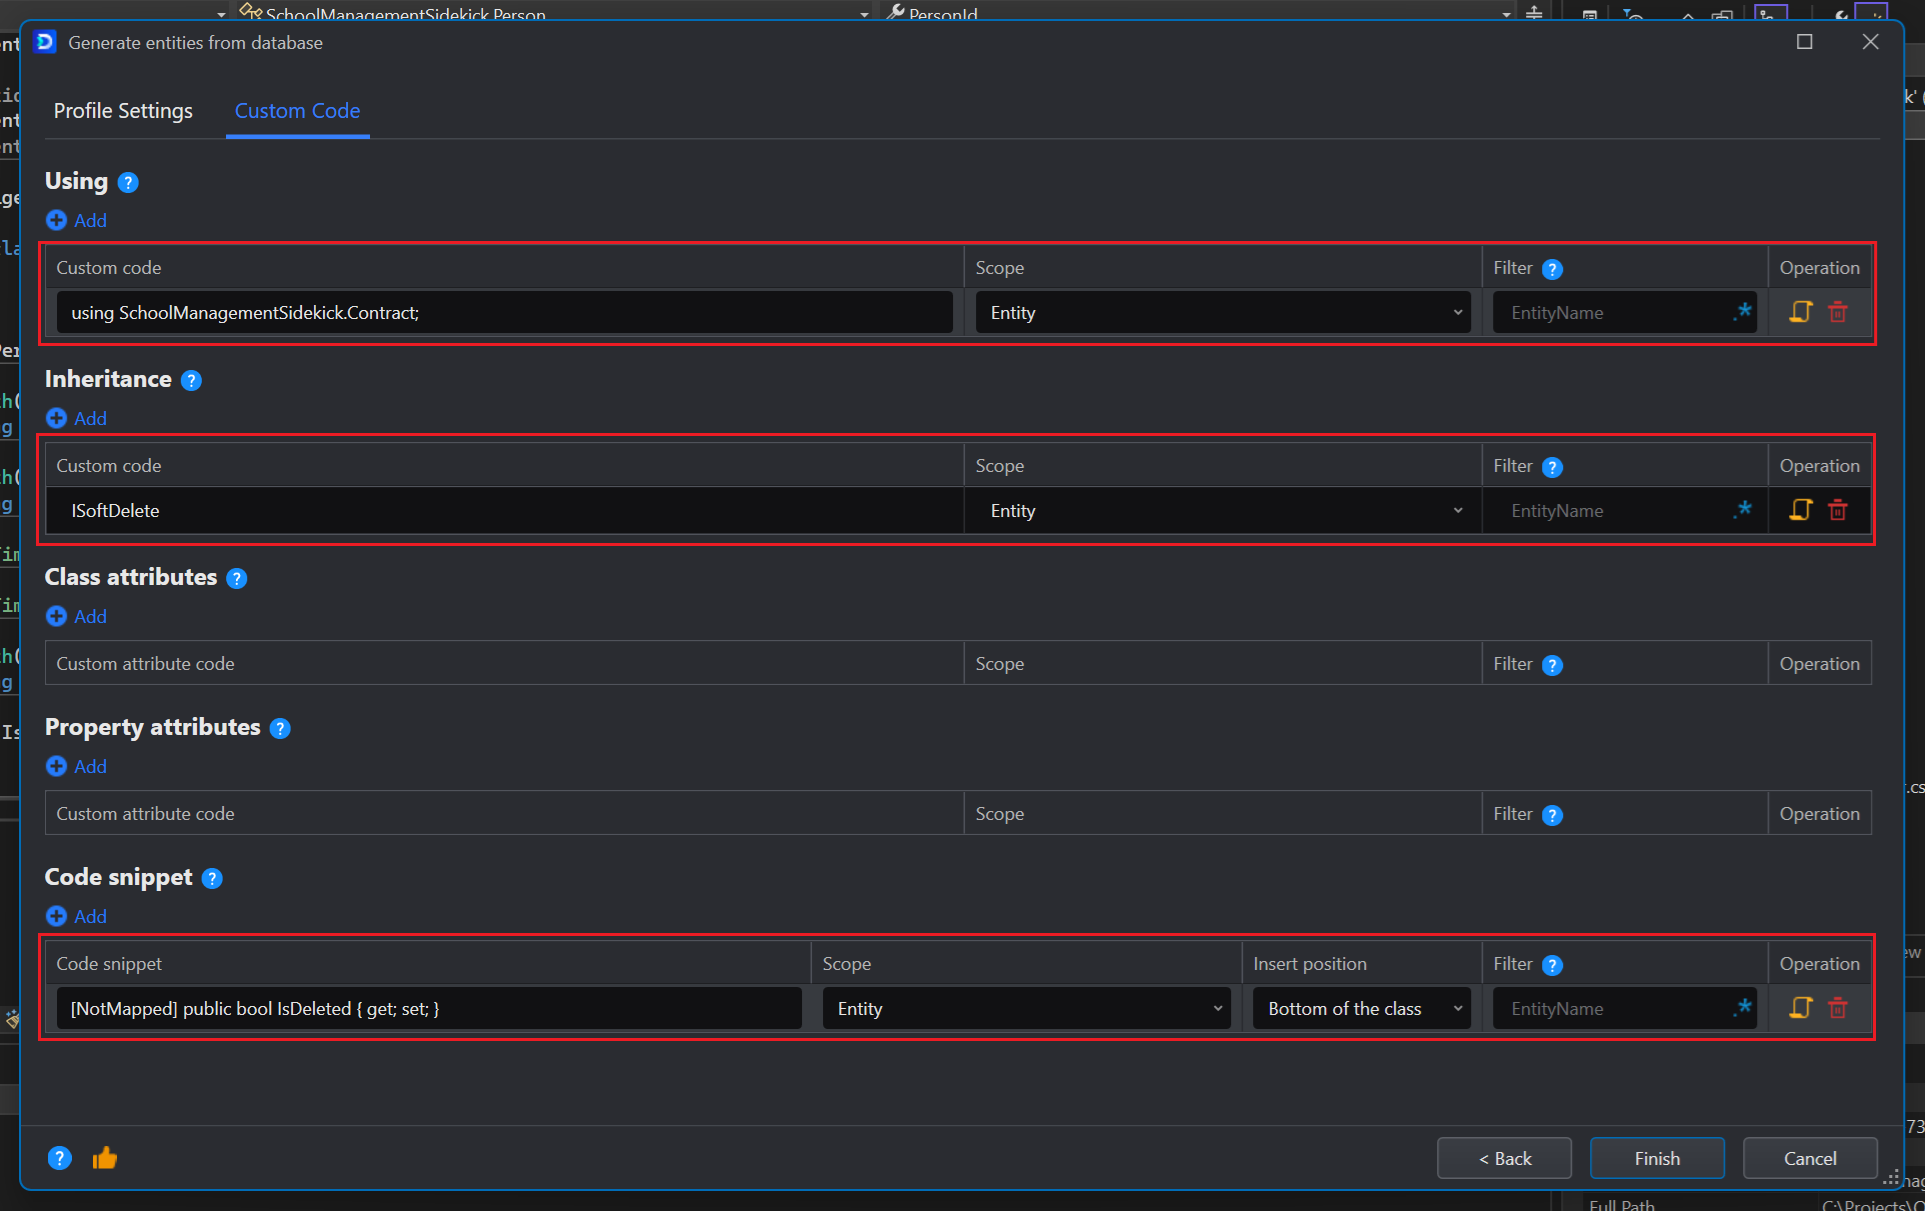
Note: We included the [NotMapped] attribute because this property is not on the database, it's only for demonstration.
When editing the Code snippet section entries, you can enter multiple lines. When the objects are generated, the injected code will also have multiple lines.
Return to the Profile Settings tab and make sure Overwrite and Apply custom code to the generated code checkboxes are ticked.

Note: For the rest of this tutorial it's going to be assumed these checkboxes are toggled on.
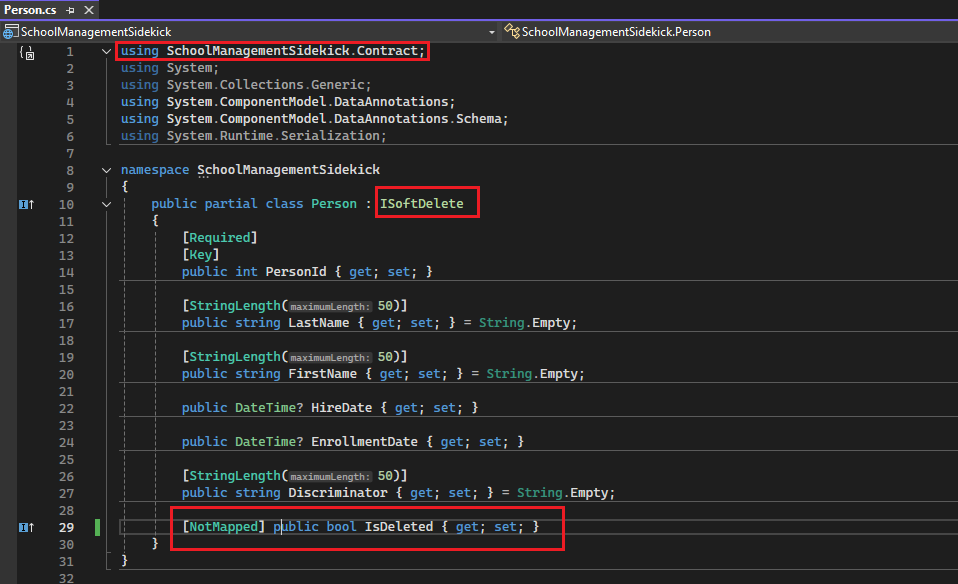
After this, click Finish.
If we open the Person.cs file, we will see our custom code has been inserted into the class:
Enhancing Services with Custom Logic
Let's extend the project by adding a filtering functionality that can then be reused by several services.
Right-click on the Person entity and go to EF Core Sidekick>Generate services and Web APIs. Let's select the same services we selected previously (Get, GetList and GetPage) and click Next. Then, in the Custom Code tab we'll add a filtering function to the services as Code snippets. First in the interface:
public IQueryable<TEntity> GetFiltered<TEntity>(Expression<Func<TEntity, bool>> filter, CancellationToken token = default)
    where TEntity : class;
And then in the implementation:
public IQueryable<TEntity> GetFiltered<TEntity>(Expression<Func<TEntity, bool>> filter, CancellationToken token = default)
    where TEntity : class
{
    return _unitOfWork.GetRepository<TEntity>().GetQueryable(false)
        .Where(filter);
}
The resulting code snippets section will look like this:

Note that the code is entered as multiple lines:

We will also add an import to provide the Expression object:

Then click Finish.
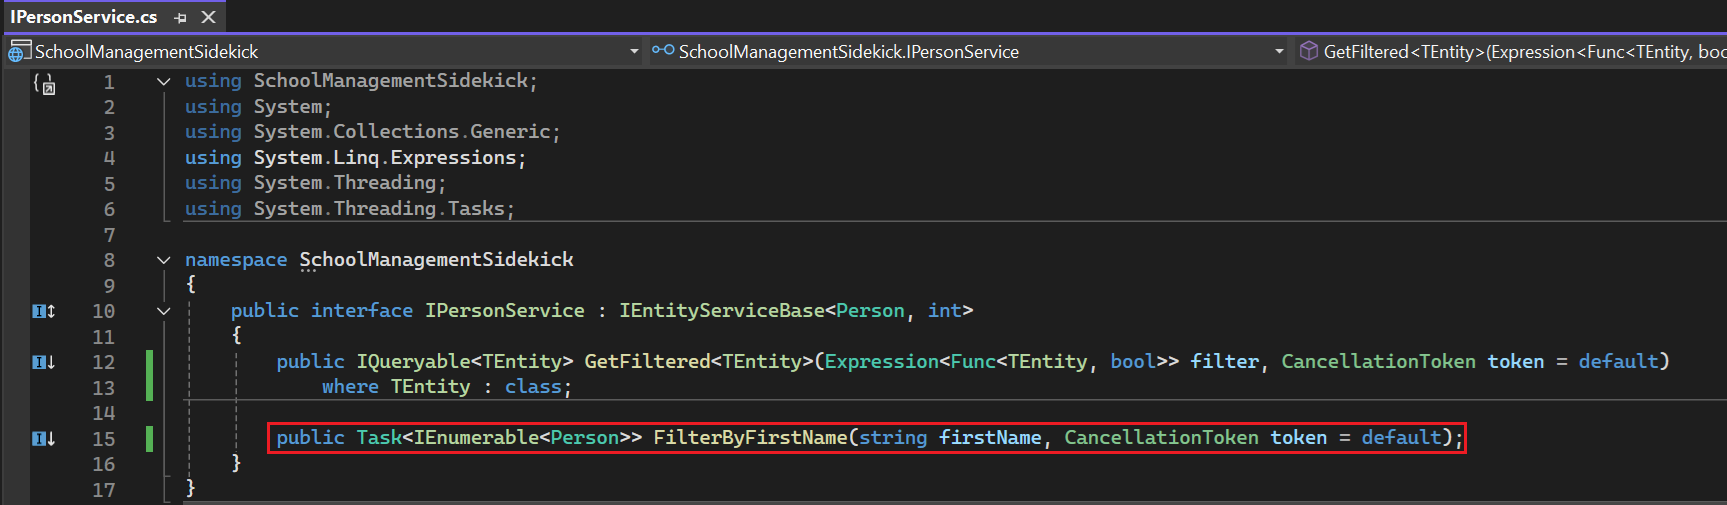
With this, we can implement custom filters on the services we desire, for example to add a First Name filter to the PersonService, we can manually modify the IPersonService.cs file and add the following:
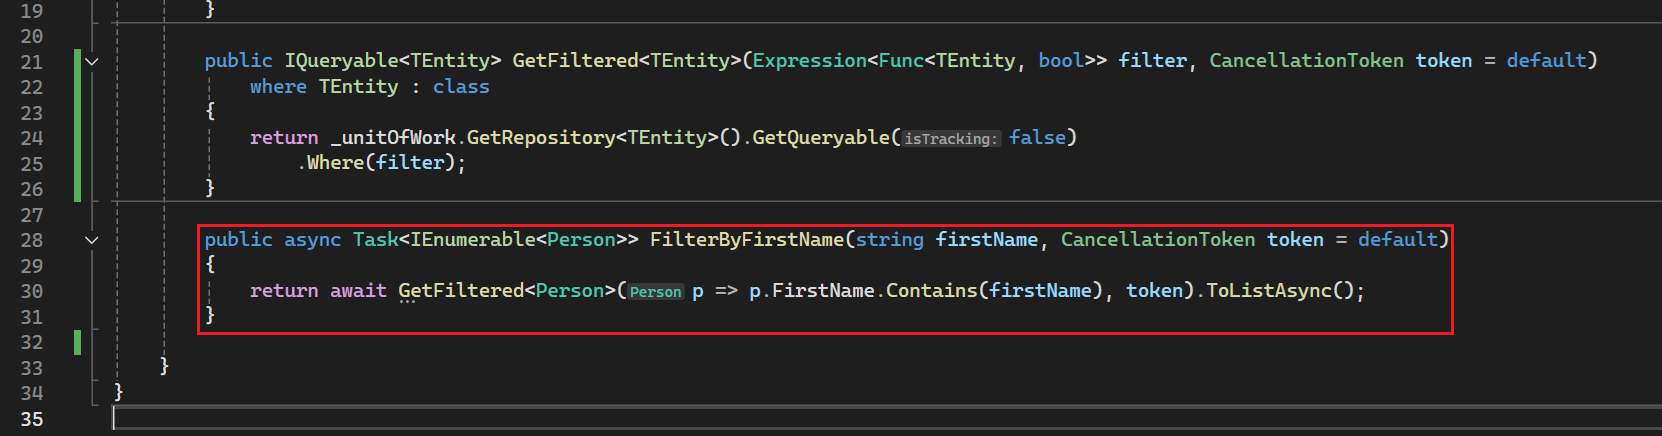
then to the PersonService.cs file add:
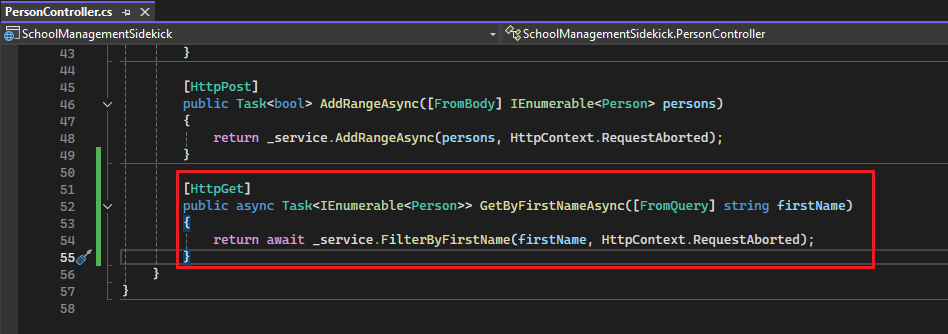
And finally in the PersonController.cs file we add the endpoint:
Note: These changes will be lost if you regenerate the services/APIs with the Override option set.
With this, we have added functionality to the base service in a persistent manner, while making more specific changes to the generated Services and APIs.
Extending API Functionality
It is also possible to modify the functionality of the generated API controller, either by hand (the changes might be lost) or through Custom Code.
Wrapping API responses
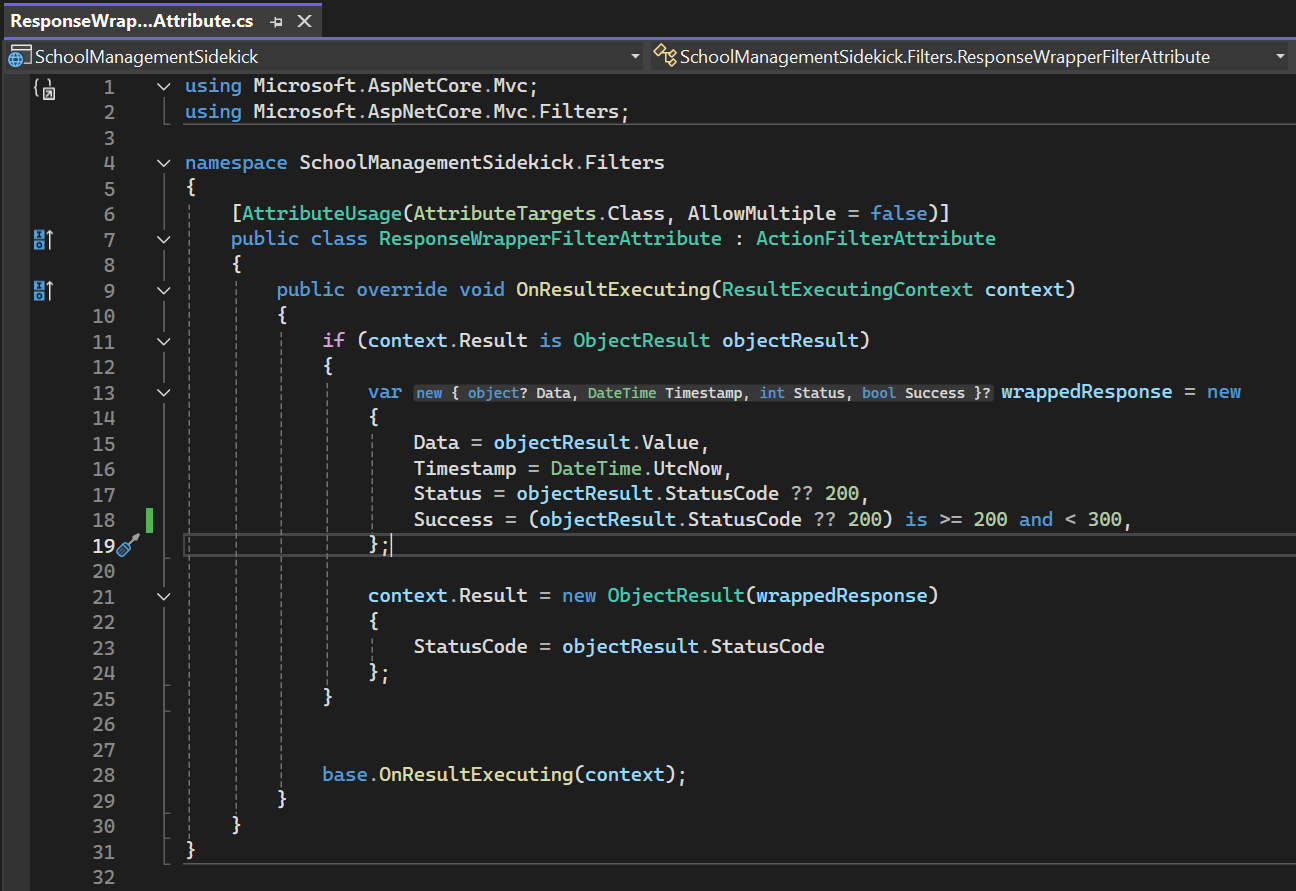
Let's modify our controllers so that the responses are always wrapped inside a predefined object. We'll create a directory named Filters in the project root and inside it a ResponseWrapperFilterAttribute.cs object defined as follows:
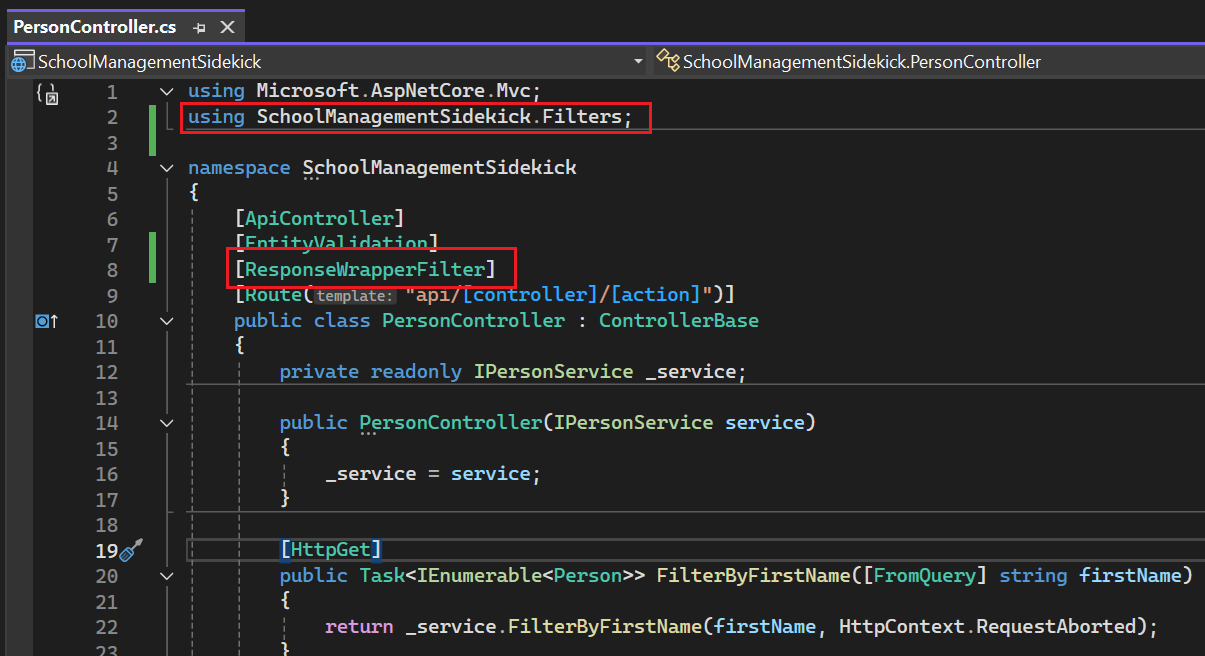
Next, we'll decorate the controller with this attribute we created:
Alternatively, you can also inject this attribute into the Code Generation process (so that it gets included in the generation) by specifying it in the Custom Code settings:
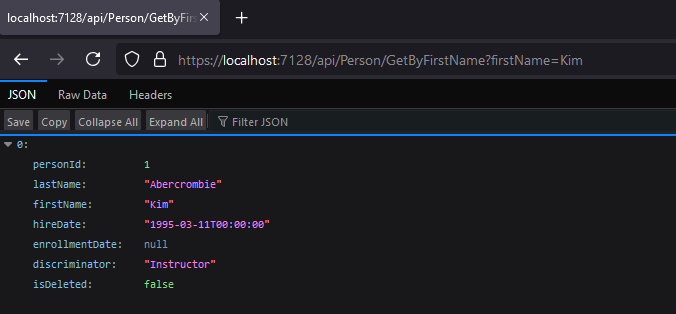
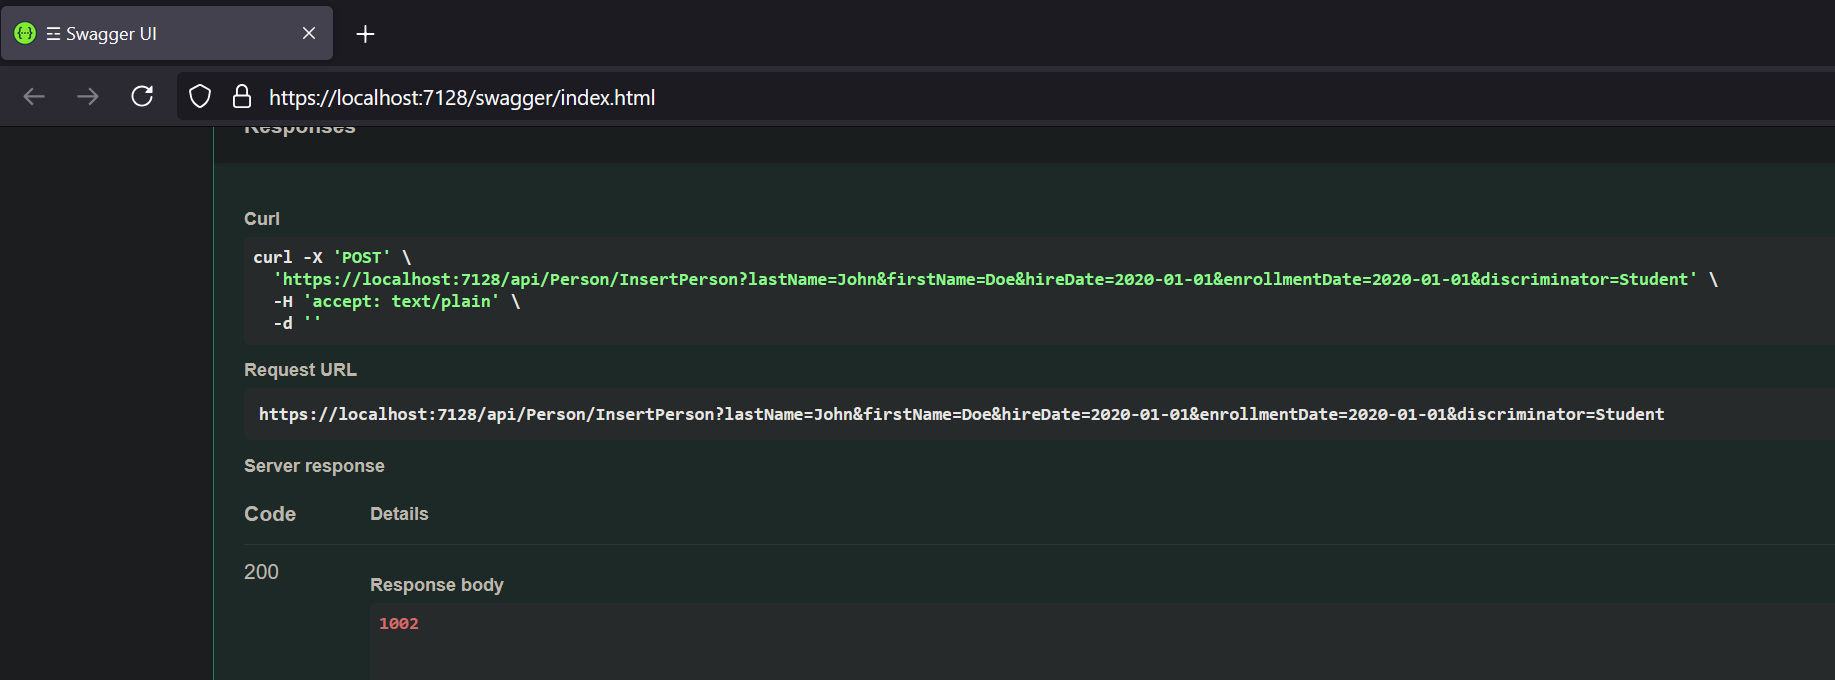
Run the Web APIs, and test any of the endpoints on the Swagger page, you will get a result similar to the following:
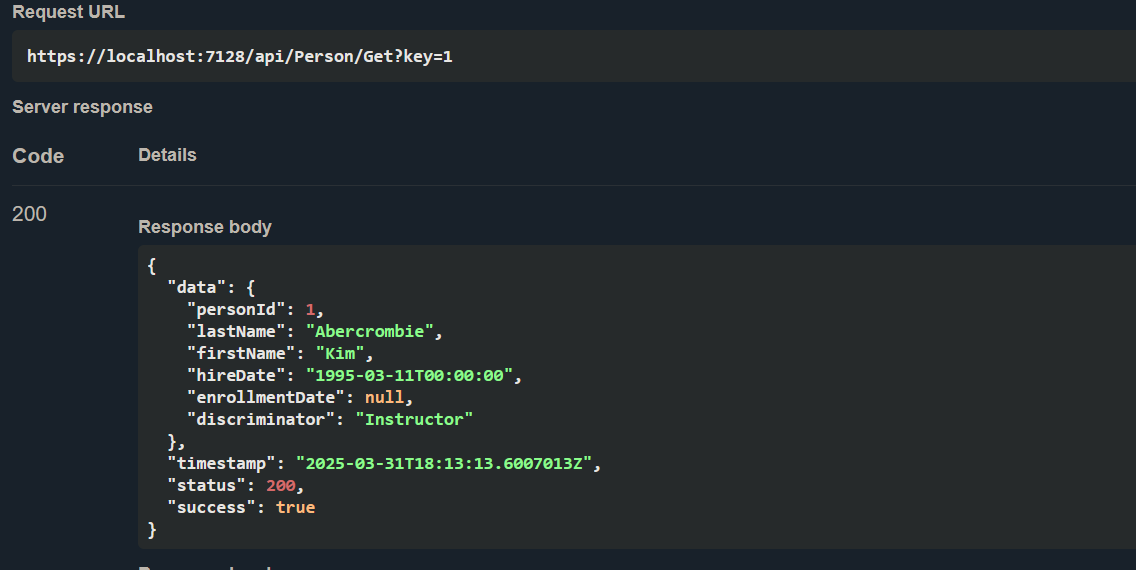
You can follow a similar approach for other API layer modifications such as custom exception management, custom security strategies, etc.
Handling Database Schema Changes Effectively
If you don't make any changes to the resulting files after the model generation, addressing database changes is as simple as just doing the process again (making sure the overwrite option is set).
However, as you get more and more experience working with Web APIs you might run into the need of making manual changes to the resulting models or services. And in this case you might not want to lose these changes when addressing a database modification. For these situations you might benefit greatly by making your custom changes through the Custom code section of the generation window. By making the changes through this interface you can rest assured that those changes will persist across regenerations, even after making changes to the database schema itself.
However, there might be instances in which you can't rely on this feature, or the changes are too complicated to rely on the Custom Code section of the generation. For these cases, since EF Core Sidekick uses EF Core at its center, you only have to make changes on defined locations to accommodate the changes, namely Contract/Entities for changes on the table and Dal/Configurations to configure the entity's fields:
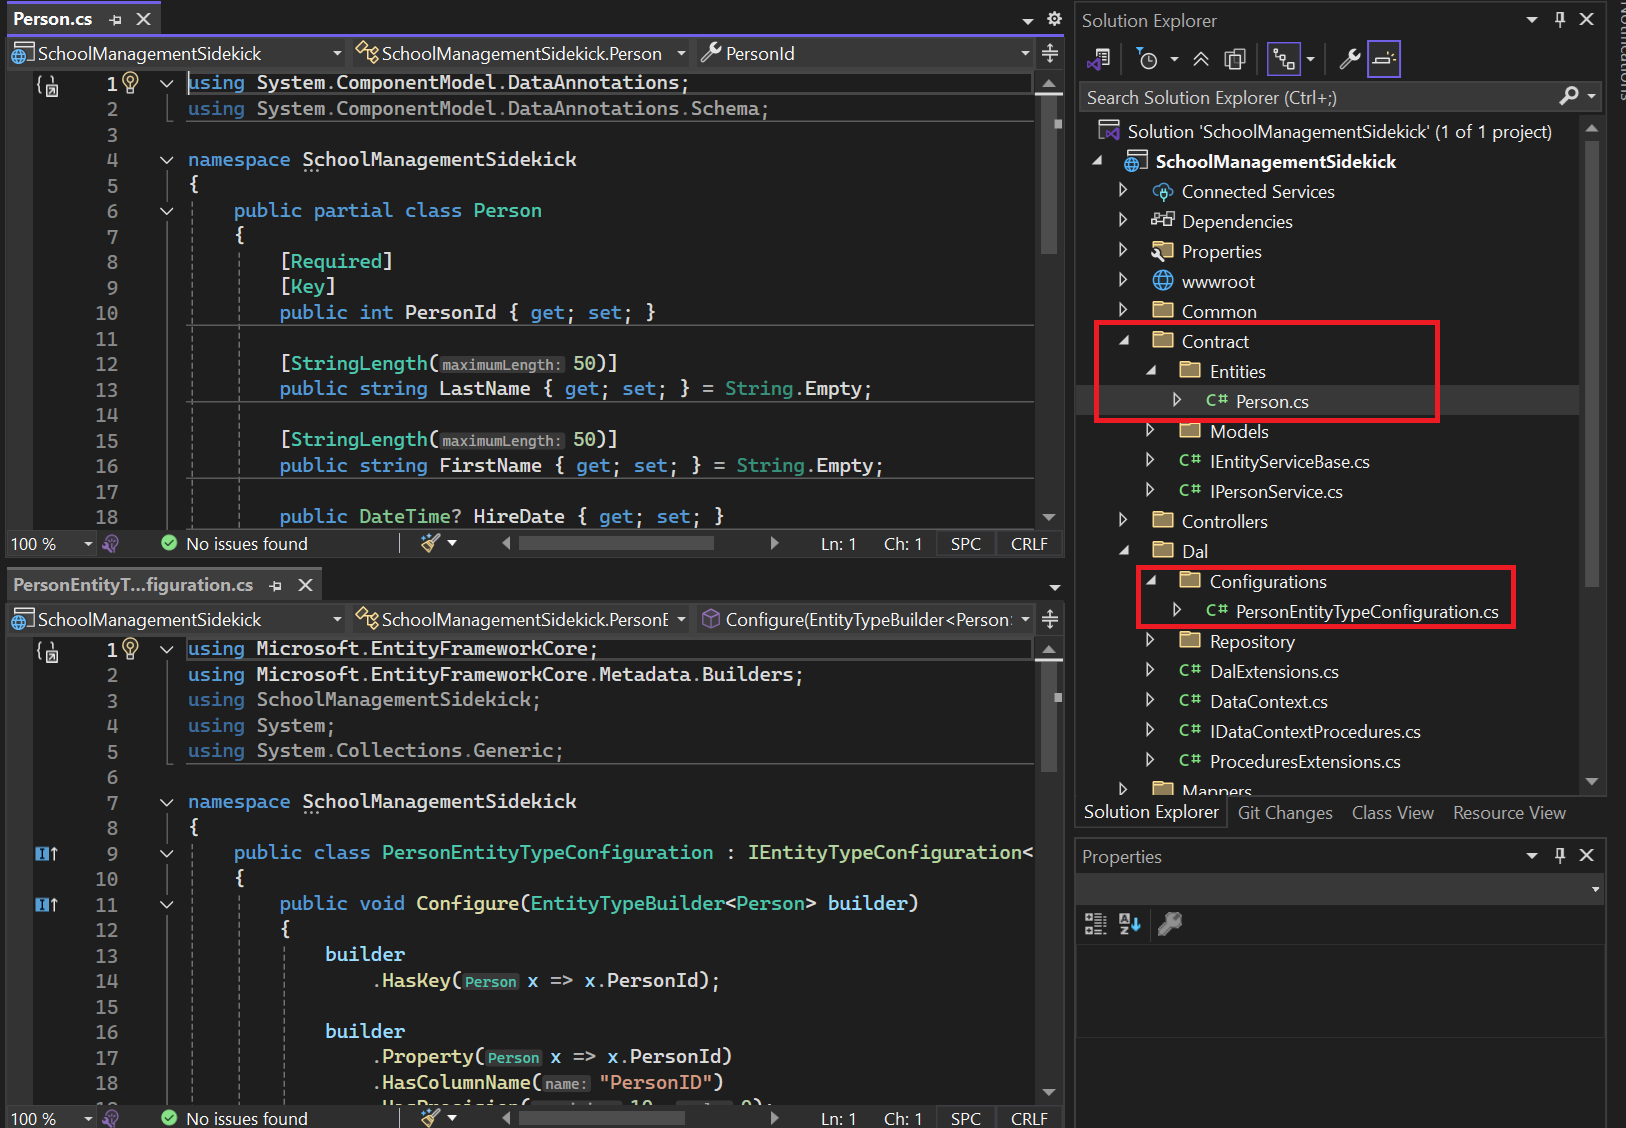
Additionally, you can define the custom logic on separate classes, and then insert this functionality into the generated entities through the Custom Code tab during the generation process.
Working with other data sources
For more complex systems, data is not only retrieved from regular tables; views, functions and procedures are also very frequently used. Fortunately, EF Core Sidekick allows the creation of entities that are retrieved from these types of sources as well.
Views
The process is identical to creating any other kind of Entity: Right-click on the solution > EF Core Sidekick > New Entities from DB. But this time we select the View objects in the database:
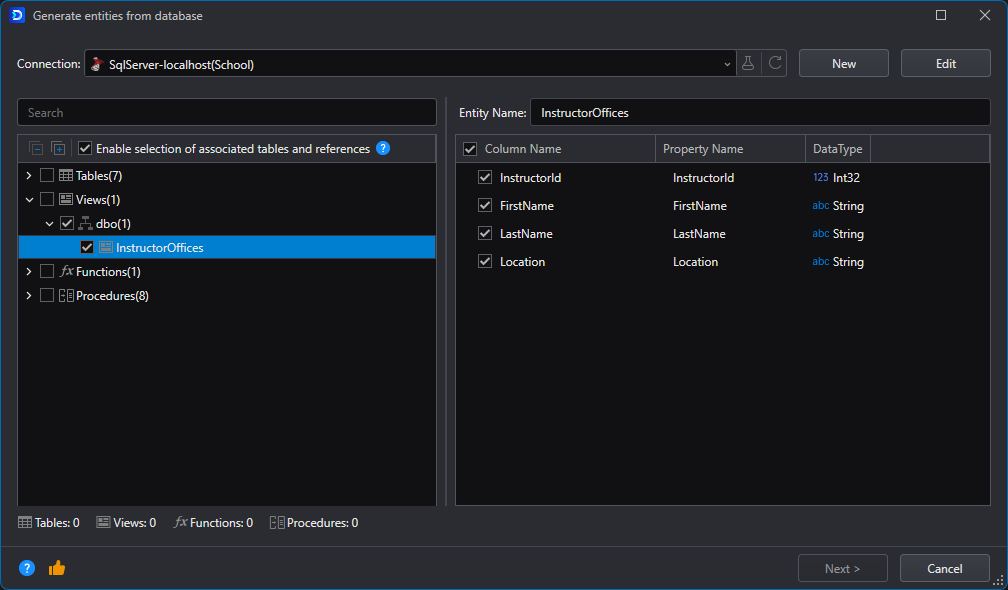
Please note that you can change the name the generated property will have:
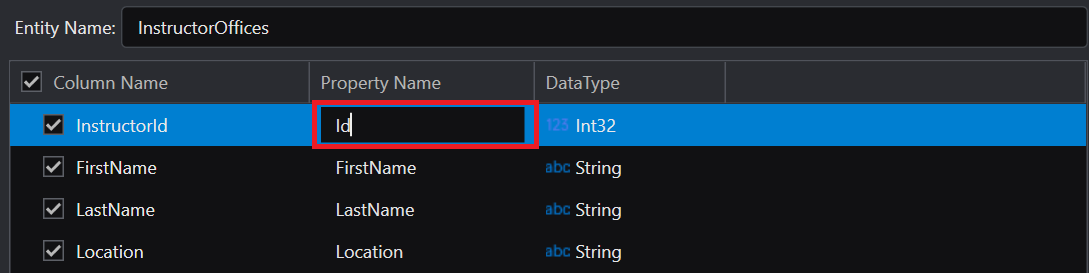
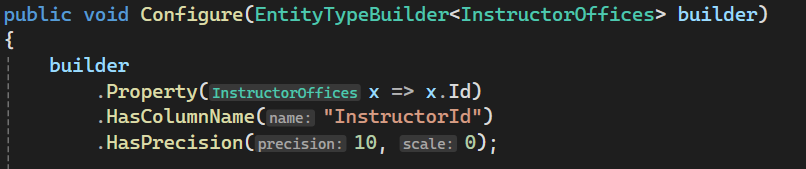
And the mapping will be handled automatically:
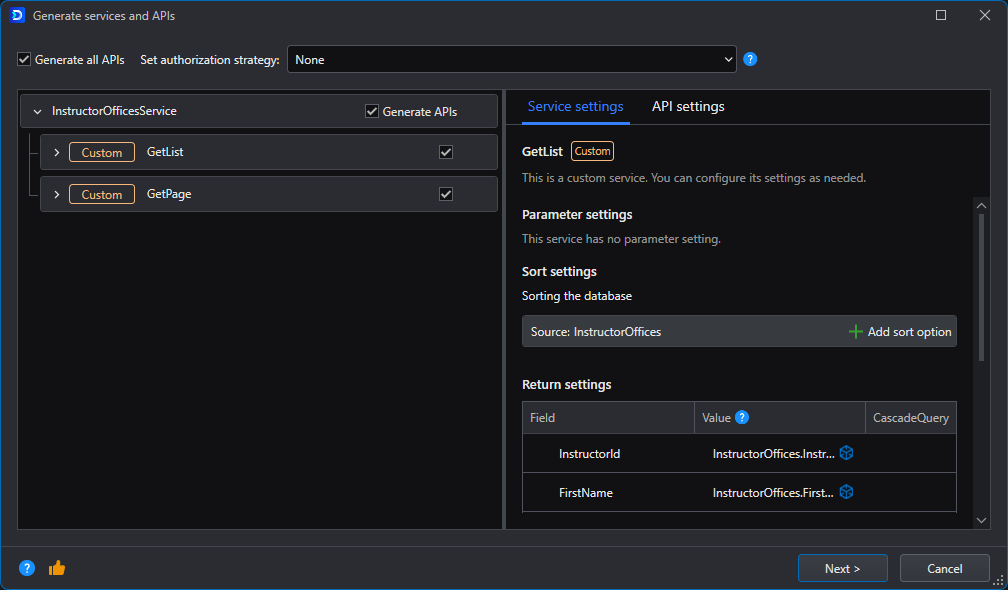
Then, when attempting to generate the services and Web APIs, EF Core Sidekick detects the Entity refers to a view, and it only preconfigures read-only endpoints:
Functions
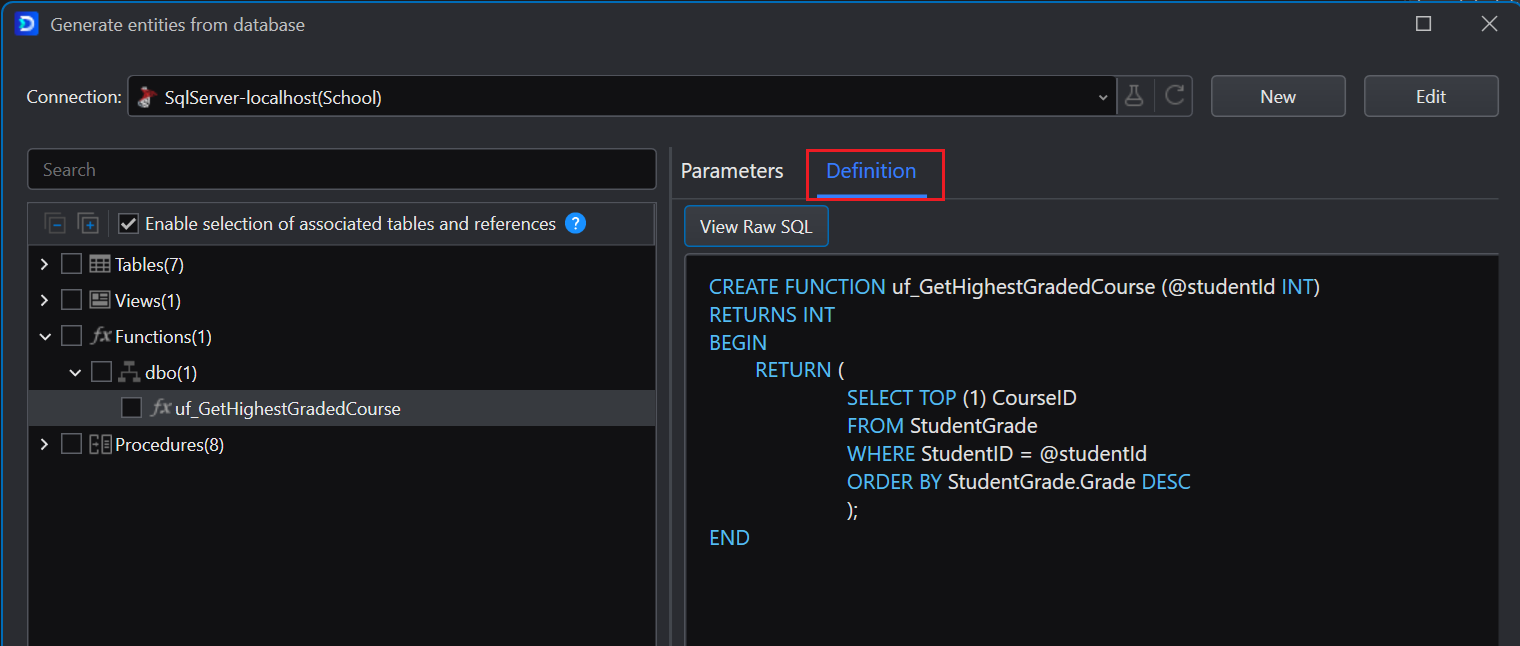
Note: the function is not included in the School database sample, you will need to create it in the School schema:
CREATE OR ALTER FUNCTION uf_GetHighestGradedCourse
(@studentId int)
RETURNS int
BEGIN
	RETURN (SELECT TOP(1) CourseID FROM StudentGrade WHERE StudentID = @studentId
		ORDER BY StudentGrade.Grade DESC);
END
When importing DB functions, the process is still the same, however the resulting objects are a bit different.
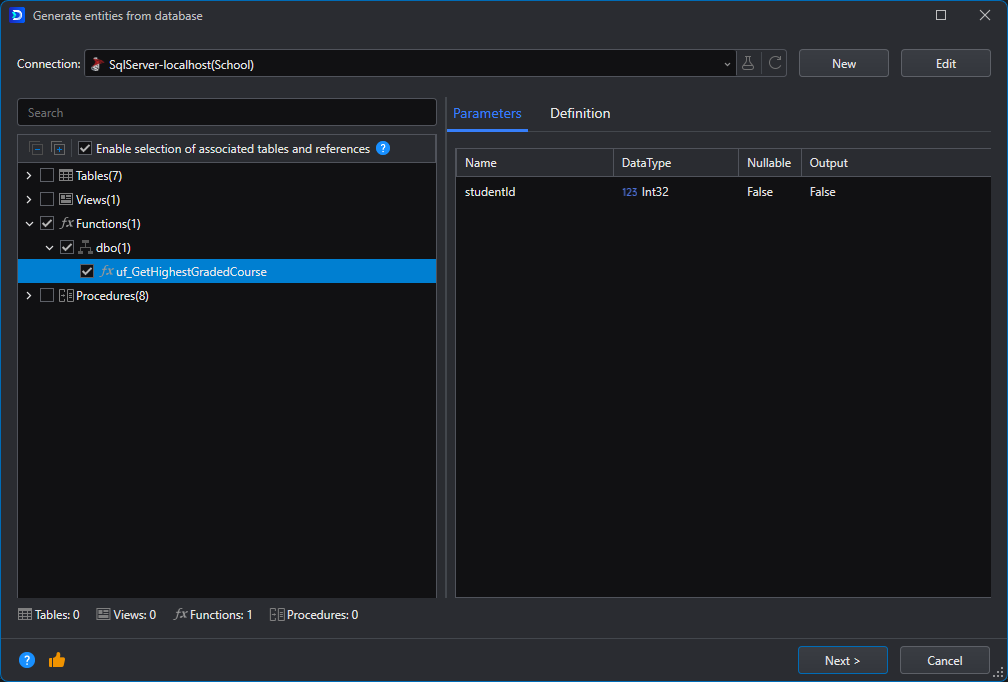
You can inspect the definition of the function in the Definition tab:
The result is placed in the file Dal>DataContext.Functions.cs:
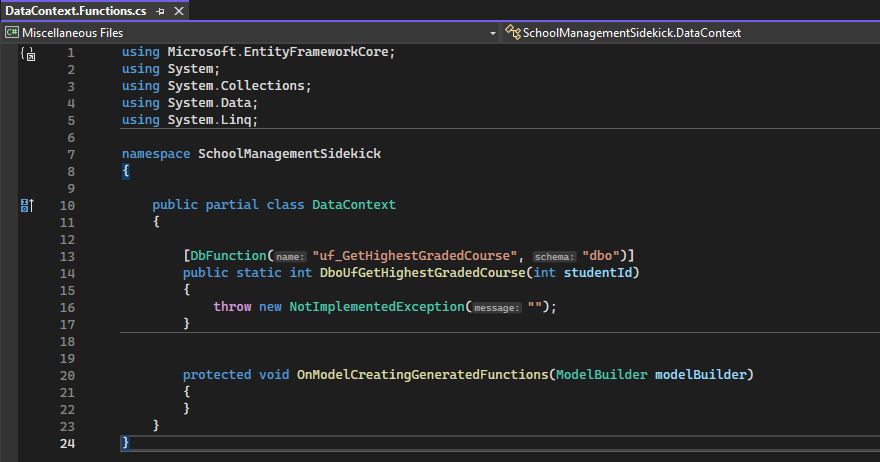
The resulting object is different in that you can't generate Services or Web APIs from it, instead, because the function is already decorated with the DbFunctionAttribute, which means we can now use it in LINQ Queries.
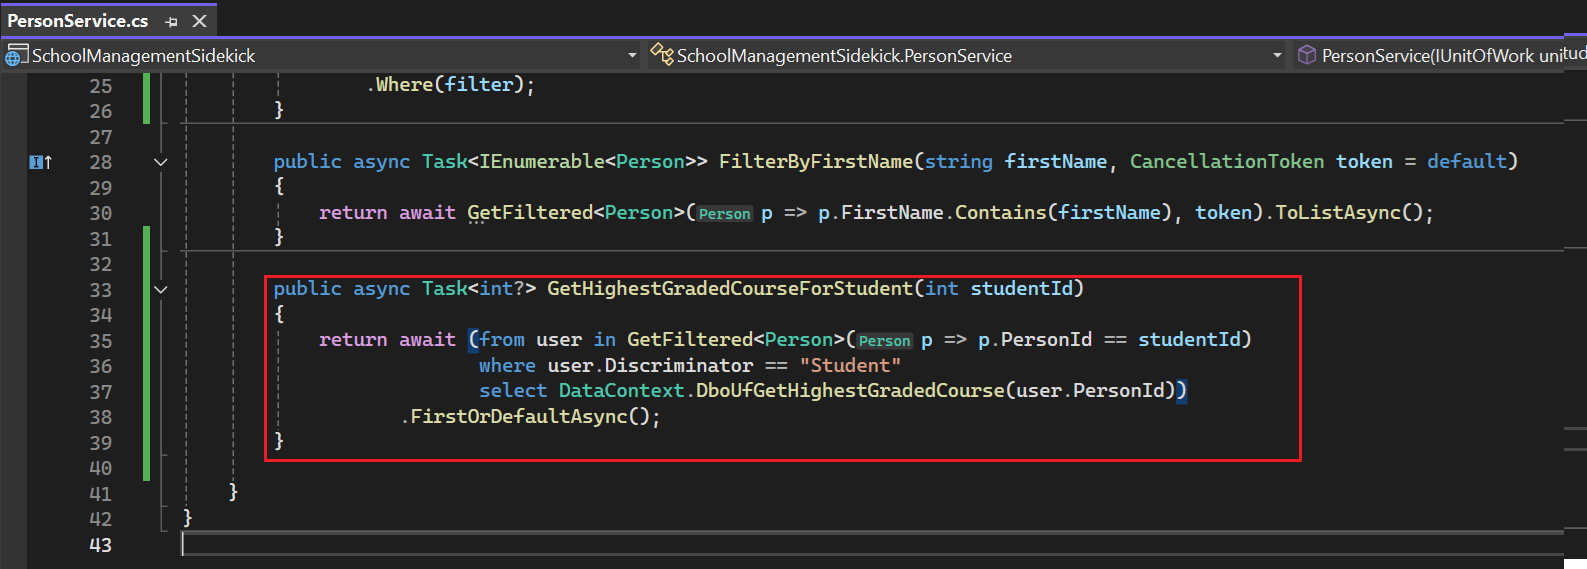
Let's add a new function to our PersonService:
Let's use Visual Studio's refactoring tools to quickly pull the method up into the interface. With the cursor on the function name, press Alt + .:
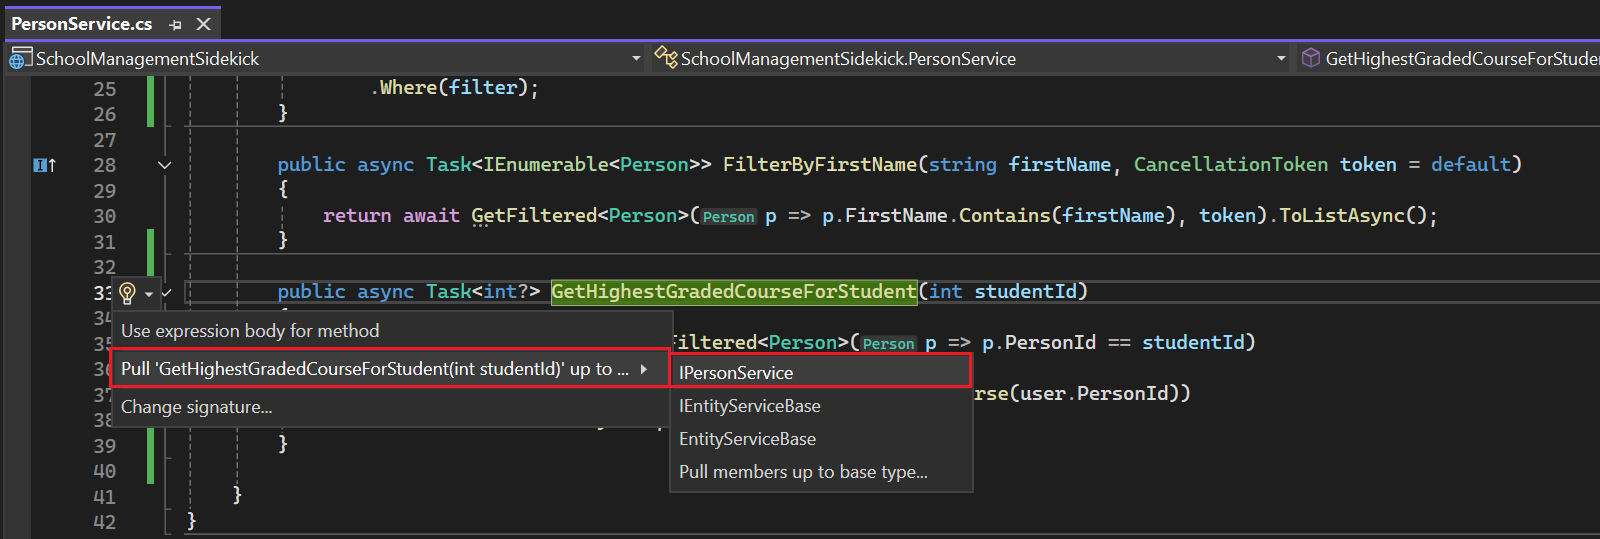
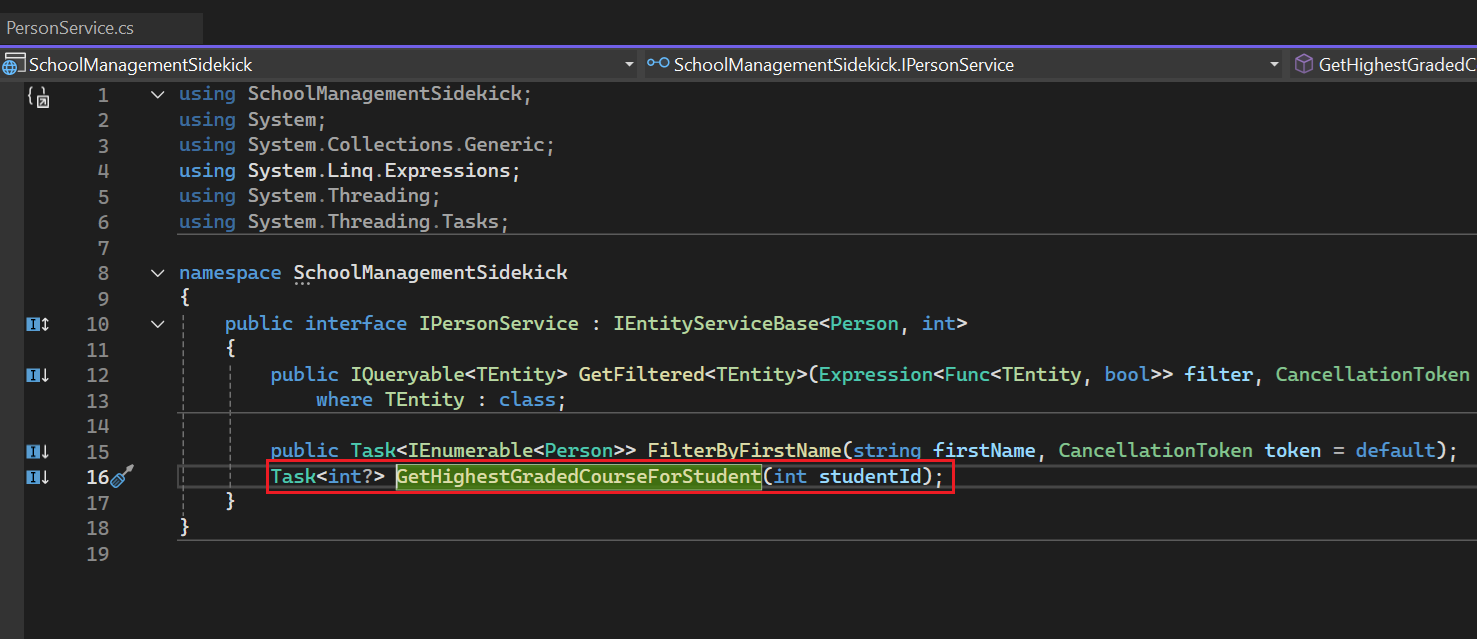
This results in the method signature being placed in the IPersonService interface:
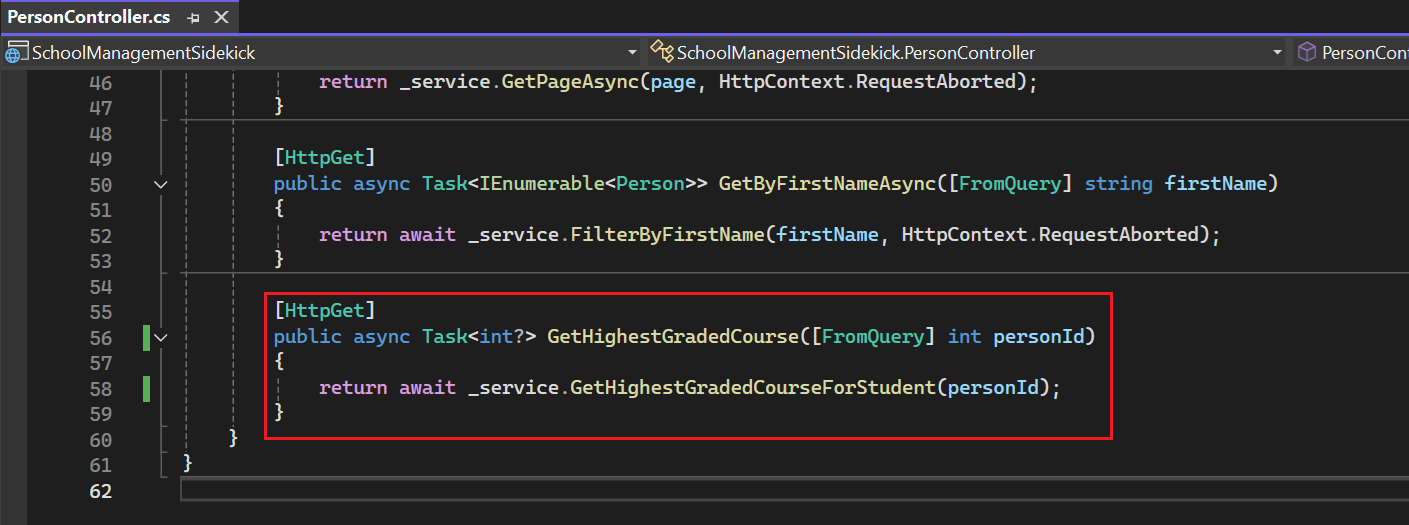
We can now use this service to create a new endpoint in the PersonController:
If we run the Web APIs and invoke the endpoint with the Swagger interface, we will see the function being used in the Console Window output:

Stored Procedures
When creating a new entity from a database object, select the Procedures you want to generate entities from:
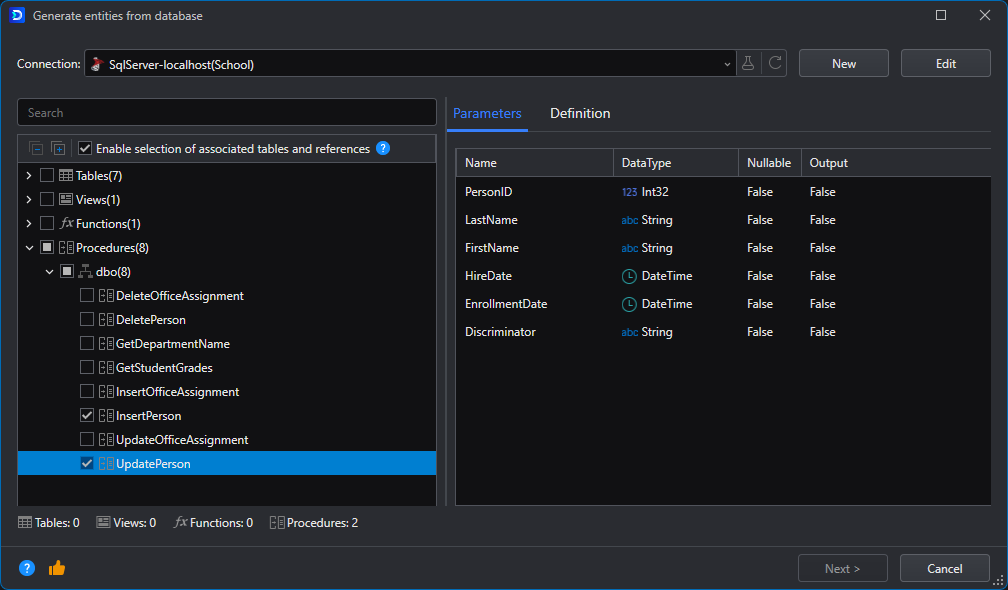
Same as with functions, you can inspect the procedure's definition on the Definition tab.
After finishing the generation, the following files are created:
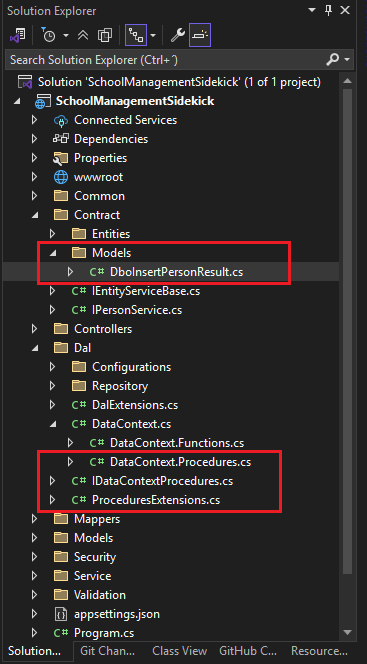
The files have the following purposes:
DboInsertPersonResult.cs
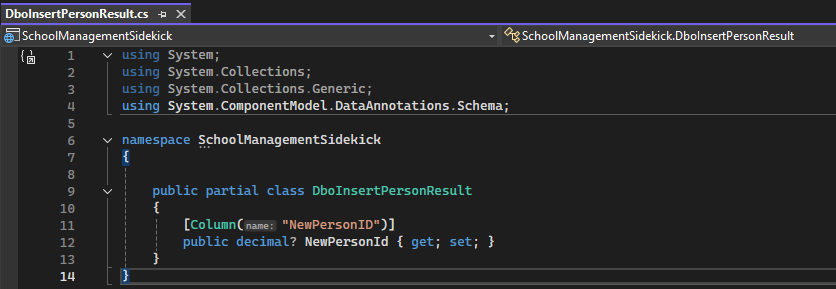
Defines the model that contains the return data of the procedure
IDataContextProcedures.cs
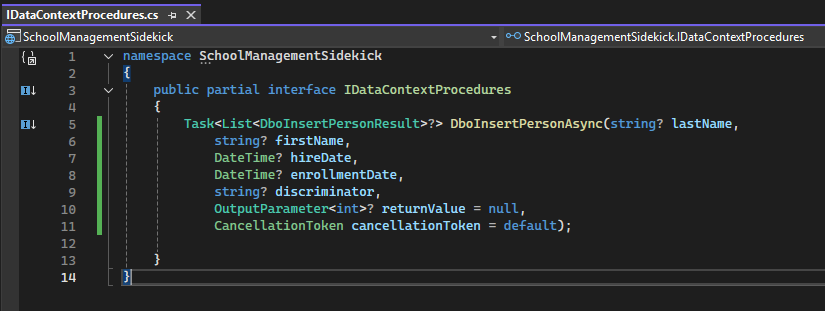
This interface defines the signature of the store procedure, that will be implemented by the next file.
DataContext.Procedures
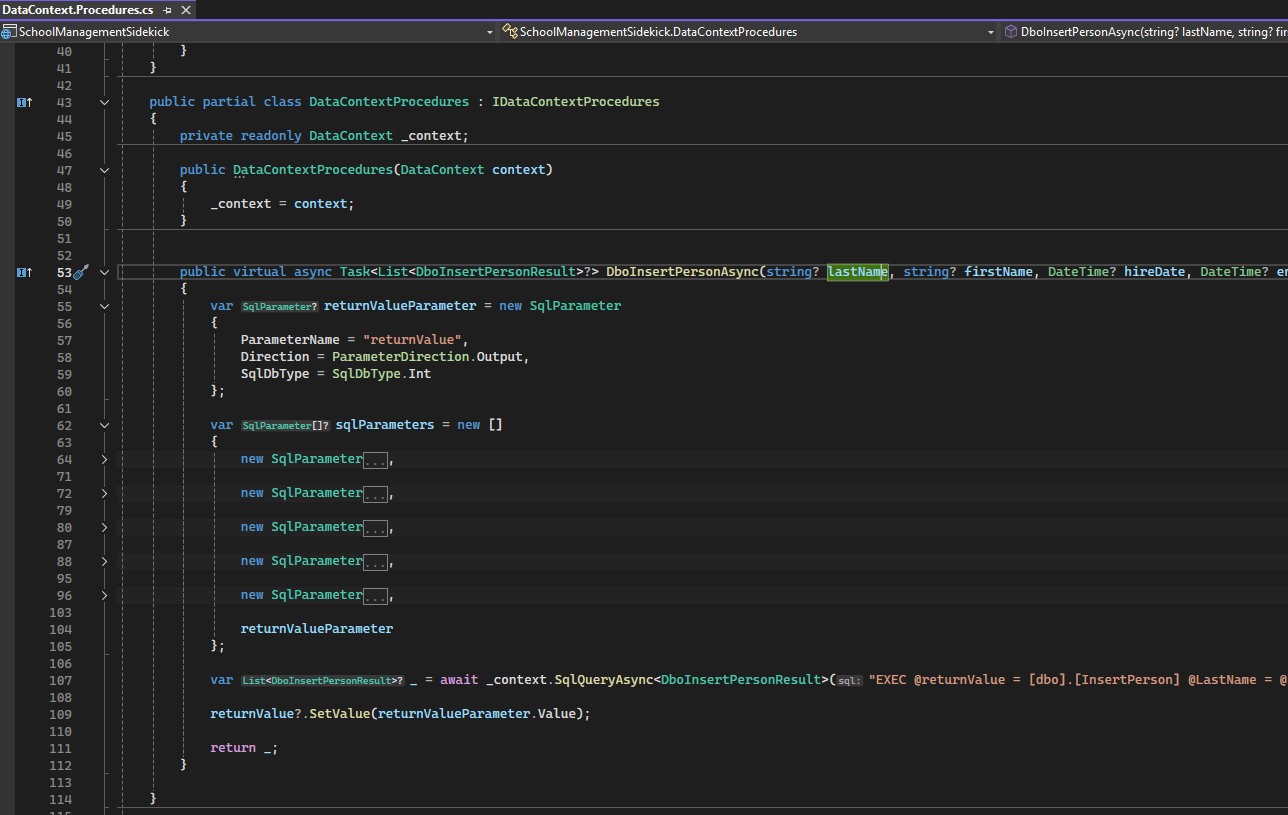
Implements the interface previously defined, and is the concrete class that invokes the Stored Procedure.
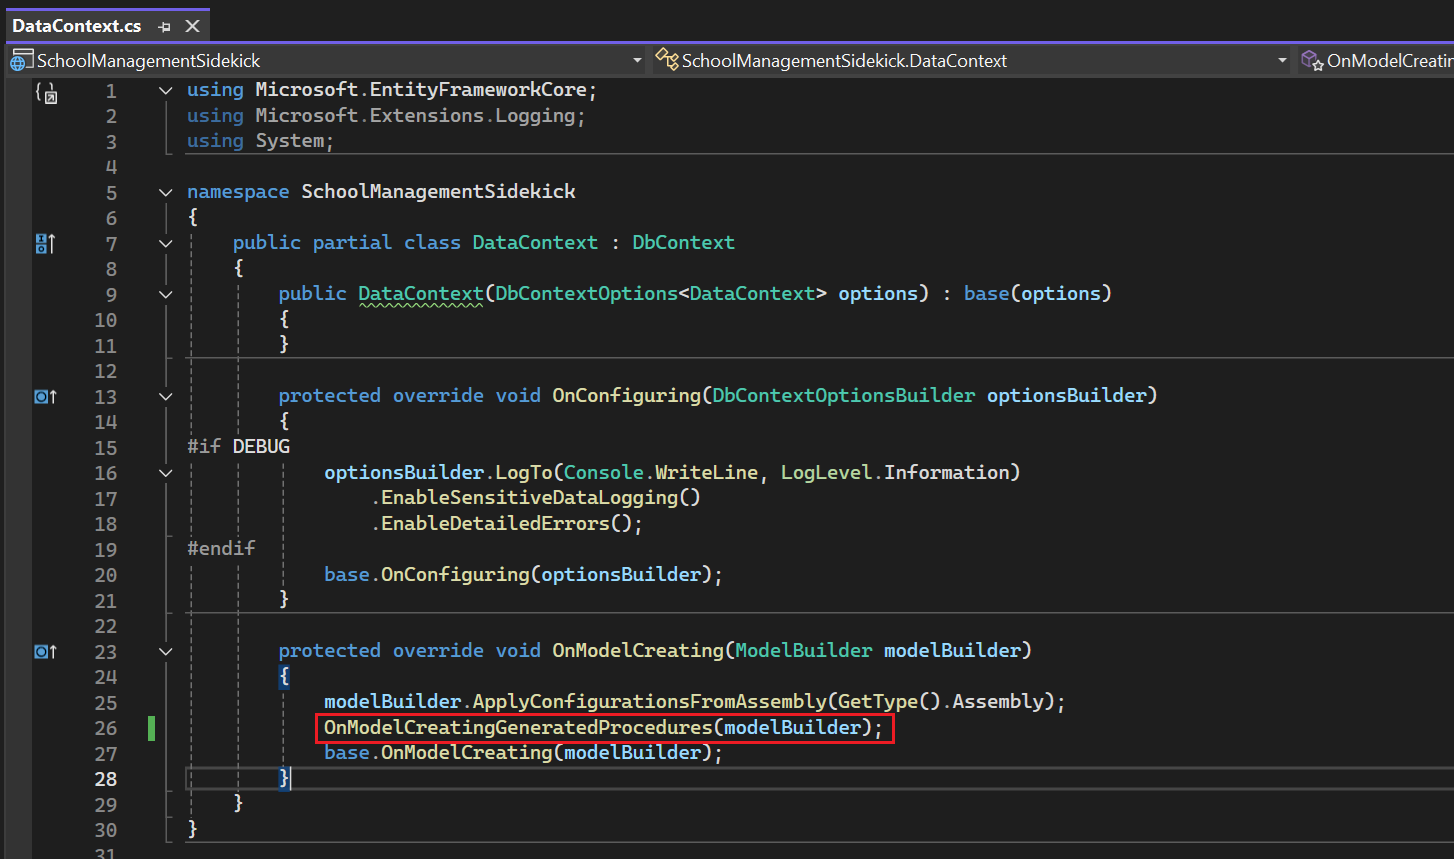
Next we need to register the return type object DboInsertPersonResult into the DataContext as a model. We do this by modifying the DataContext's OnModelCreating:
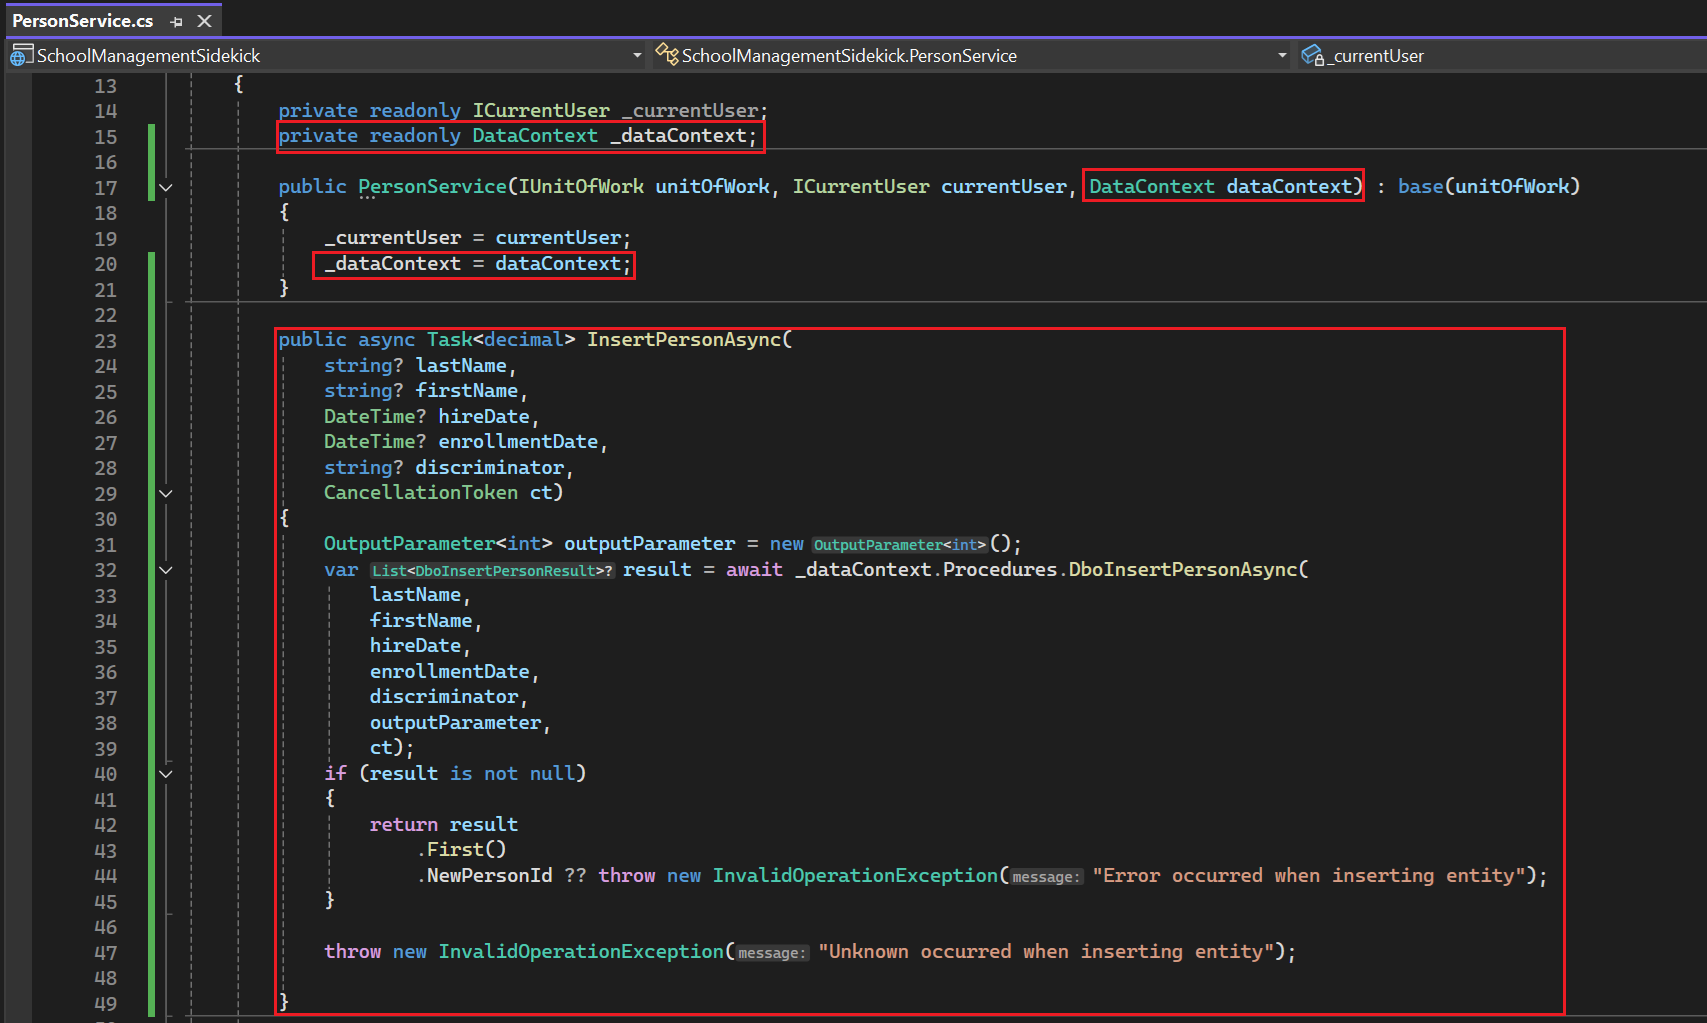
Please note that Stored Procedures and Functions may sometimes define Output Parameters, which require to be handled by the service (there are no output parameters in a REST API call). For this example, the Output Parameter is not something we want to use so we discard it in the service implementation. We'll make the following changes to the PersonService class:
We then pull the method into the interface, like we did with the function.

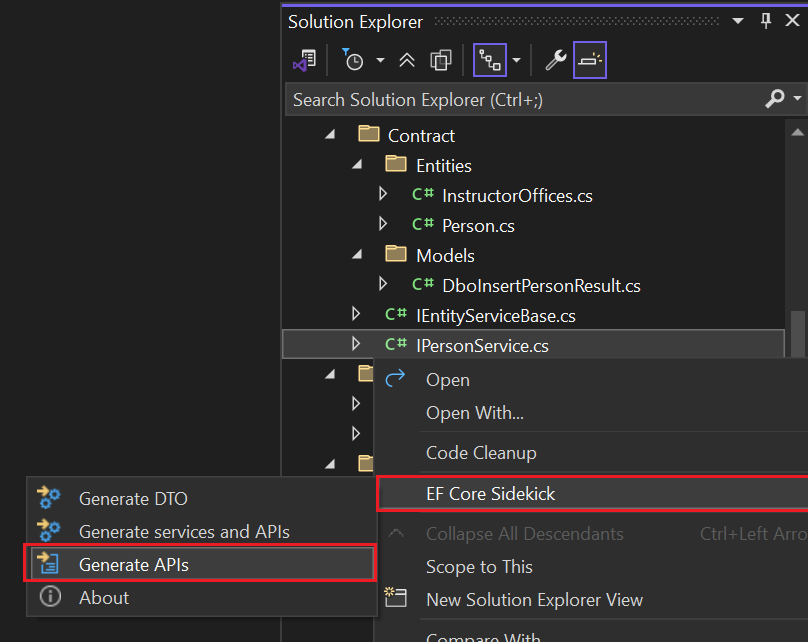
With the service updated, we can use EF Core Sidekick to regenerate the controller with the new method. Right-click on the IPersonService.cs file and go to EF Core Sidekick>Generate APIs:
In the configuration window, we select the methods we created, and the read-only methods:
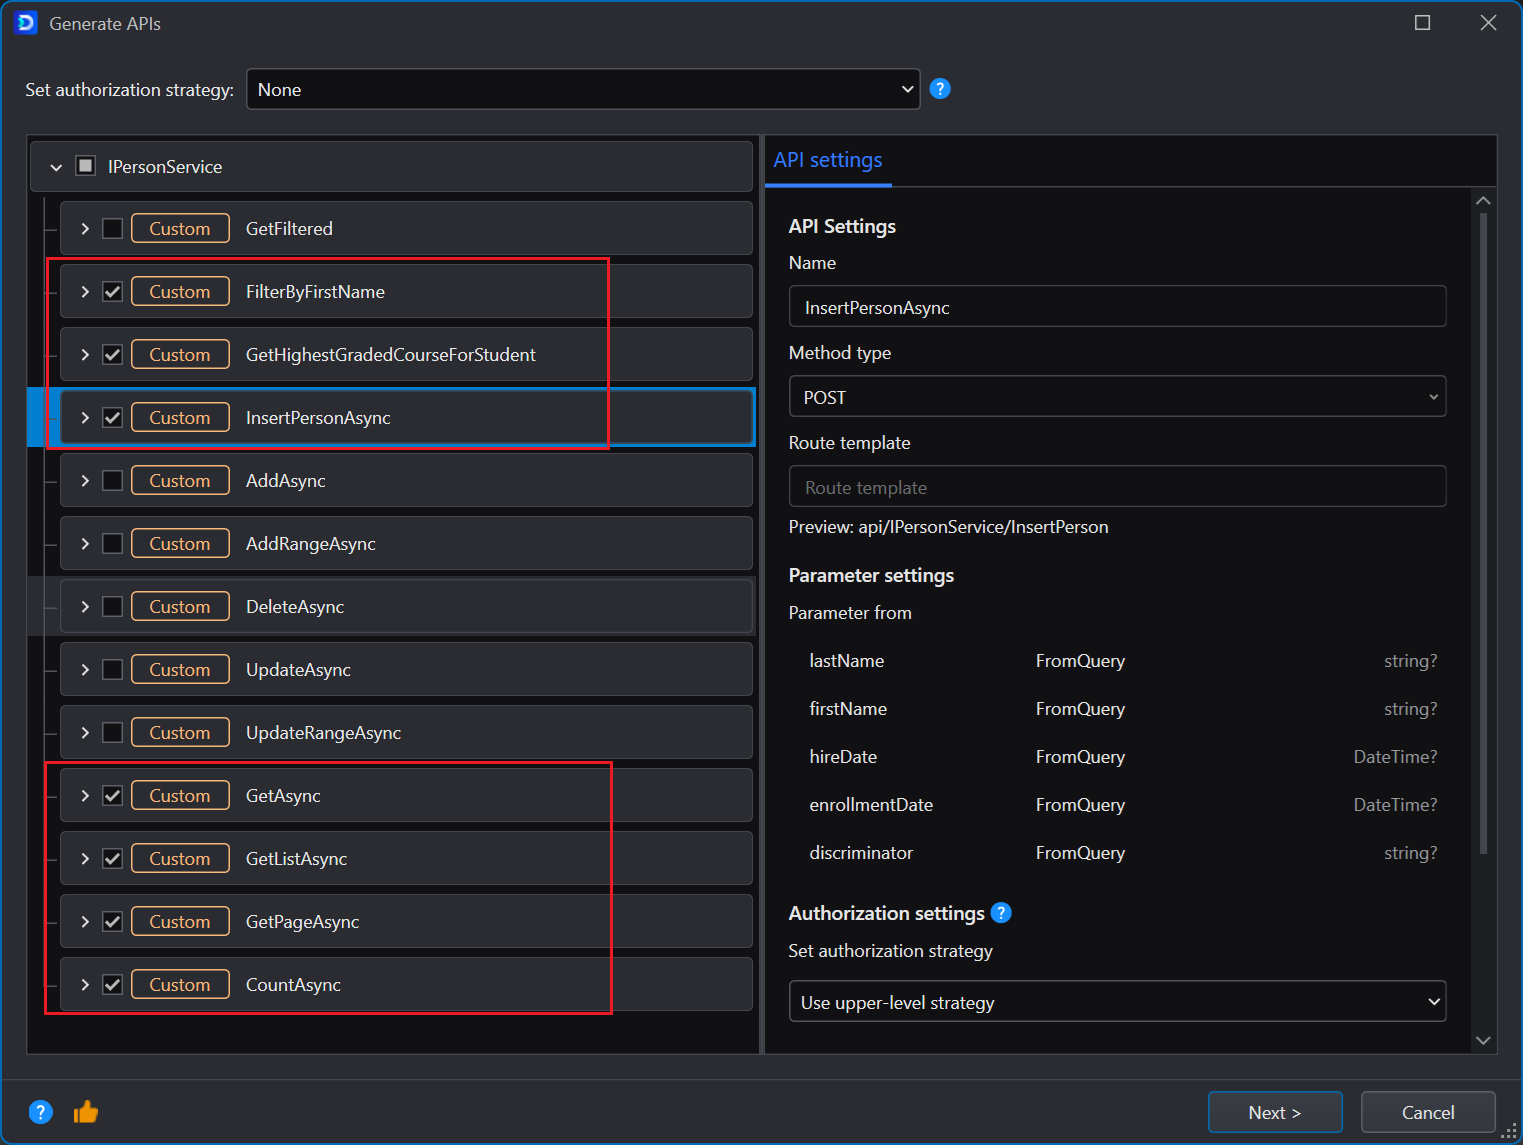
Note: The method discovery includes the base class, which is the one that contains all the methods that show up, additional to the ones we see defined in the interface.
We click the Next and then the Finish buttons. Finally, we run the Web APIs again and see the new endpoint in the Swagger page:
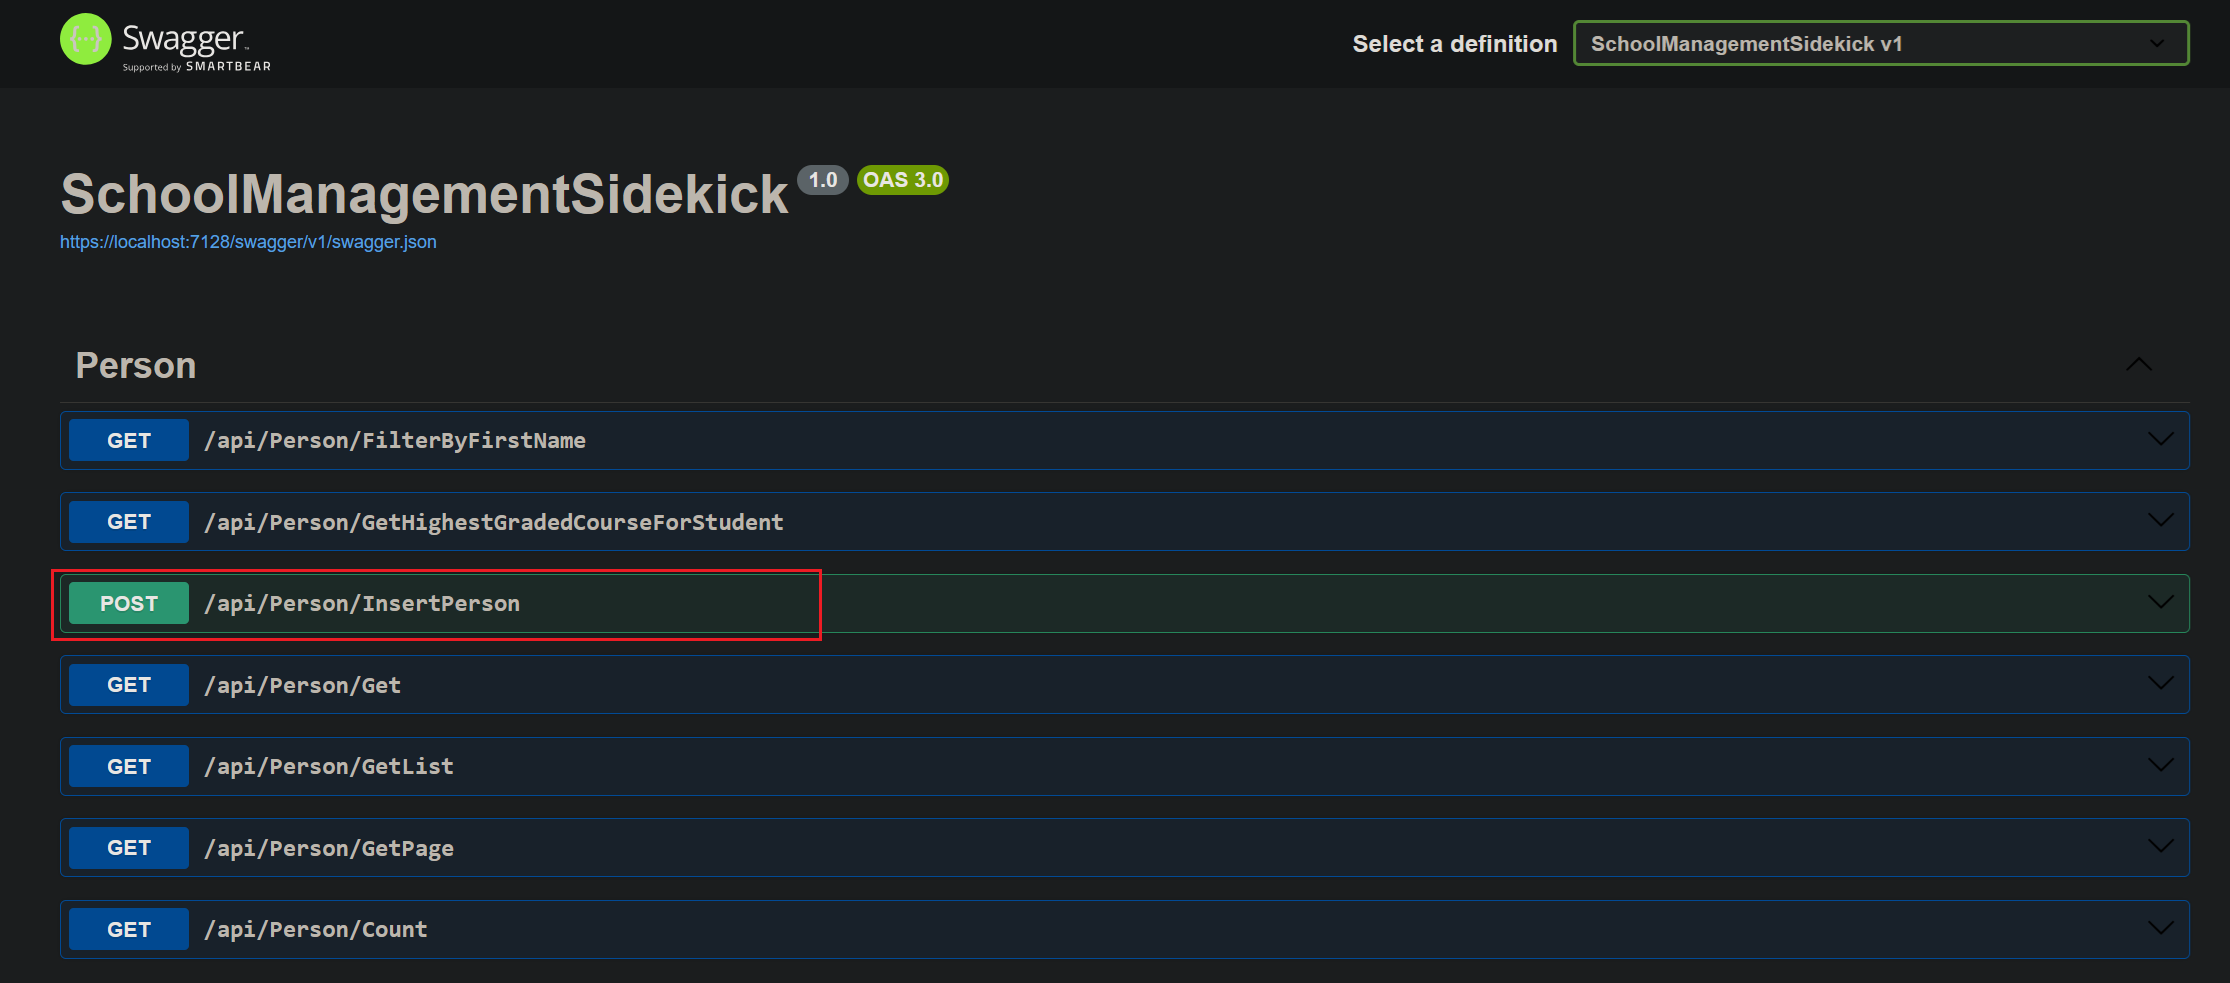
And we can now use it:
Implementing Critical API Security Practices
Authentication with JWT in EF Core Sidekick-Generated APIs
Making sure the resources you expose through the Web APIs are only accessible to people with the required authorization is a very important part of API development. Fortunately, ASP.NET Core is very flexible in terms of the security approaches that can be provided. One of the most commonly used security techniques is JWT tokens for endpoint authorization.
JWT Authentication
You can read more about JWT Authentication in ASP.NET Core here but as a quick overview all that needs to be done (provided you already have an authentication server set up) is:
Configure JWT in Program.cs
builder.Services.AddAuthentication(JwtBearerDefaults.AuthenticationScheme)
    .AddJwtBearer(options =>
    {
        options.Authority = "https://the-authentication-server";
        options.Audience = "the-audience";
    });

app.UseAuthentication();
app.UseAuthorization();
Protect an endpoint
[Authorize]
[HttpGet("secure-data")]
public ActionResult<string> GetSecureData()
{
    return "This is protected data.";
}
With this, only the people that the authentication server has granted a token will be able to access the resources in GetSecureData().
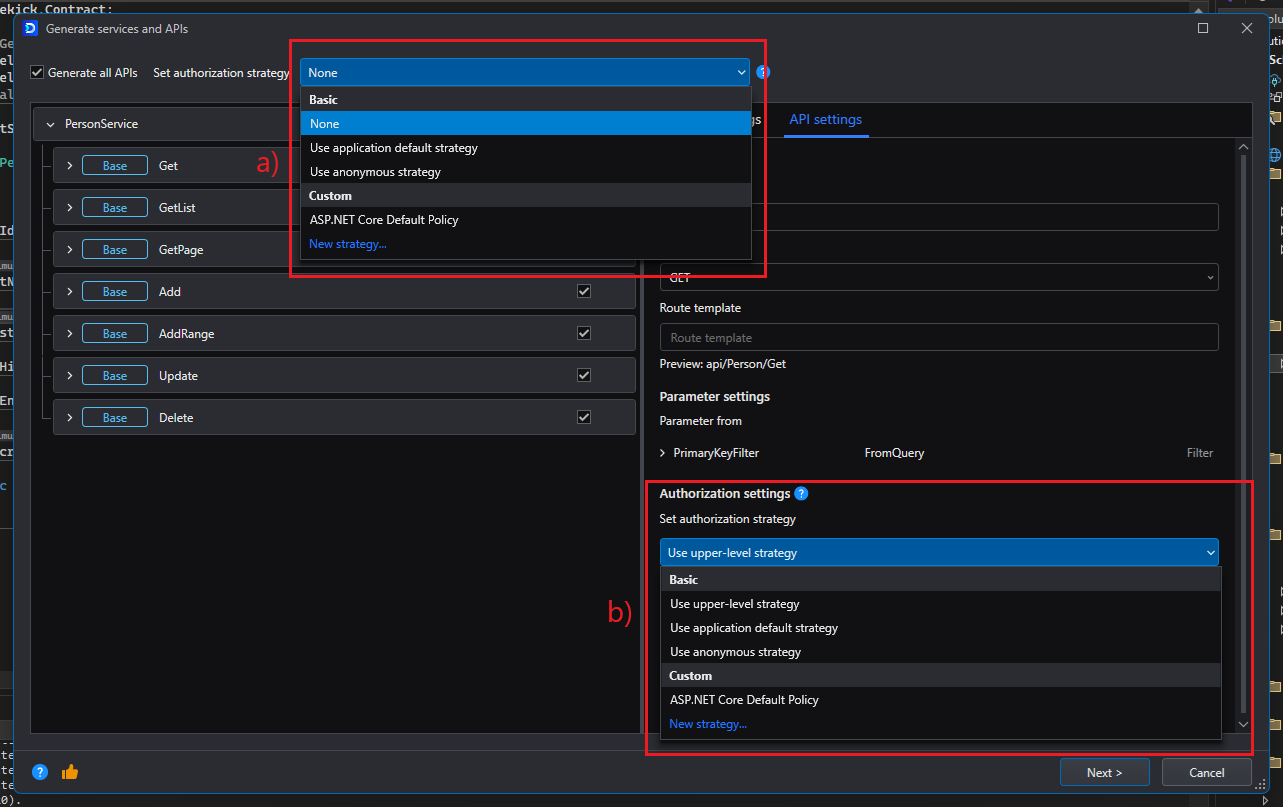
Configuring Authorization at Controller and Endpoint Levels
With EF Core Sidekick, you can choose to set the authentication strategy at a) controller level or b) endpoint level by selecting the appropriate strategy in the corresponding field:
Best practices for maintainability and performance
EF Core Sidekick helps you quickly generate maintainable code that uses the best practices. For example:
- Implementing efficient and clean design patterns to help with maintainability and isolation (i.e. Repository and unit of work pattern).
- Clear separation of concerns by having specific functionality isolated in their own classes, thus enhancing reusability.
However, for real projects, you will also need to pay attention to these practices during manual maintenance;
- Minimize manual code changes and try to make use of the Custom code in the EF Core Sidekick generation as much as possible.
- Store sensitive values/strings outside of the source code. In this example we used user-secrets, but this is appropriate mostly only in development. You should employ other ways of securely obtaining sensitive values (passwords, connection strings, etc.), such as Azure Key Vault.
Following are a couple more things that are good to keep in mind.
Keeping an appropriate separation of concerns and responsibilities
When generating entities, services or controllers using the EF Core Sidekick, components are placed in different locations and namespaces according to the architectural place they occupy:
To preserve a high degree of maintainability it's recommended that manual changes are done following this structure. Or if your organization has a specific way of structuring things, you can create a new profile that matches those specifications in the Generation profile section of the generation window.
Implement DTOs instead of returning entities directly
When consuming data from the Web APIs, it's faster and easier to return the entire entity from the database but this might not be a good idea all the time; namely when:
- The entity contains a lot of properties that are not useful in every circumstance (e.g. sometimes we only need the ID and name of the Person but don't care about the other properties)
- The entity contains some properties that are sensitive and should not be exposed to users without the appropriate authorization level
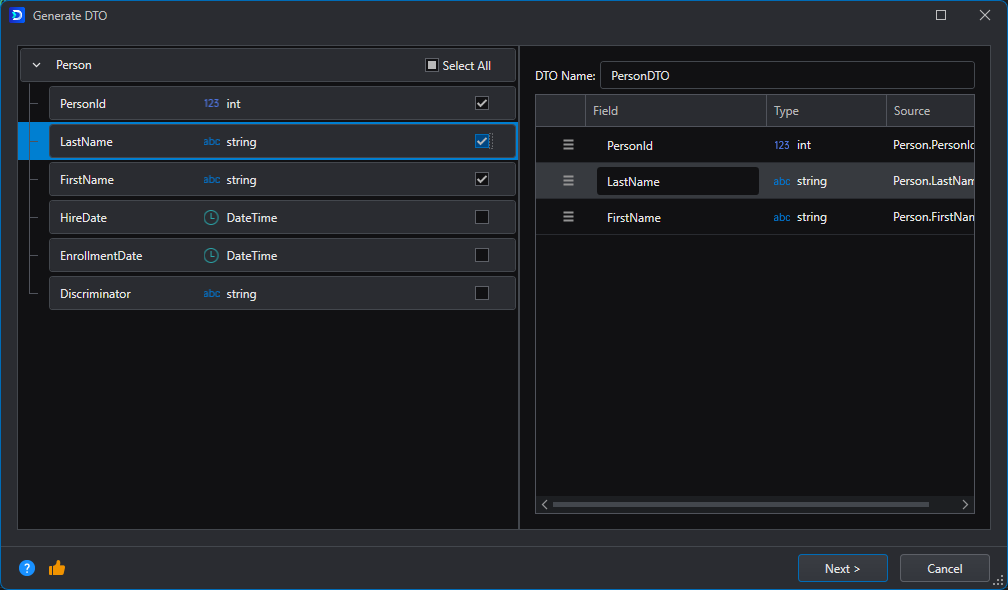
For these cases it's a good idea to implement DTOs (Data Transfer Objects) that copy some of the Entity's values: only the minimal amount necessary to complete the specific request.
This is a process that can become really repetitive, so EF Core Sidekick also includes a feature to quickly design DTOs from existing entities if you right click on the Entity>EF Core Sidekick>Generate DTO:
After clicking Next you can choose, among other options, if you want to generate a mapper extension class as well, which will save you from having to do this manually:
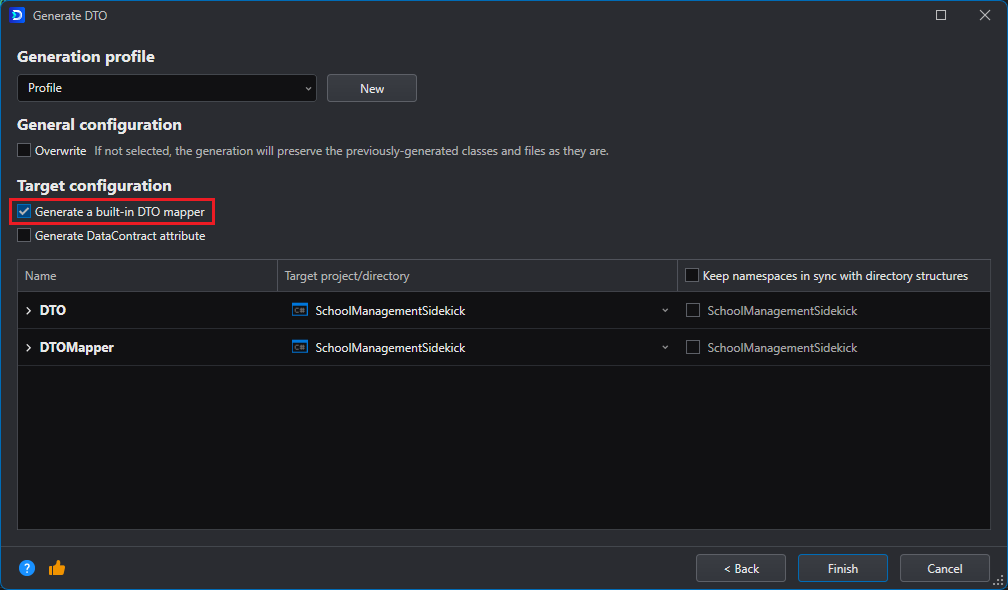
With the DTOs generated, you can integrate them into your controllers by making use of the generated mapper class:
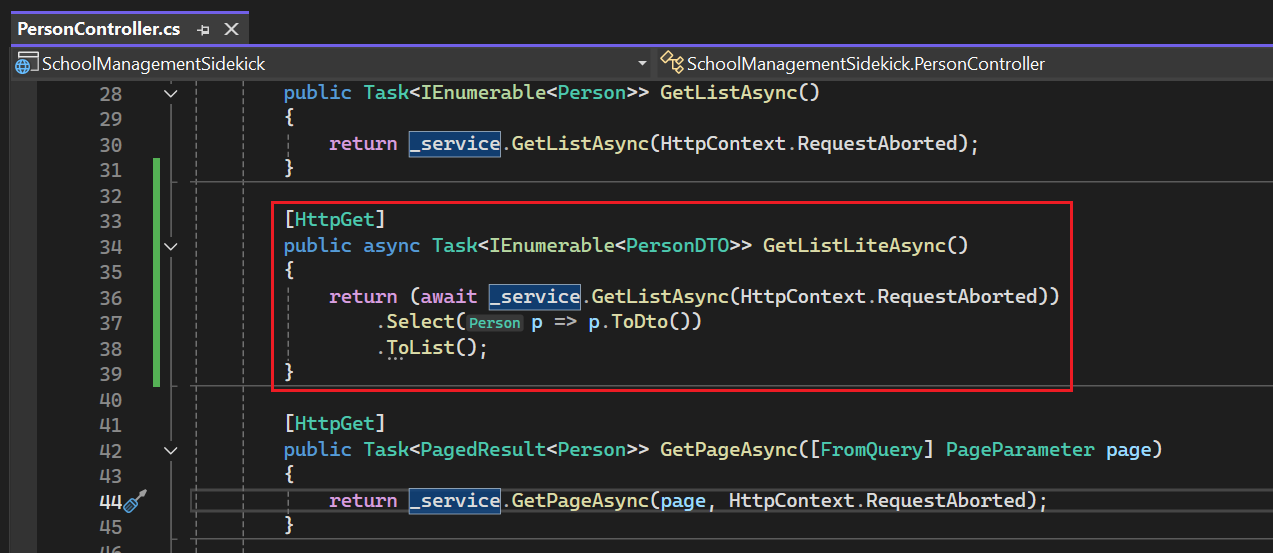
This way DTOs can be easily created. And if you choose to generate a built-in mapper, you'll be able to convert between the Entity and the DTO (and viceversa) with a single function call.
Conclusion & Next Steps
Hopefully by this point, you can see the amount of work that creating the simplest of Web APIs entails, and the benefits that EF Core Sidekick brings to the table. The more tables and complexity the database you're working with has, the more significative the amount of time saved by EF Core Sidekick becomes. Not to mention that this tool does not limit you on what you can do, because once you generate the C# classes from the tables, you are able to make any modifications you see fit; or if you see yourself constantly regenerating the models you can add your custom code into the generation settings so that it's injected every time you run the process.