EF Core Sidekick: Using this extension for auto code generation
Last revised: December, 2025
Introduction
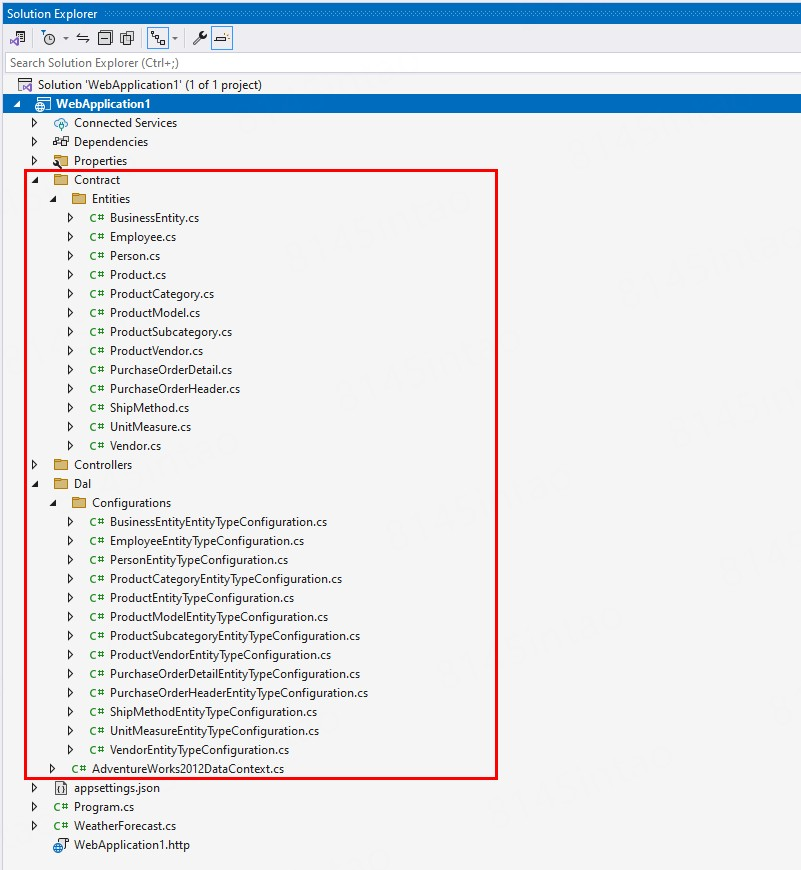
EF Core Sidekick is a Visual Studio extension that enhances the power of auto code generation in Visual Studio. It provides a set of tools and templates for generating EF Core entities and derived DbContext from existing database, and then generating DTOs (data transfer objects), services, and REST APIs from the entities.
The auto code generation process takes place locally (no Internet connection or server is required).
What's New
Version 23.0.0.720
This version of EF Core Sidekick provides the following new feature:
- Supports Visual Studio 2026. Supports Entity Framework Core 10.
- The Generate Services and APIs windows now provides an option to add the logic for recording invocation logs and the Try-Catch clause to catch and wrap exceptions in the generated code.
- When using Entity Framework Core 8 or later versions, the Date datatype from SQL Server is automatically mapped to DateOnly. When using versions prior to Entity Framework 8, a converter is provided to automatically convert between DateOnly and DateTime.
View historical releases.
Installation
Make sure your environment meets the following requirements:
Visual Studio 2022 or Visual Studio 2026 has been installed.
The following workloads are required to install:
- ASP.NET and web development
- Data storage and processing
Visual Studio IDE should NOT be running when installing EF Core Sidekick.
EF Core Sidekick supports the following database connection:
The SnapDevelop IDE can connect to the following database types and versions.
| Database Type | Database Version | Driver |
|---|---|---|
| MySQL Amazon RDS for MySQL Amazon Aurora for MySQL Azure Database for MySQL |
5.6, 5.7, or 8.0 8.0.20 5.6.10a 5.6 |
ODBC |
| Oracle Amazon RDS for Oracle |
12c, 18c, 19c, or 23ai 12.1.0.1 |
Oracle Developer Tools for Visual Studio or ODBC |
| PostgreSQL Amazon RDS for PostgreSQL Amazon Aurora for PostgreSQL Azure Database for PostgreSQL |
10.1, 11.3, 12, 16, or 17 12.3-R 11.6 11 |
Npgsql PostgreSQL Integration or ODBC |
| SQL Server Amazon RDS for SQL Server Azure SQL Database |
2017, 2019, or 2022 2017 14.00.3281.6.v1 Latest SQL Server Engine (as of September 2020 ) |
MicrosoftSqlServerProvider, SqlServerDotNetProvider *, or ODBC |
| SQLite | 3 | VisualStudio.Data.Sqlite or ODBC |
SqlServerDotNetProvider is the official .NET Data Provider for Microsoft SQL Server and is typically installed along with .NET Framework or .NET Core. You can find detailed information on how to install and configure SqlServerDotNetProvider through the following links:
For .NET Framework: https://docs.microsoft.com/en-us/sql/connect/ado-net/sql-server-net-data-provider
For .NET Core: https://docs.microsoft.com/en-us/sql/connect/ado-net/sqlclient-namespace
User Guide
Create entities from an existing database
Step 1: Launch the functionality
There are three methods to access this functionality:
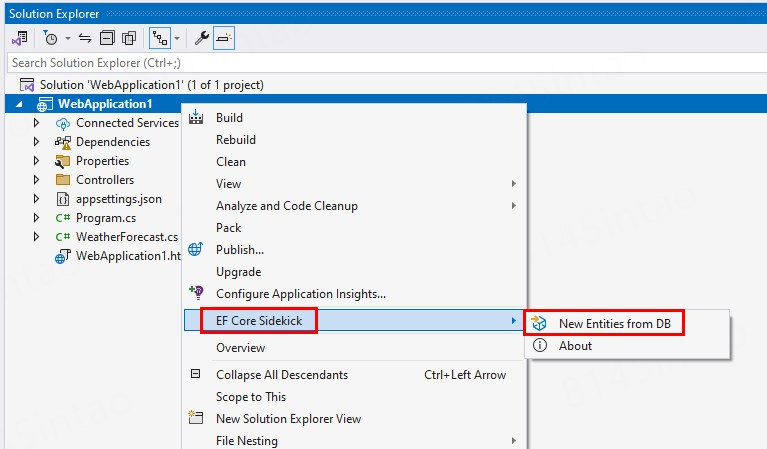
- Select the IDE menu Tools > EF Core Sidekick > New Entities from DB, or
- Right click the project and select EF Core Sidekick > New Entities from DB, or
- Right click the database connection in Server Explorer and select EF Core Sidekick > New Entities from DB.
Step 2: Connect to the database
Right click the project and select EF Core Sidekick > New Entities from DB.
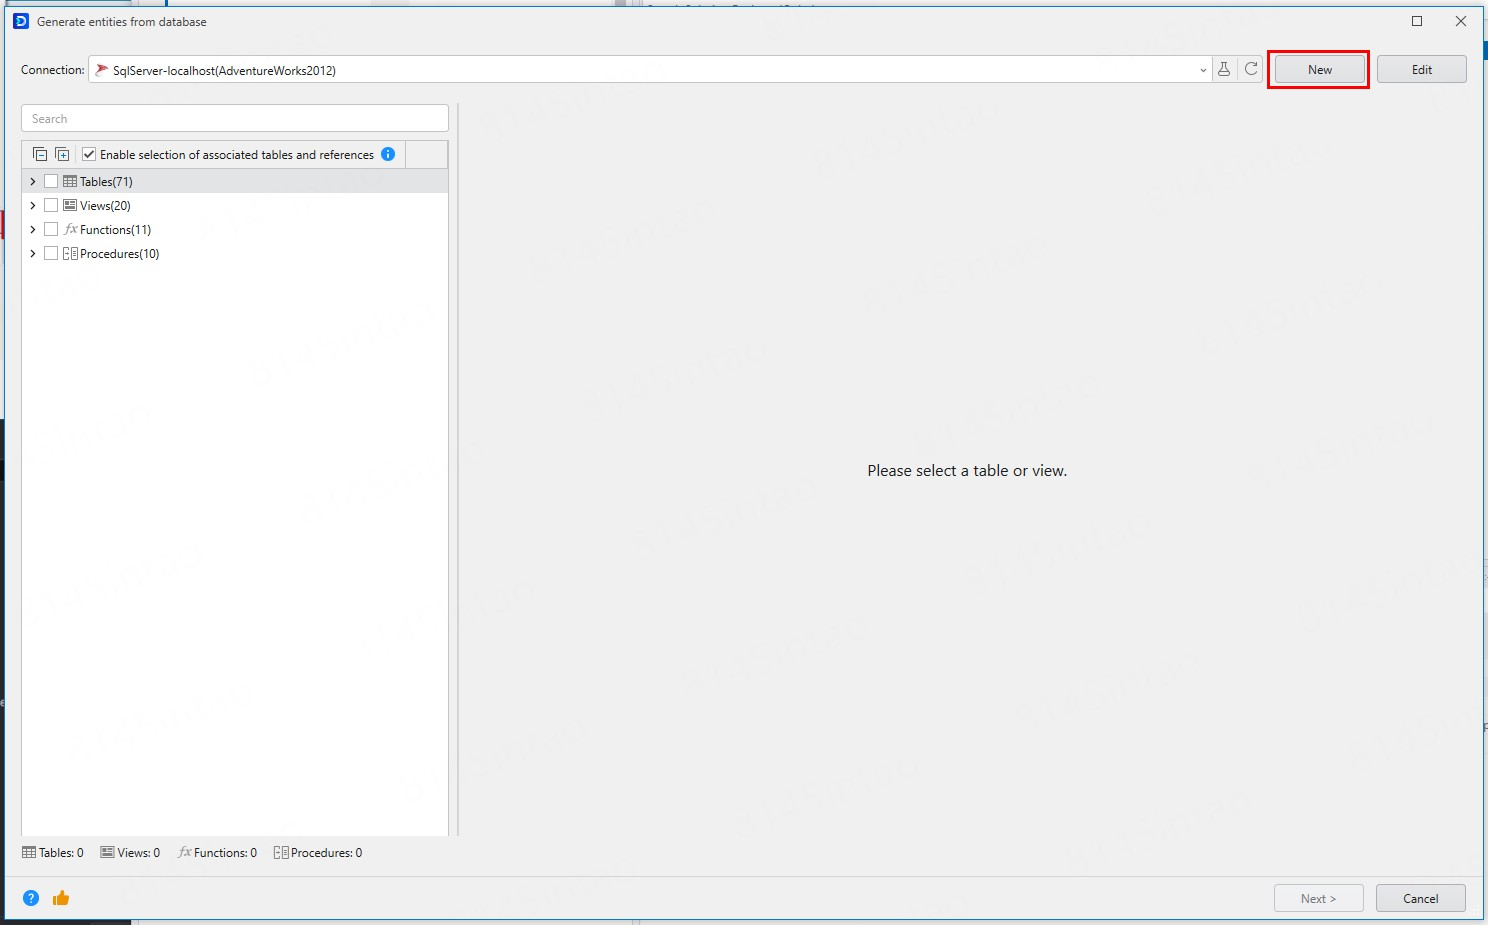
Click New to create a new database connection.
In the Connection Properties dialog that displays, specify the connection information for the database.
The following takes SQL Server database as an example. For more information about connecting to the SQL Server database, refer to https://learn.microsoft.com/en-us/visualstudio/data-tools/add-new-connections?view=vs-2022.
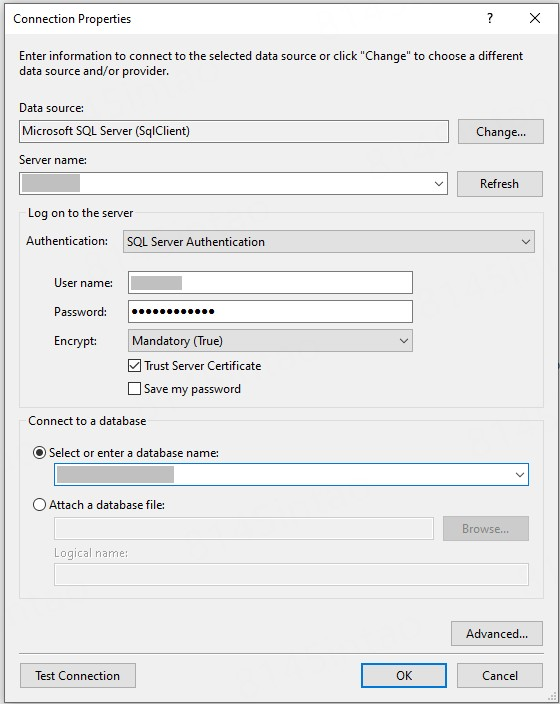
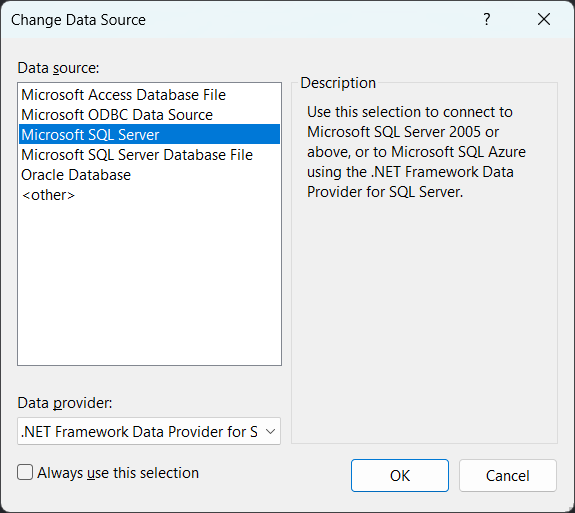
The Data source field indicates the database type and the data provider to be used for the connection. You can change this by clicking the Change button and then selecting a different data source and data provider. You will need to install the data provider beforehand.
After you specify the connection properties in the Connection Properties dialog, click Test Connection to make sure the database connection is successful.
Step 3: Select tables, views, or functions
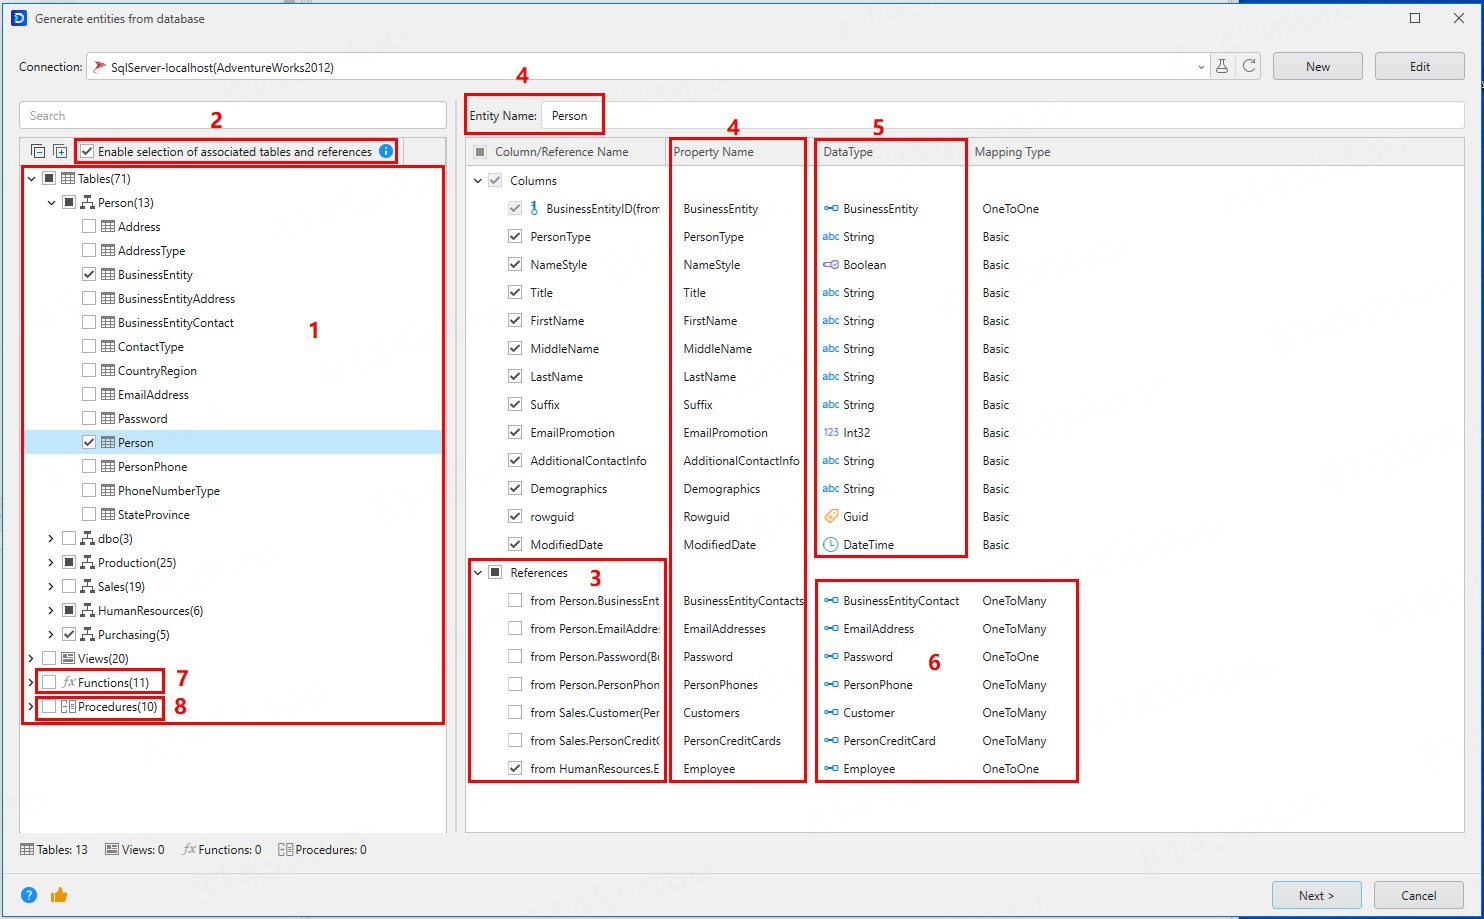
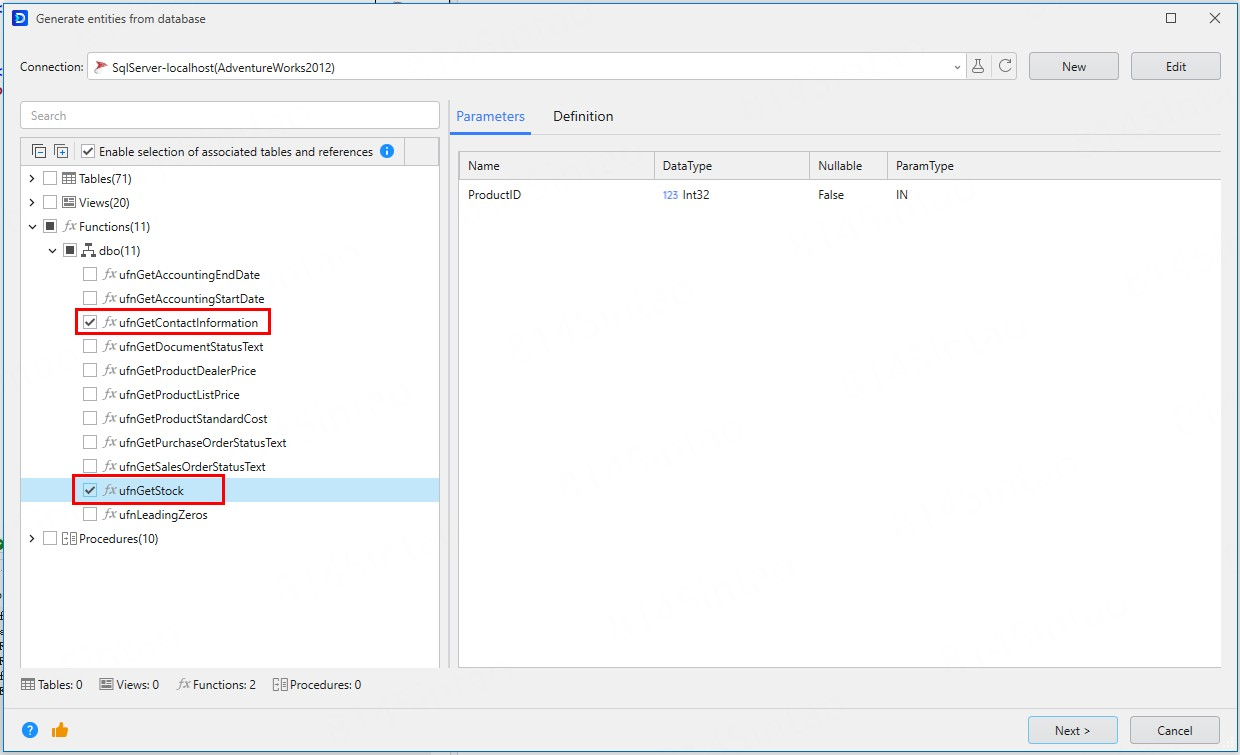
After creating the database connection, you can select it in the Generate entities from database window, and then you can select one or more items (tables, views, functions, and/or stored procedures) from the database (①). If the list is long, you can search for the name of the item. If you have created entities before from the same database connection, the last selected items will be still selected for easy selection.
The Enable selection of associated tables and references option (②) is selected by default, so when you select a table, the tables that are referenced by the selected table (so called referenced tables) will be automatically selected and the reference relationship will be displayed in the DataType and Mapping Type columns (⑥).
The tables that make references to the selected table (so called referencing tables) are not selected. When the Enable selection of associated tables and references option is selected, the referencing columns will be visible in the References section (③), if you manually select the referencing columns in the References section, the corresponding referencing tables (and the referenced tables of these tables) will be automatically selected.
You can change the default name for the entity and/or property (④) when necessary.
You can view the data type of each field (⑤), and the relationship of tables (⑥).
You can select the user defined function (⑦) in the database and generate a DataContext function with the same name. For more information, refer to Generate the database functions.
You can also select the stored procedure (⑧) in the database.
Click Next to proceed.
Step 4: Specify the generation settings
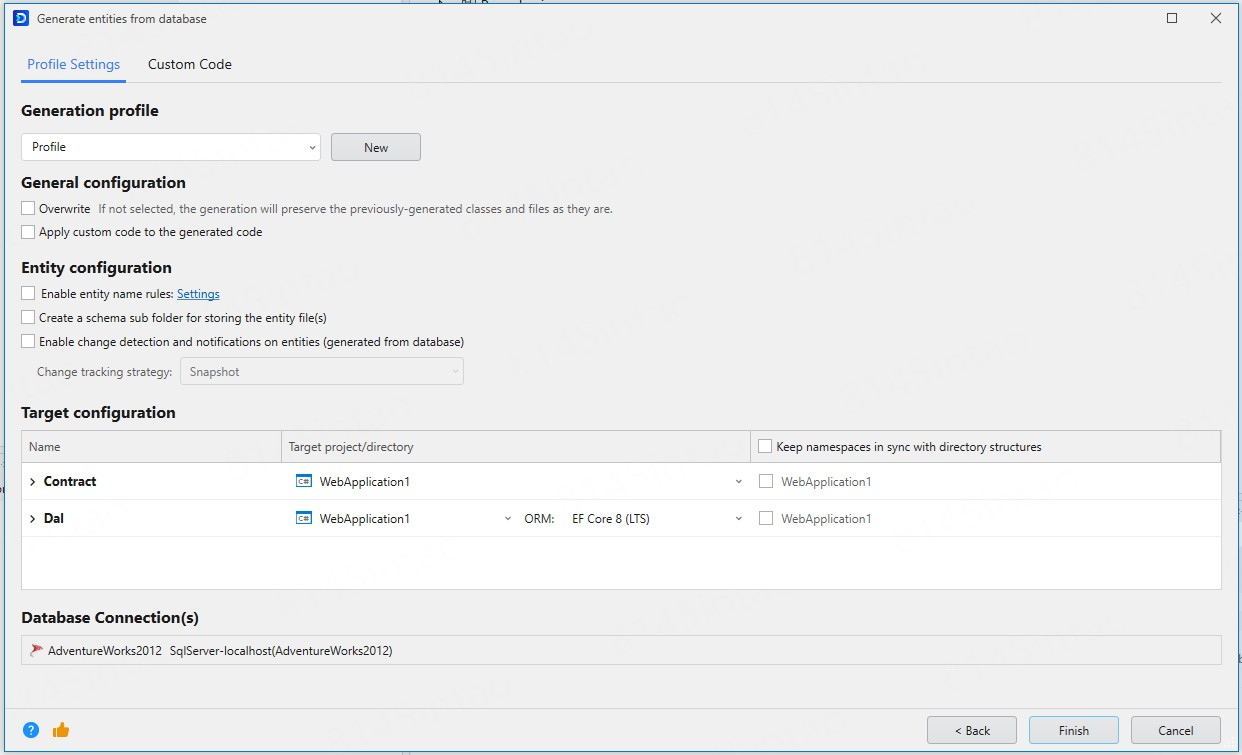
After you select the tables, views, functions, and/or stored procedures, you can specify settings for the entity generation and the custom code.
Profile Settings
In the Profile Settings tab, you can select an existing generation profile or click New to create a new profile.
General configuration
- Overwrite: Overwrites the existing files with the same file names.
- Apply custom code to the generated code: When this option is selected, you can configure and add the custom code in the Custom Code tab.
Entity configuration
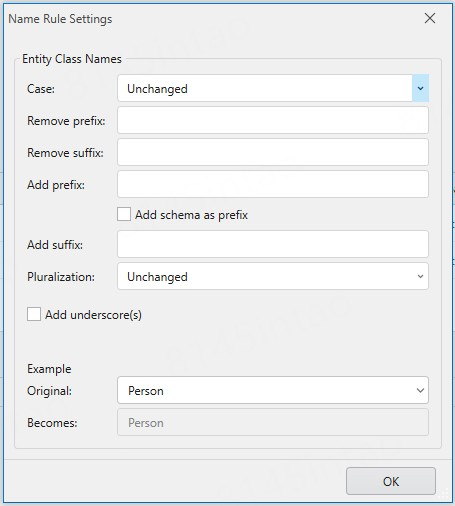
Enable entity name rules: Configure the naming mapping rules between entity classes and database objects, so that the generated code conform to your project naming specifications or database naming conventions to improve development efficiency.
- Case: Control the case of letters in the file name: first letter capitalized, all lowercase, or all uppercase.
- Remove prefix: Remove the specified prefix from the name. For example: for table name "tbl_Product", removing the prefix "tbl_" results in the generated name "Product".
- Remove suffix: Remove the specified suffix from the name. For example: for table name Customer_tbl, removing the suffix "_tbl" results in the generated name "Customer".
- Add prefix: Add a custom prefix to the name. For example: for table name "Order", adding the prefix "App_" results in the generated name "App_Order".
- Add schema as prefix: Add the schema name as the prefix of the file name. For example, "dbo_Order" contains the schema prefix "dbo_" and "Order" does not contain the schema prefix.
- Add suffix: Add a custom suffix to the name. For example: for table name "User", adding the suffix "Entity" results in the generated name "UserEntity".
- Pluralization: Convert the file name to plural or singular form.
- Add underscore: Separate compound words with underscores. For example: "username" is generated as "user_name".
Create a schema sub folder for storing the entity file(s): A folder will be created using the name of the schema and the entities will be stored in this folder.
Enable change detection and notifications on entities (generated from database): Able to track changes made to entities generated from database tables, by using the following change tracking strategy:
SnapShot
ChangedNotifications
ChangingAndChangedNotifications
ChangingAndChangedNotificationsWithOriginalValues
For differences about these strategies, refer to https://learn.microsoft.com/en-us/ef/core/change-tracking/change-detection.
Target configuration
You can specify where the files will be generated, and which namespace will be used.
You can modify the relative output path where the files will be generated.
For Dal (data access layer), you can also specify the ORM (EF Core is supported currently).
Database Connection(s)
Database connections will be shown here. If there are multiple connections in the project, then more than one connection will be shown here.
Custom Code
For more, refer to Custom Code.
Step 5: Generate entities
Click Next to generate the entity files.
After entities are generated successfully, you will need to copy the scripts from the screen to inject the database context in Program.cs and add connection string in appsettings.json file respectively. Modify the connection string according to your database information.
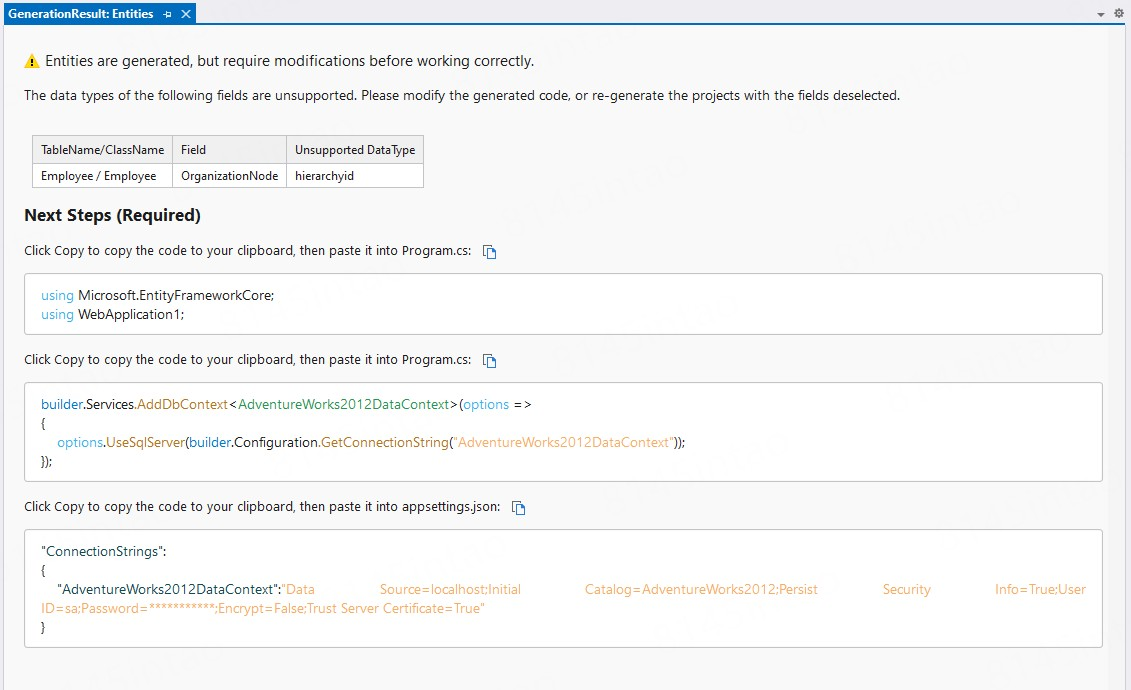
After the files are generated successfully, they will be listed under the project.
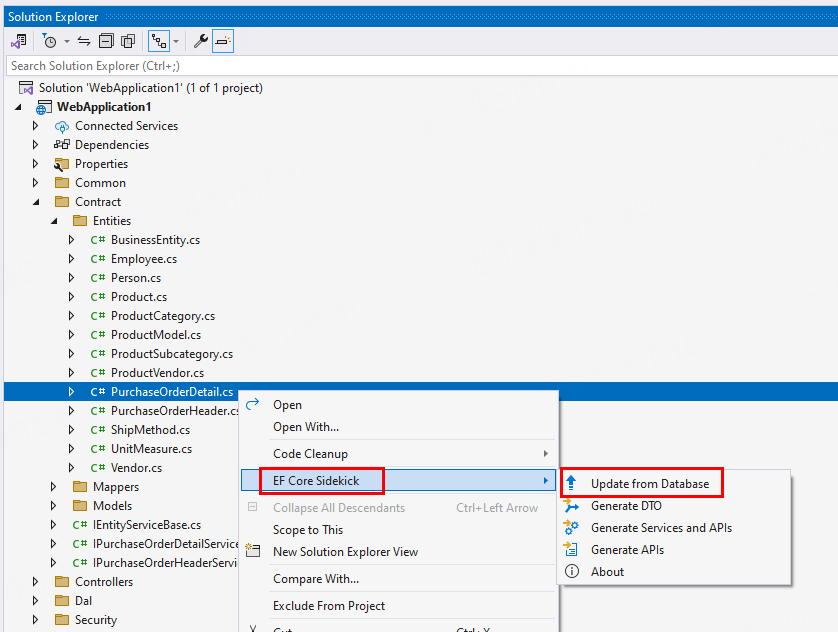
Step 6: Update entities
After generating the entity files, for entities that were generated from tables or views, if there are any updates to the tables or views , you can right-click on the entity files, select EF Core Sidekick > Update from Database to update them.
On the upper part of the Update entity from database window, you can see the current Connection Name (①), the current Table Name (②), and the current Entity/Class Name (③). On the lower part of the window, the left side shows the the latest data of the table (or view) in the database and the right side shows the data that will be contained in the updated entity file based on the columns selected. Any modifications you have previously made to the entity file will be remained.
You can click the Delete icon to remove fields from the entity file as needed. The updated entity file will no longer contain the fields you delete. Primary key and foreign key columns cannot be deleted, and their delete icons are grayed out.
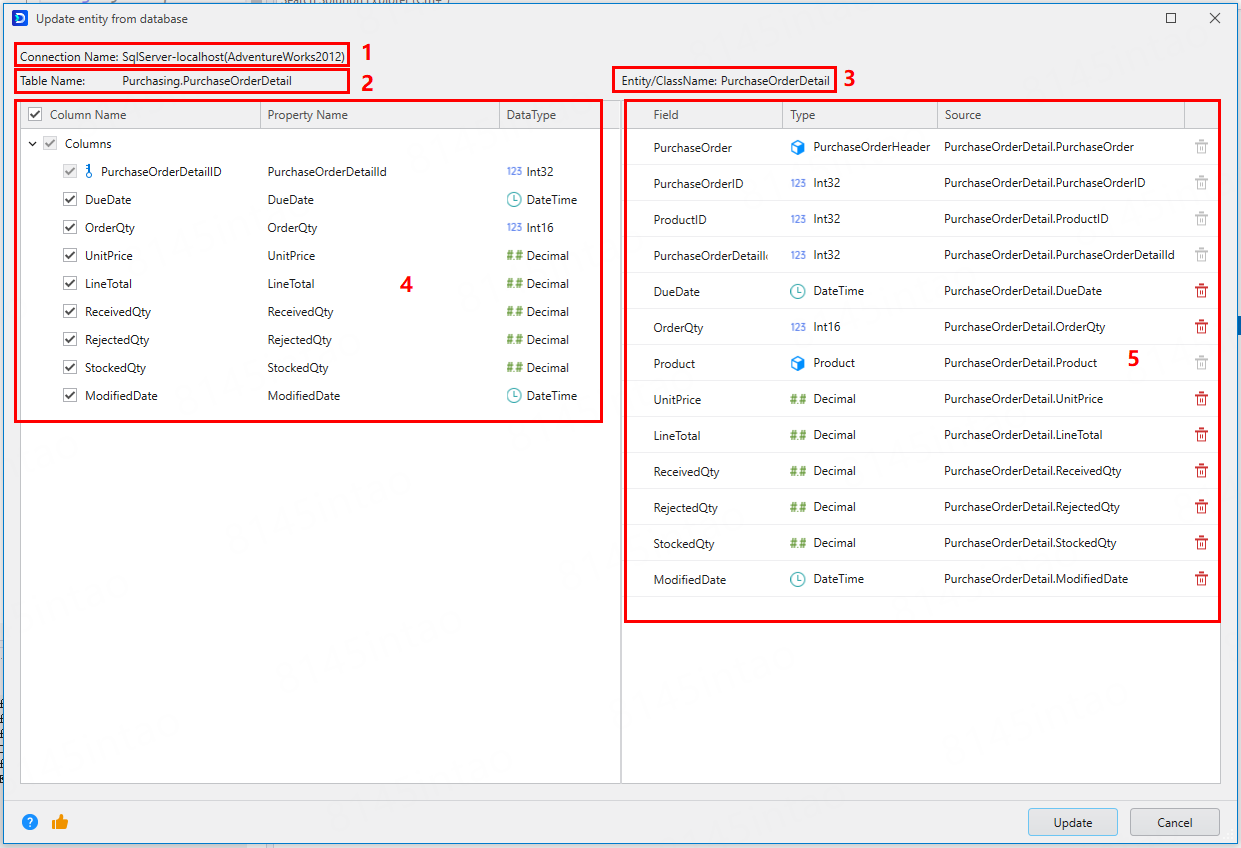
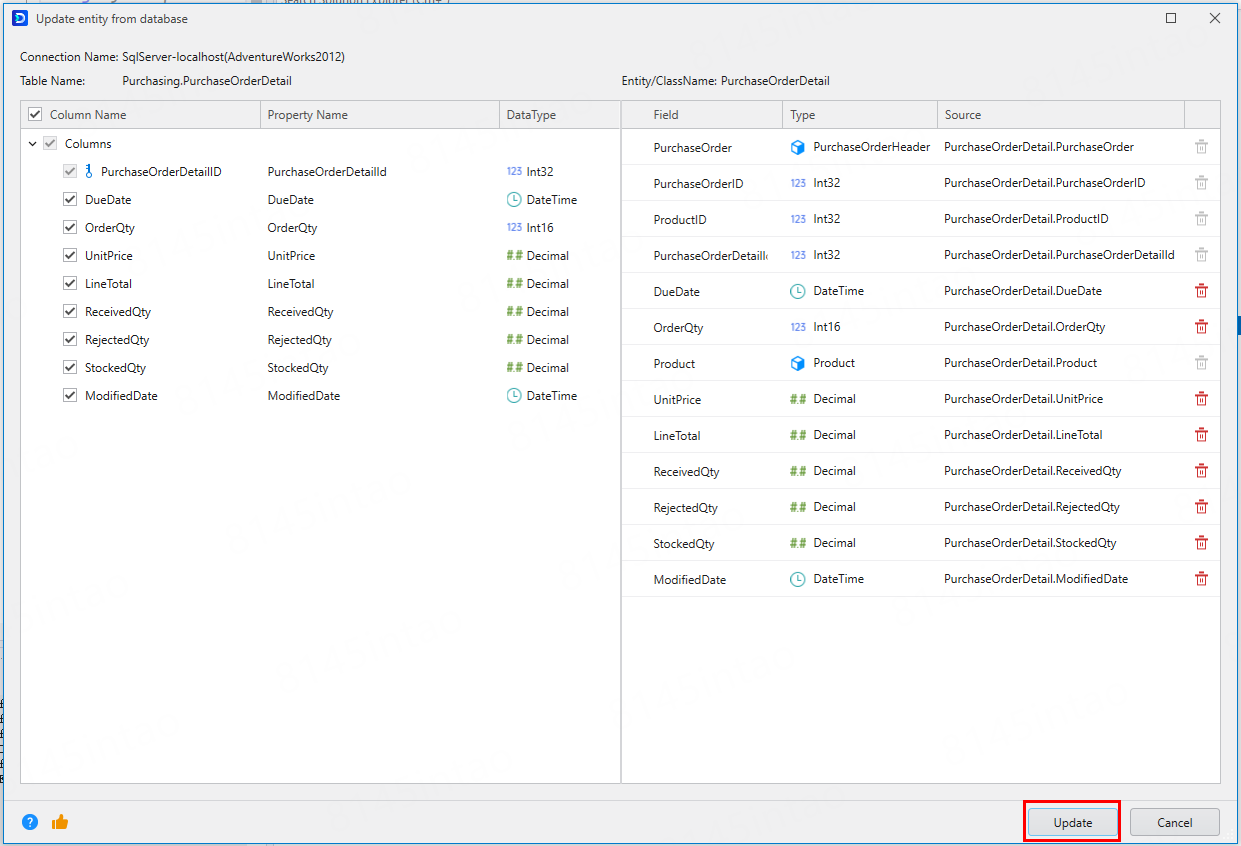
Click the Update button to update the entity file.
Only entities that were generated from tables or views by using EF Core Sidekick are supported to be updated. You can update the entity files one by one as needed by referring to the instructions above.
Generate the database functions
The user defined functions in the database can be generated as DataContext functions with the same name. For more about the user-defined functions, refer to https://learn.microsoft.com/ef/core/querying/user-defined-function-mapping.
Currently, the following two types of functions are supported: scalar-valued function and table-valued function.
Select one or more user-defined functions.
You can view the parameters and definition of the function on the right.
A DataContext.Functions.cs file will be generated under Dal/DataContext.cs.
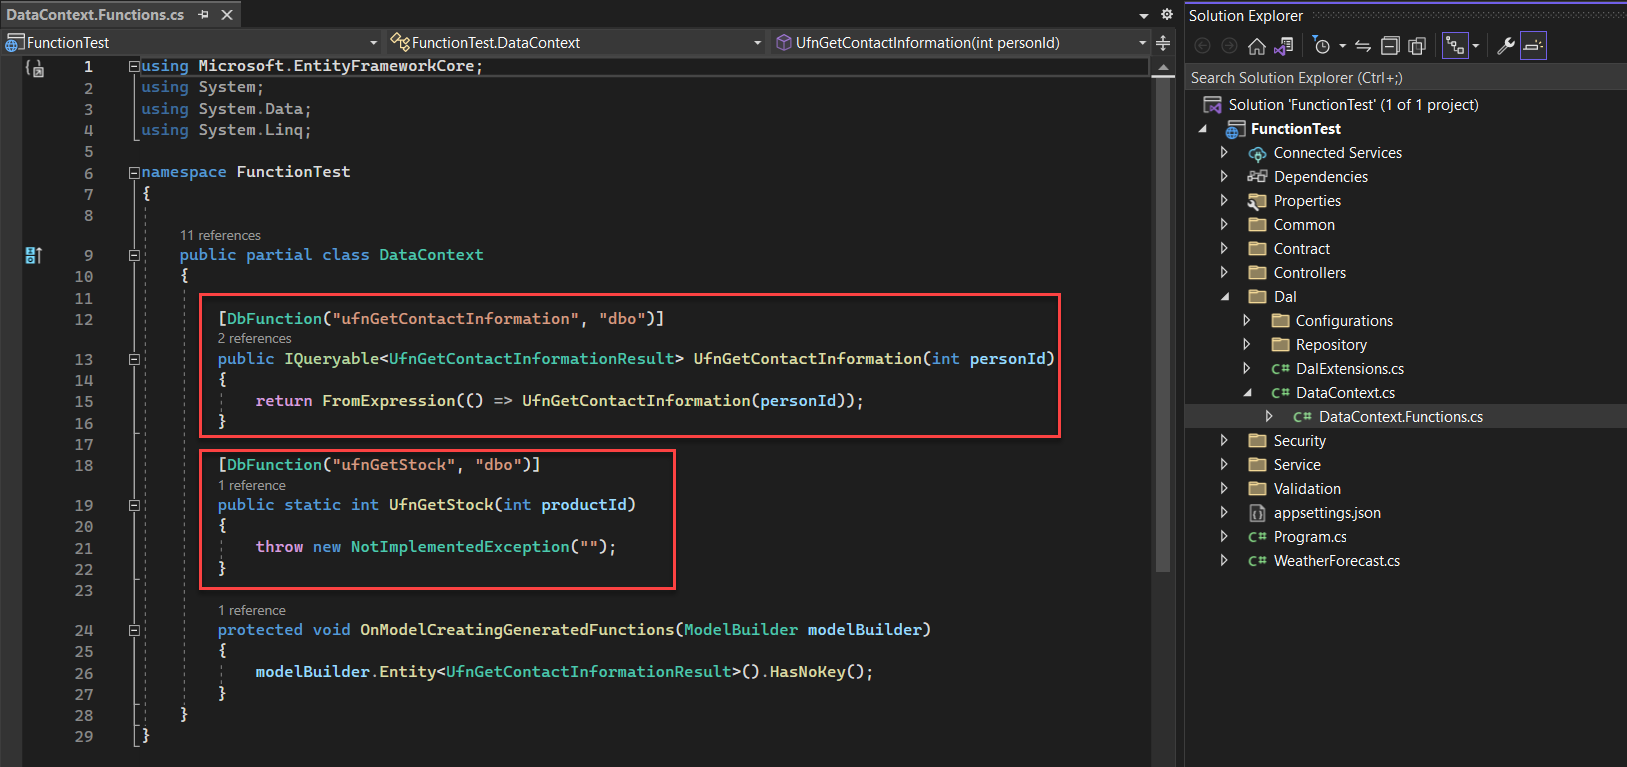
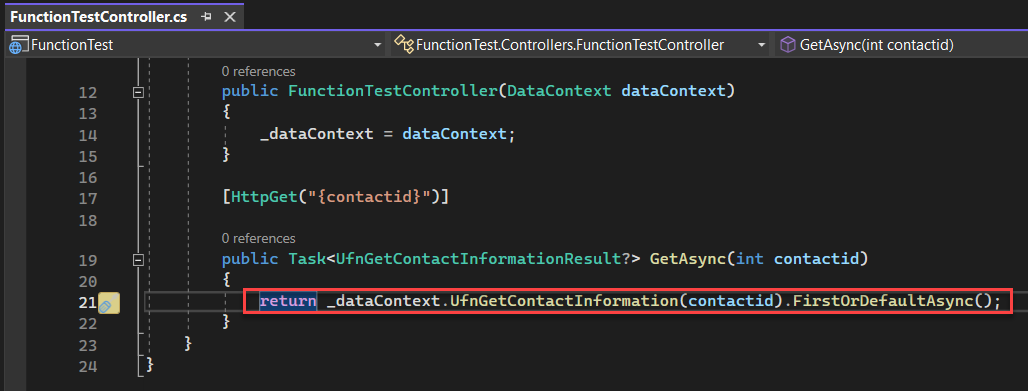
You can now call the function.
For example, you can call a scalar-valued function with the following scripts:
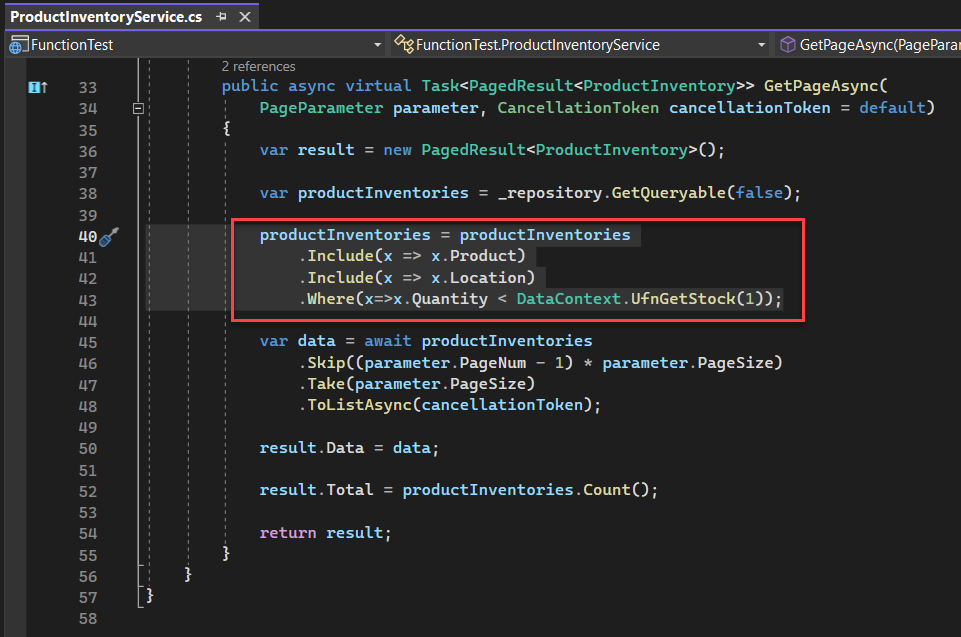
You can call a table-valued function with the following scripts:
Generate DTO
You can generate DTO (Data Transfer Object) from entities.
Step 1: Launch the functionality
There are two methods to access this functionality:
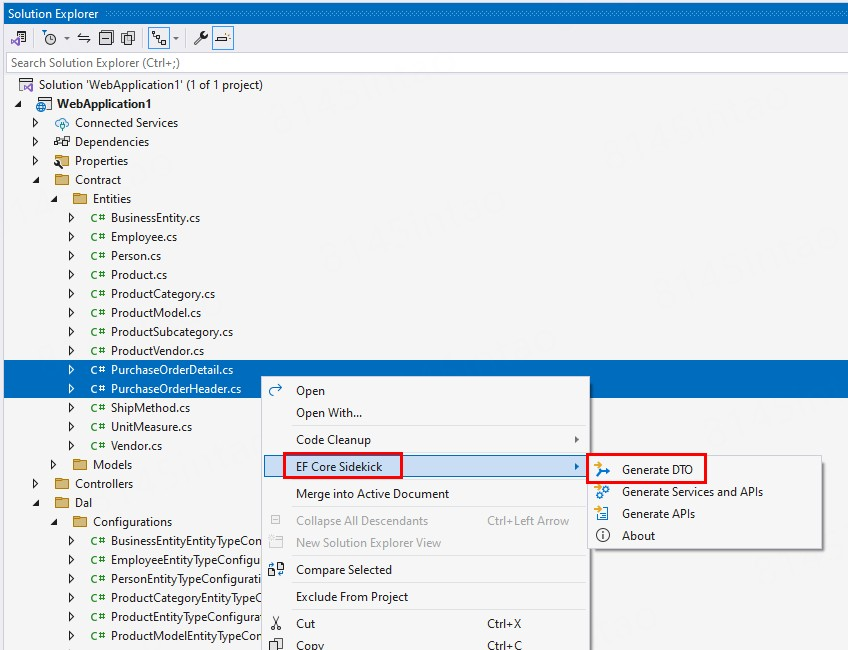
- Select one or more CS files and then right click and select EF Core Sidekick > Generate DTO, or
- Right click in the script editor of the CS file and select EF Core Sidekick > Generate DTO.
Step 2: Select fields
Select one or more entities and then right click and select EF Core Sidekick > Generate DTO.
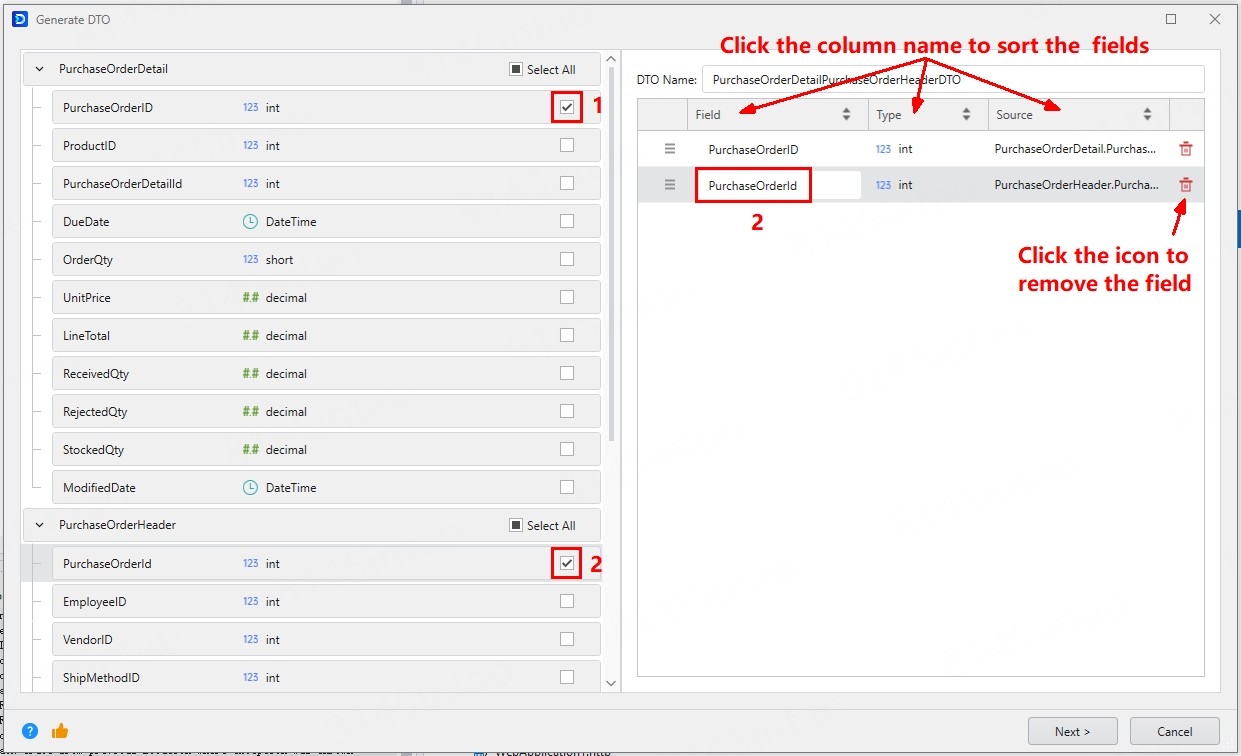
Select which fields (①) to be included in the DTO. You can modify the field names (②) in the DTO.
Step 3: Specify the generation settings
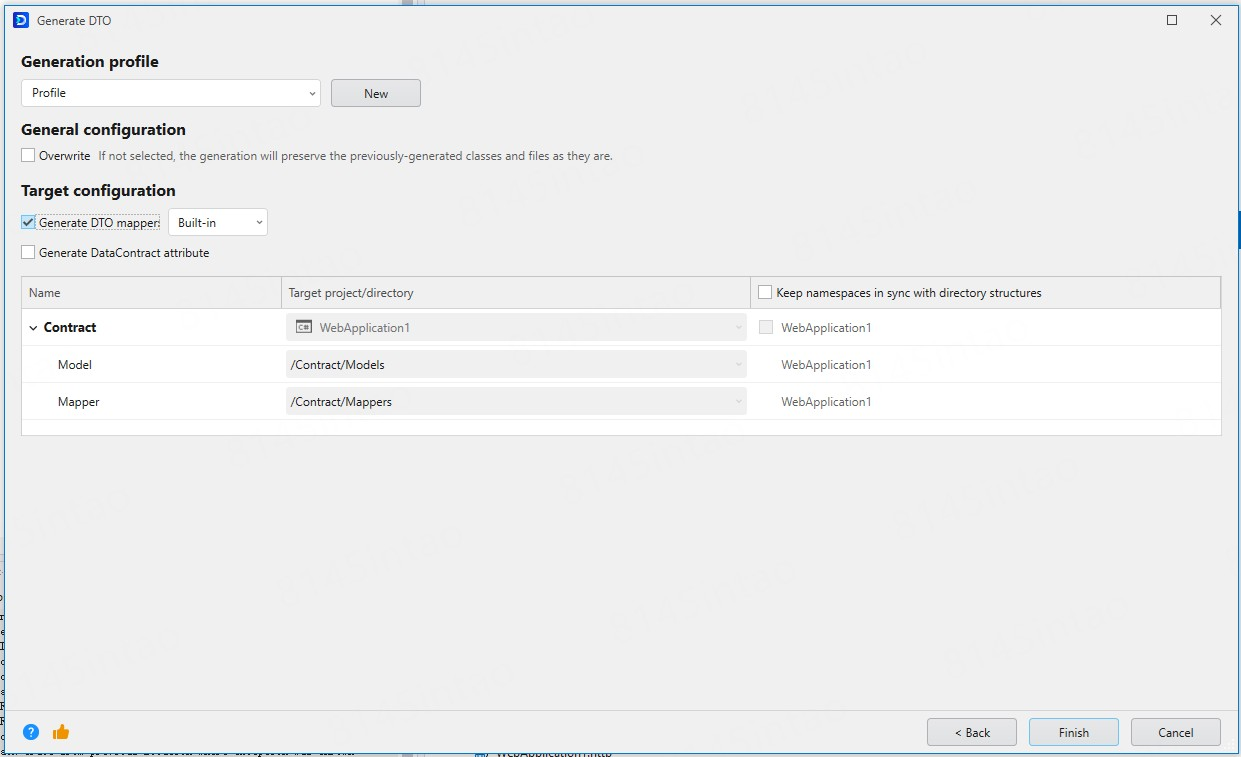
Specify settings for the DTO generation. You can select an existing generation profile or click New to create a new profile.
General configuration
- Overwrite: Overwrites the existing files with the same file names.
Target configuration
- You can specify whether to generate files for a built-in DTO mapper. You can select from the following options in the dropdown box:
- Built-in: Generate DTOs using the built-in conversion template. Suitable for: Scenarios where multiple Entities generate multiple DTOs, or where complex field-mapping logic is involved.
- AutoMapper: Use an AutoMapper configuration file to register mapping rules through mapping configurations. Suitable for: Scenarios where a single Entity corresponds to a single DTO.
- You can specify whether to generate the
DataContractattribute in the DTO file. - You can specify where the files will be generated, and which namespace will be used.
- You can modify the relative output path where the files will be generated.
Step 4: Generate DTO
Click Finish to generate the files.
After the DTOs are generated successfully, you can follow the instructions on the screen to convert between DTOs and entities using a third-party mapper.

Generate services and APIs from an entity
After the entity files are generated successfully, you can generate services and APIs from the entity.
Step 1: Launch the functionality
There are two methods to access this functionality:
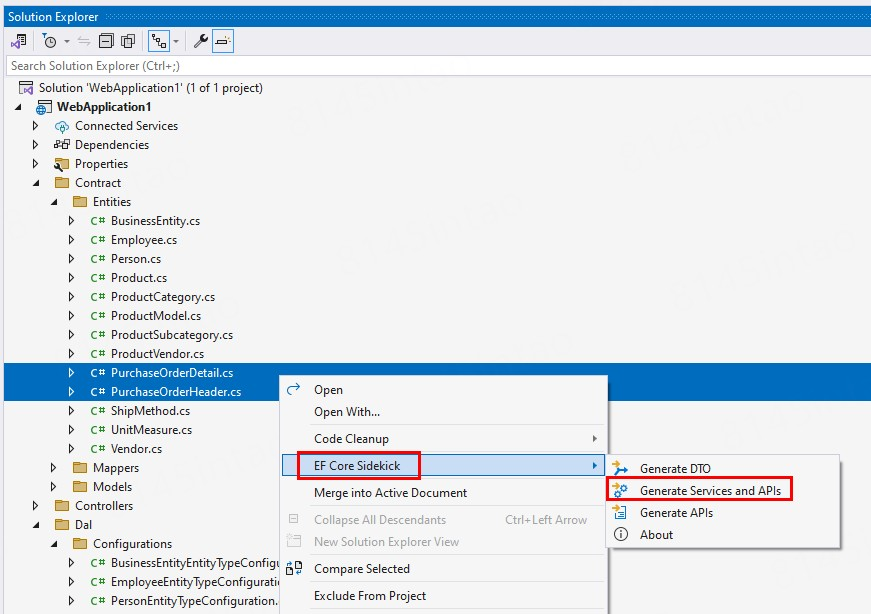
- Select one or more CS files and then right click and select EF Core Sidekick > Generate services and APIs, or
- Right click in the script editor of the CS file and select EF Core Sidekick > Generate services and APIs.
Step 2: Configure the services and APIs
Select APIs
Select one or more entities and then right click and select EF Core Sidekick > Generate services and APIs.
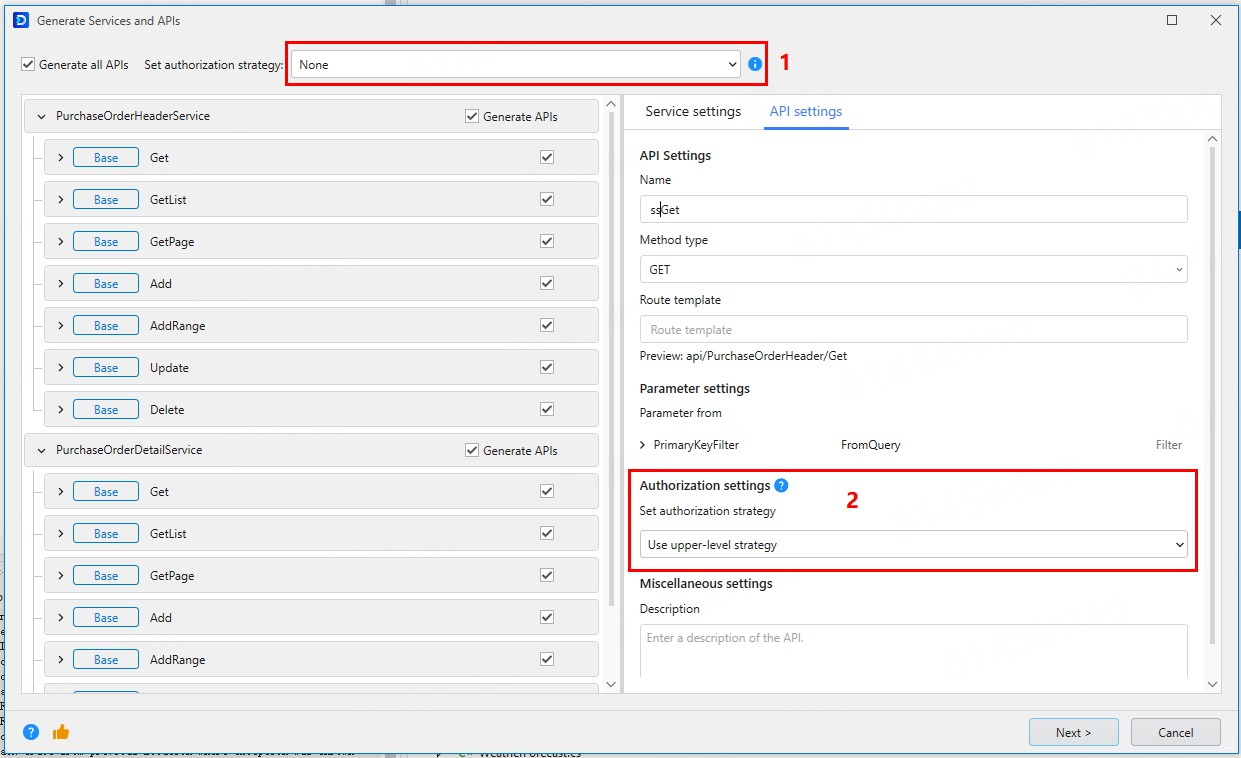
In the Generate services and APIs window, Generate all APIs (①) is selected by default which means APIs will be generated for all base services. You can also select Generate API (②) to generate API for the particular service(s) only.

Configure authorization
You can select the authorization strategy for the controller (①) (the upper-level of API), so all APIs will by default use this strategy. You can also select different strategy for each API in the API Settings page (②).
For controller, you can select one of the following basic authorization strategies: None, Use application default strategy, Use anonymous strategy, or use other custom policies.
None: Use no authorization strategy:
Use application default strategy: Uses the default strategy configured for the application.
Use anonymous strategy: Uses the anonymous access strategy. Anonymous access allows requests to go through without authentication.
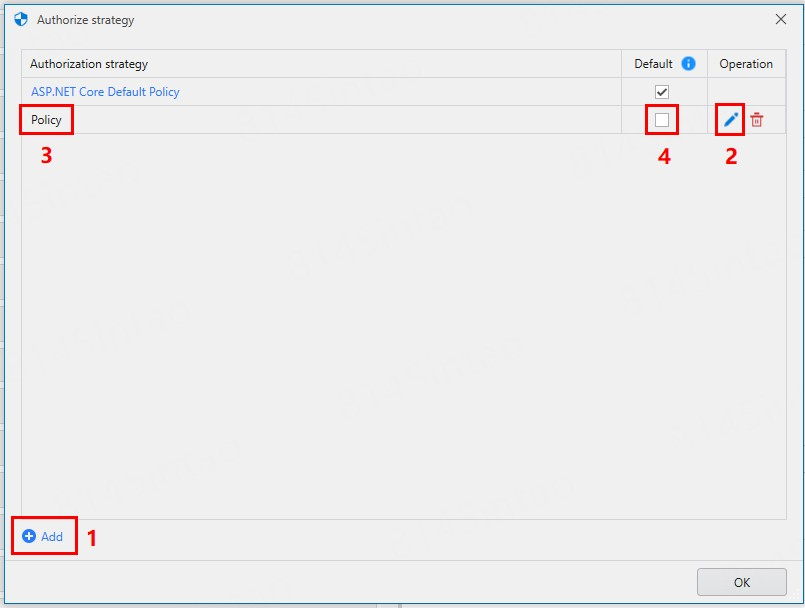
To add a new custom policy, you will need to write codes and implement the policy first, and then add the policy here, by selecting New Strategy at the bottom of the strategy list box.
In the Authorize strategy dialog box, click Add (①) to add a policy and then click the Rename icon (②) to change the default name to the actual policy name (③), or select it as the default policy (④).
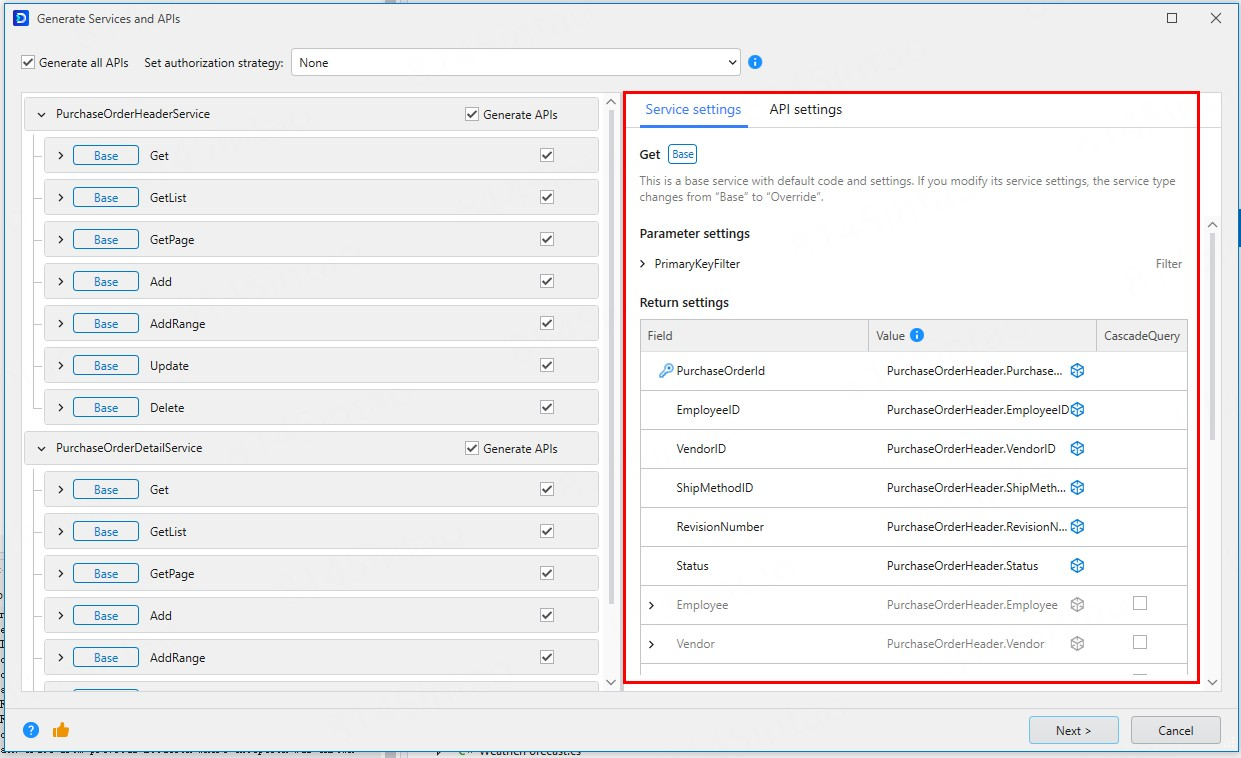
Configure service
You can configure the settings for each service in the Service settings tab.
Parameter settings
Lists the request parameters of the service.
Sort settings
(For GetList and GetPage) Click Add sort option to sort the data in the database. You can select a field or input an expression and then specify to sort by ascending or descending order.
Assignment settings
(For Add, AddRange, and Update) You can set values for fields. You can select a field or input a value or expression.
Return settings
(For Get, GetList and GetPage) Specify the return value of each response field of the service. You can select a field or input a value or expression.
(For Add, AddRange, Update, and Delete) List the return value of the service.
Sorting the return data
(For GetList and GetPage) Click Sort sources to select an entity and then click Add sort option to select a field or input an expression to sort the data.
Description: The description of the service.
Configure API
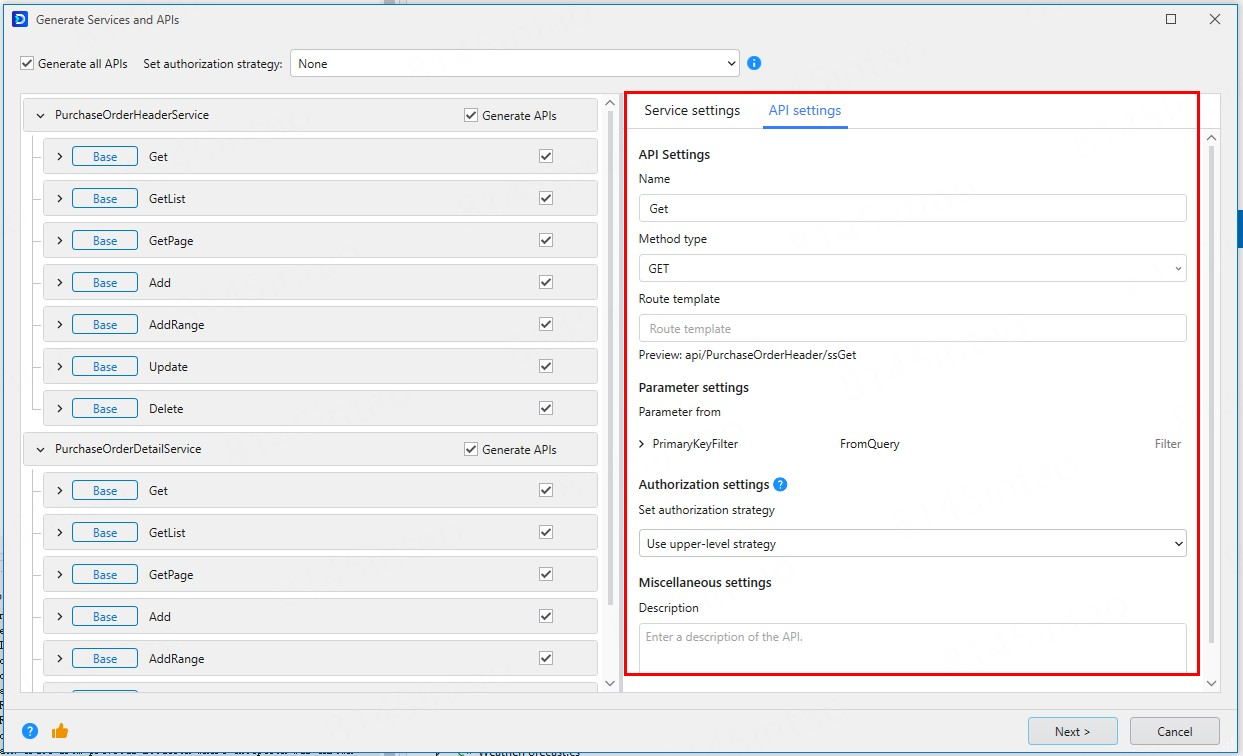
You can configure the setting for each API in the API settings tab.
Name: The name of the API.
Method type: The default method type of the API.
Route template: Specify the route template, for example, api/[controller]/[action].
Parameter settings
You can select to get parameters from the following: FromQuery, FromRoute, FromForm, FromBody, or FromHeader.
FromQuery: Binds parameters from the query string.
FromRoute: Binds parameters from the request route.
FromForm: Binds parameters from the form data in the request body.
FromBody: Binds parameters from the request body.
FromHeader: Binds parameters from the request header.
Authorization settings: For the current API, you can select one of the following basic authorization strategies: Use upper-level strategy, Use application default strategy, Use anonymous strategy, or use other custom policies.
Use upper-level strategy: Uses the upper-level strategy. For an API, the upper-level is controller. By default the API will use the strategy that is selected for the controller.
Use application default strategy: Uses the default strategy configured for the application.
Use anonymous strategy: Uses the anonymous access strategy. Anonymous access allows requests to go through without authentication.
Description: The description of the API.
Click Next to proceed.
Step 3: Specify the generation settings
Profile Settings
In the Profile Settings tab, specify settings for the services and APIs generation. You can select an existing generation profile or click New to create a new profile.
General configuration
- Overwrite: Overwrites the existing files with the same file names.
- Apply custom code to the generated code: When this option is selected, you can configure and add the custom code in the Custom Code tab.
- Enable logging and exception handling: When this option is selected, the generated code includes logic for recording invocation logs, which are output to the terminal window when the application is running, and the Try-Catch clause is provided in the generated code to catch and wrap exceptions.
Target configuration
- You can specify where the files will be generated, and which namespace will be used.
- You can modify the relative output path where the files will be generated.
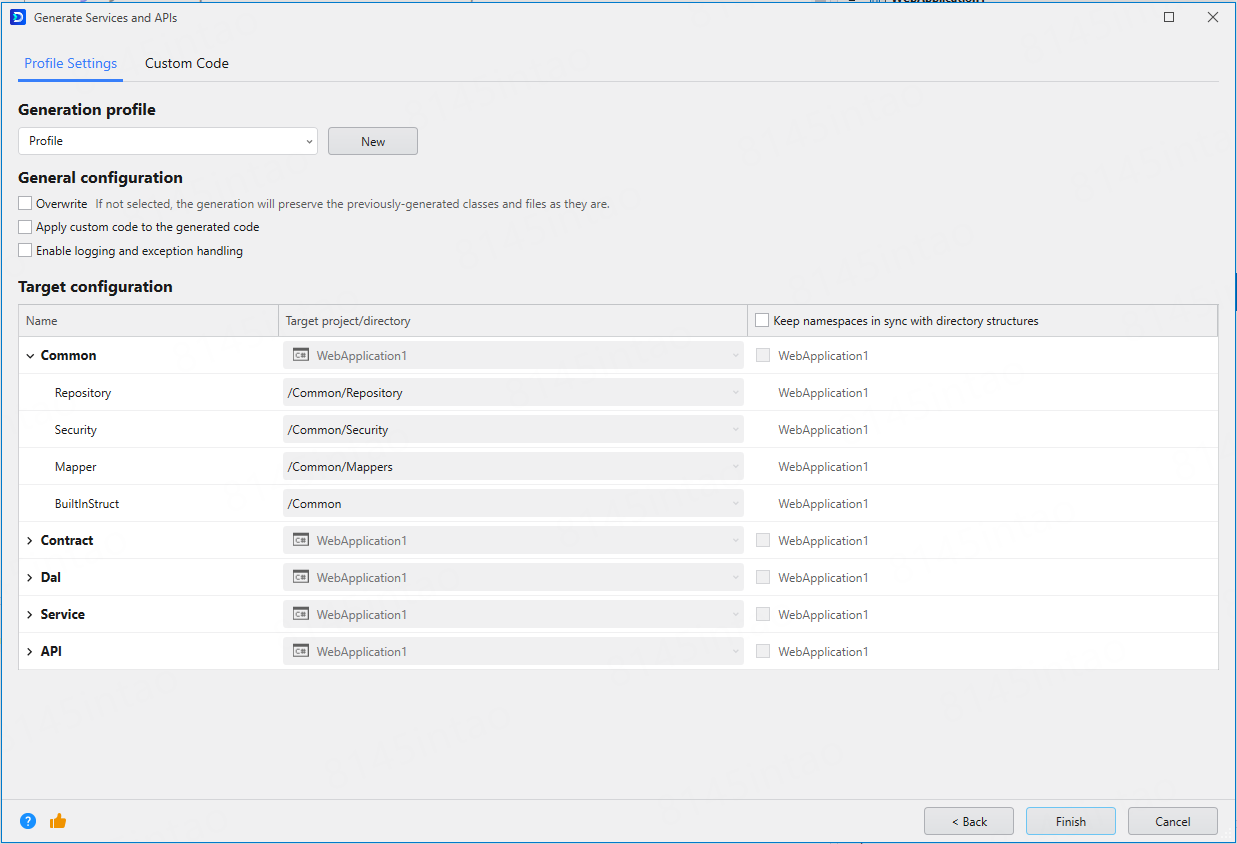
Custom Code
For more, refer to Custom Code.
Step 4: Generate services and APIs
Click Next to generate the files.
After services and APIs are generated successfully, you will need to copy the scripts from the screen to inject the repository and service in Program.cs respectively.
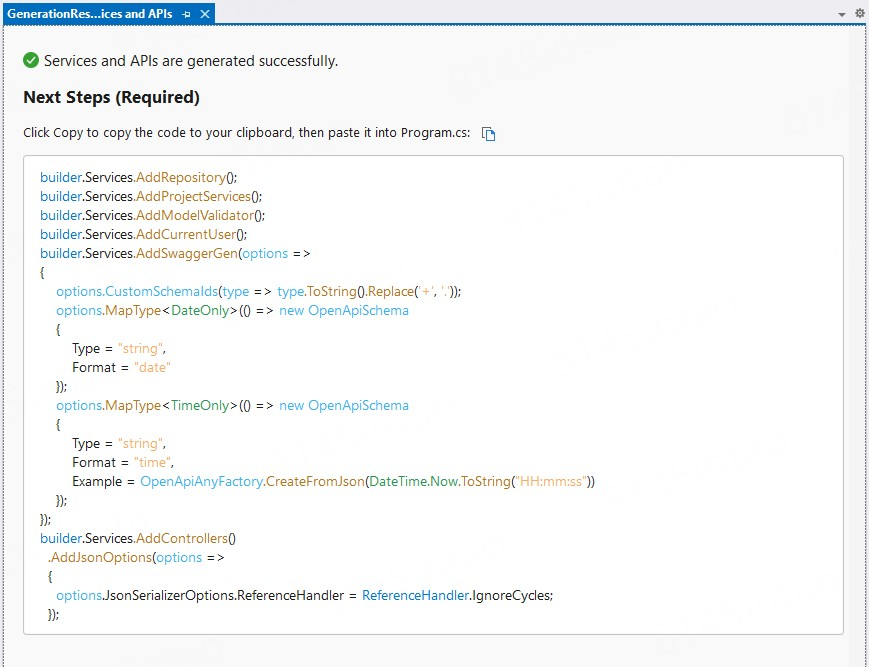
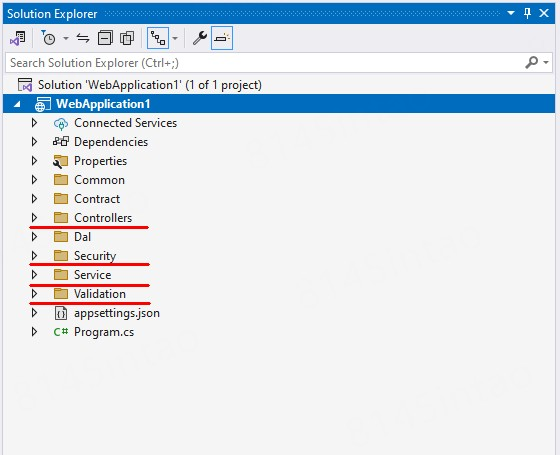
After the files are generated successfully, they will be listed under the project.
Generate APIs
You can also generate APIs only from the controller, implementation, or interface.
There are two methods to access this functionality:
- Select one or more CS files and then right click and select EF Core Sidekick > Generate APIs, or
- Right click in the script editor of the CS file and select EF Core Sidekick > Generate APIs.
Follow the instructions in Configure authorization and Configure API to configure and generate the APIs.
Custom Code
Custom code allows users to modify or add code to the generated code to meet specific needs. For example,
Custom code can address the incompatibility where the generated code from this extension does not perfectly align with the existing project code.
Custom code can also solve the issue of manually written code being overwritten when the project is regenerated. When you directly add or modify code in the project, this code will be overwritten when the project is regenerated. You can use custom code to automatically incorporate this code into the project instead of directly modifying or adding code in the project.
When the Apply custom code to the generated code option in the Profile Settings tab is selected, you can define the custom code settings in the Custom Code tab.
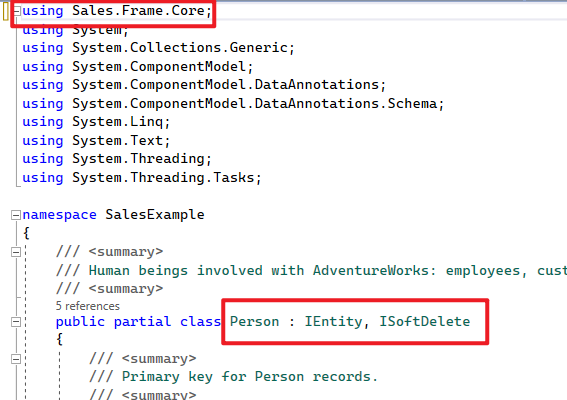
You can change the template for certain code such as Using, inheritance, class attributes, property attributes, method attributes, constructor injection, and code snippet.
For each custom code, you can select the scope where the code will take effect: Entity, Entity Configuration, DataContext, Service, or Controller. If the scope is Entity, you can also specify the criteria for filtering entities, so that only the entities that meet the criteria will apply the custom code.
For Property attributes, you can also specify the criteria for filtering entity fields.
For Constructor Injection, you can also specify the dependencies.
For Code Snippet, you can also specify where to insert the code.
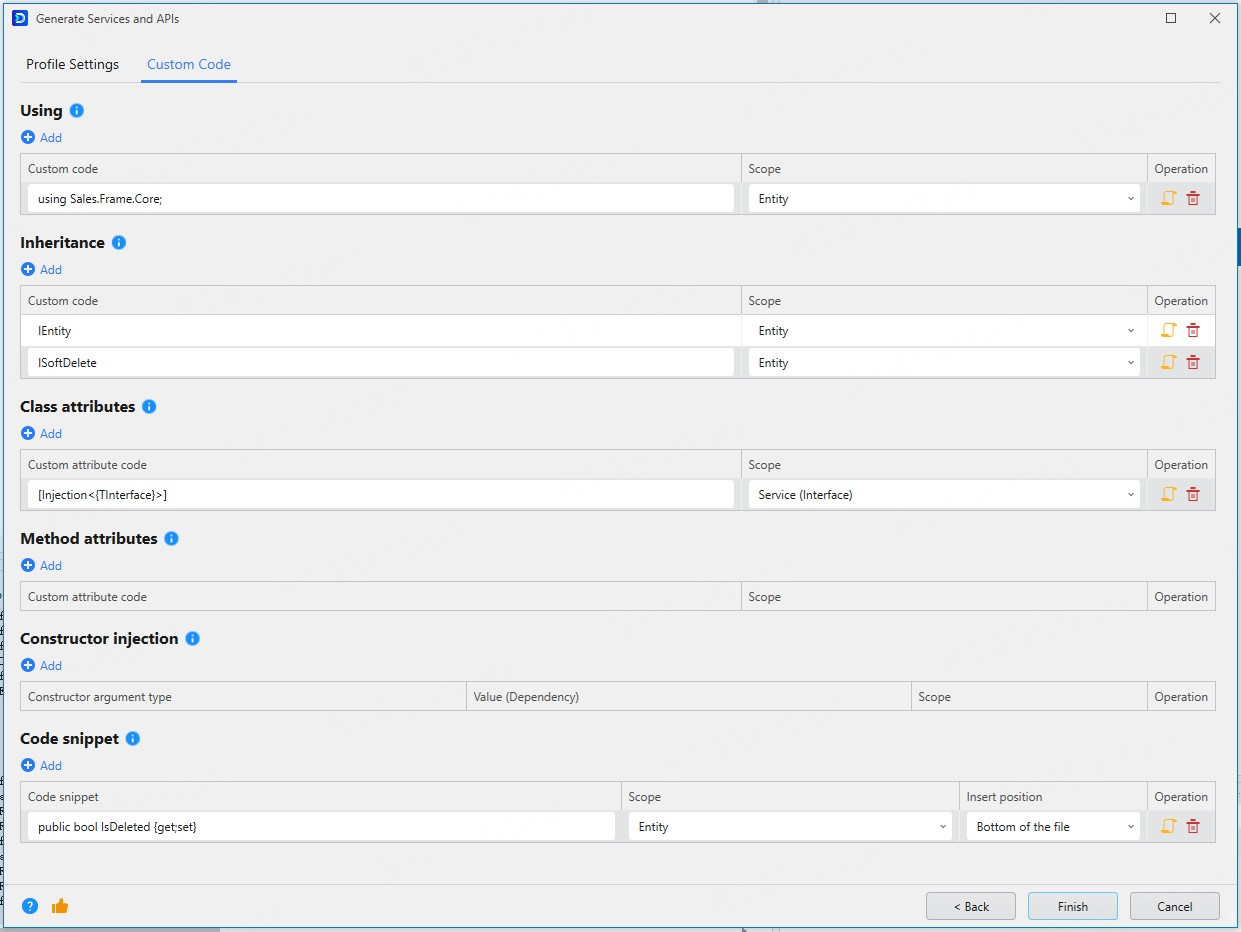
Example 1: The newly generated entity automatically inherits certain interfaces and properties to implement data operations for the entity.
Specify the namespace where the relevant interfaces are located and specify the inheritance of the corresponding interfaces:
IEntity: indicates the need for interaction with the database ISoftDelete: data needs to be logically deleted
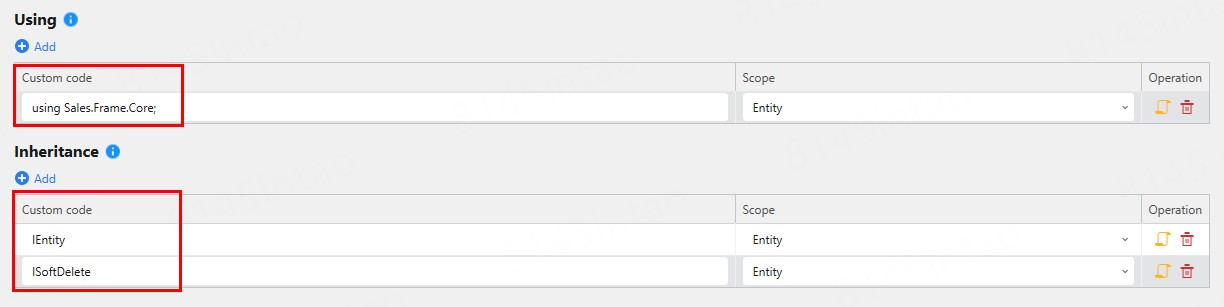
Add the IsDeleted property to each entity:

All newly generated entities will automatically inherit IEntity and ISoftDelete, and have the IsDeleted property added.

Example 2: Automatically inject services
Specify the Injection attribute:

Relevant services are automatically injected.

For more examples, refer to Add custom code in the SnapDevelop documentation.
FAQs
How to add a new field in the generated code
Depending on the field type, the following solutions are recommended:
If you add fields in batches (to each entity), you can add them through custom code. However, you need to synchronize the fields to the database manually;
If you add a new computed field, you can directly modify the generated code without needing to sync with the database;
If you add a new database field, you can add it directly in the database, and then use Update from Database to automatically update the new field to the entity. For more, refer to [Step 6: Update entities](#Step 6: Update entities).
Failed to connect with the MySQL database
When connecting with the MySQL database through the ODBC driver, the following error occurs:
Retrieving database table/view failure: ERROR [22018] [MySQL] [ODBC 8.0(a) Driver] [mysqld-5.6.30]. Please verify that the current connection is valid.
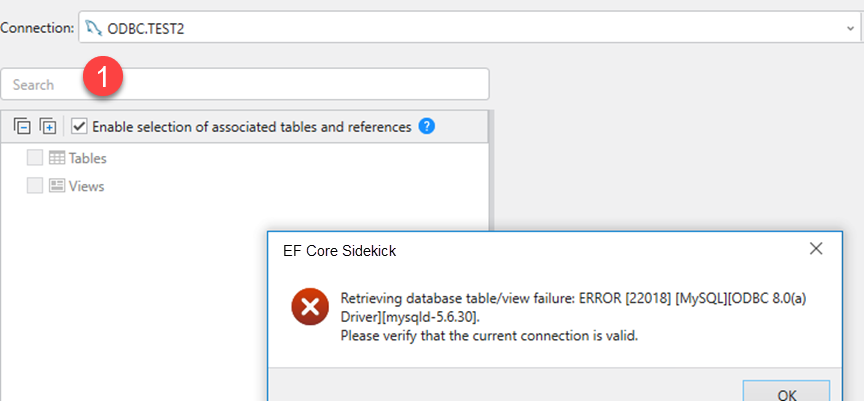
Solution:
- Make sure the version of driver matches that of the database.
- Make sure the character set of driver matches that of the database.

Historical releases
Version 23.0.0.700
This version of EF Core Sidekick provides the following new feature:
- When generating the DTO class:
- Provides an icon to quickly remove duplicate fields.
- Supports sorting the columns of the DTO class.
- When generating DTO classes in batch, all properties are selected by default to reduce user actions.
- Supports updating the existing Entity without re-scaffolding when there's an update in the database table.
- Supports renaming properties and updating the existing files instead of generating new files.
- When generating the Entity class, supports generating multiple DBContexts when the current project has multiple database connections.
Version 23.0.0.680
This version of EF Core Sidekick provides the following new feature:
- When generating services and APIs, all the interface parameters are changed from the Entity class to the DTO class. The main changes are as follows:
- Generate a corresponding DTO class from the Entity class, with all fields mapped accordingly.
- Parameters and return values of all services and interface classes are passed using the DTO class.
- Parameters and return values of all Controller classes are passed using the DTO class.
- The conversion between the Entity class and the DTO class supports AutoMapper.
- Supports using AutoMapper to generate the DTO class (both the Built-in and the AutoMapper methods are available from the dropdown menu).
- AutoMapper is supported only when generating the DTO class from a single Entity class.
- AutoMapper is not supported when generating the DTO class from multiple Entity classes, only the Built-in method is supported.
Version 23.0.0.643
This version of EF Core Sidekick provides the following new feature:
- Supports displaying and formatting DML statements for Oracle functions and stored procedures.
Version 23.0.0.625
This version of EF Core Sidekick provides the following new feature:
- Supports customizing naming rules when exporting entities.
Version 23.0.0.611
This version of EF Core Sidekick provides the following new feature:
- Supports exporting functions and stored procedures from the Oracle database.
- The MySQL database export feature now supports .NET 9 and EF Core 9.
Version 23.0.0.603
This version of EF Core Sidekick provides the following new feature:
- Supports .NET 9 and EF Core 9 with Oracle database (in addition to SQL Server, PostgreSQL, and SQLite).
- Fixes other internal bugs to improve user experience.
Version 23.0.0.597
This version of EF Core Sidekick provides the following new features:
- Supports .NET 9 and EF Core 9 (Supports SQL Server, PostgreSQL, and SQLite databases).
- Fixes other internal bugs to improve user experience.
Version 23.0.0.580
This version of EF Core Sidekick provides the following new features:
- Able to view both the formatted and raw SQL of functions and stored procedures when creating entities from the database. (Supports SQL Server, MySQL, and PostgreSQL databases.)
- Fixes other internal bugs to improve user experience.
Version 23.0.0.552
This version of EF Core Sidekick provides the following new features:
- MySQL supports functions and stored procedures.
- Fixes other internal bugs to improve user experience.
Version 23.0.0.527
This version of EF Core Sidekick provides the following new features:
- Adds a refresh function to the database connection list page.
- PostgreSQL supports functions and stored procedures.
Version 23.0.0.507
This version of EF Core Sidekick provides the following new features:
- Supports .NET 8 and EF Core 8.
- Supports Oracle 23ai and PostgreSQL 16.
Version 23.0.0.479
This version of EF Core Sidekick provides the following new features:
- Able to select and map the stored procedures (SQL Server only) when creating entities from the database.
- Fixes the conflict issue between EF Core Sidekick and JetBrains ReSharper.
- Fixes other internal bugs to improve user experience.
Version 23.0.0.464
This version of EF Core Sidekick provides the following new features:
- Shows the number of tables/views/functions when creating entities from the database.
- Adds a Rate feature where users can provide feedback conveniently when using the extension.
- Fixes internal bugs to improve user experience.
Version 23.0.0.456
This version of EF Core Sidekick provides the following new features:
- Enables change detection and notifications on entities (generated from database tables) and supports selecting the change tracking strategy.
- If you have created entities from the same database connection before, the last selected tables/views/functions will be remembered for easy selection next time.
- When configuring custom code, you can filter entities and fields through expressions, and apply the custom code to the filtered entities or fields only.
- The generated code is compatible with .NET 8.0.
- Optimizes the SQLite data type mappings to match with .NET data types.
Version 23.0.0.426
This version of EF Core Sidekick provides the following new features:
- Generates DTO from entities
- Supports custom codes when generating entities, services, or APIs
- Generates DataContext functions from the database functions
- Supports configuring route template for API
- Optimizes the data type mappings
Version 23.0.0.297 (Preview)
This version of EF Core Sidekick supports the following environment:
- Supports Visual Studio 2022
- Supports Entity Framework Core 6.0 and 7.0
- Supports .NET 6.0 and 7.0
- Supports SQL Server, SQLite, PostgreSQL, Oracle, and MySQL databases through ODBC or native driver
This version of EF Core Sidekick provides the following functionalities:
- Creates EF Core entities from existing databases
- Generates services and APIs from entities
- Generates APIs from controllers, implementations, or interfaces
Related product
Try the full-featured version, SnapDevelop, for free: https://www.devmagic.com.
SnapDevelop is a low-code IDE for rapidly developing cloud-native apps. It utilizes a model-driven approach to automatically generate full-stack applications, and supports subsequent development and maintenance, including compilation, debugging, testing, publishing, and deployment.