SnapDevelop Installation Guide
Last updated: September 2024
SnapDevelop Installer is an online installer that automatically downloads and decompresses installation files. During installation, your machine must be connected to the Internet. If you need an offline installer, you can download it from the SnapDevelop Installer.
No license is required to use this version, but you need to log in with your SnapDevelop cloud account when opening the SnapDevelop IDE. If you do not have a SnapDevelop cloud account, you can register one when you log in to the IDE.
Environment preparation
Before installing SnapDevelop, prepare your environment.
System Requirements
Please make sure your system meets the following requirements.
| Processor | Memory | Hard Drive | Operating System |
|---|---|---|---|
| Type: Intel or AMD Cores: 4 (8 plus recommended) Speed: 1.8 GHz or faster |
8 GB (16 GB recommended) | Minimum 4 GB (depending on features installed) | Windows 11 version 21H2 or higher Windows 10 version 20H2 or higher Windows Server 2022: Standard and Datacenter Windows Server 2019: Standard and Datacenter Windows Server 2016: Standard and Datacenter (SnapDevelop has no special requirements for the minor version number of the operating system, as long as it's within the valid support period.) |
The processor must be Wintel compliant; which means only Intel or AMD processor is supported (ARM and other processors are NOT supported).
The hard disk space requirement is an estimated value. The actual disk space required for each product may vary based on hard drive size, partitions, and features you choose to install. Additional temporary hard disk space is required to extract the installation files during installation.
Database Server Requirements
The SnapDevelop IDE can connect to the following database types and versions.
| Database Type | Database Version |
|---|---|
| MySQL Amazon RDS for MySQL Amazon Aurora for MySQL Azure Database for MySQL |
5.6, 5.7, or 8.0 8.0.20 5.6.10a 5.6 |
| Oracle Amazon RDS for Oracle |
12c, 18c, 19c, or 23ai 12.1.0.1 |
| PostgreSQL Amazon RDS for PostgreSQL Amazon Aurora for PostgreSQL Azure Database for PostgreSQL |
9.6, 10.1, 11.3, 12, or 16 12.3-R 11.6 11 |
| SQL Server Amazon RDS for SQL Server Azure SQL Database |
2017, 2019, or 2022 2017 14.00.3281.6.v1 Latest SQL Server Engine (as of September 2020 ) |
| SQLite | 3 |
Installation preparation
Before installation, please confirm that the following tasks have been completed:
Log in to Windows as an administrator, as you must have administrator rights to run the installer.
Read the release bulletin for the latest information on products being installed. The release bulletin is available at: https://docs.devmagic.com/sd/release_bulletin/index.html.
Make sure you have a TEMP environment variable that points to a directory location with at least 2GB of free space. The installer writes files to this directory during the installation process and frees up space after the installation is complete.
Online installation
Step 1: Run the SnapDevelop Installer (you must have administrator rights to run the installer).
Step 2: Select the checkbox to agree to the license terms and click Continue.
Step 3: On the installer main page, click the Install button in the SnapDevelop 2025 version.
Or click More to select more options such as downloading offline packages, uninstalling SnapDevelop.
If you already have SnapDevelop installed, you will see the following options:
Modify -- Modify the selected workloads, components, or installation path.
Launch -- Launch the installed SnapDevelop.
Update -- Upgrade SnapDevelop to the latest version. If the latest version has already been installed, this option will not display.
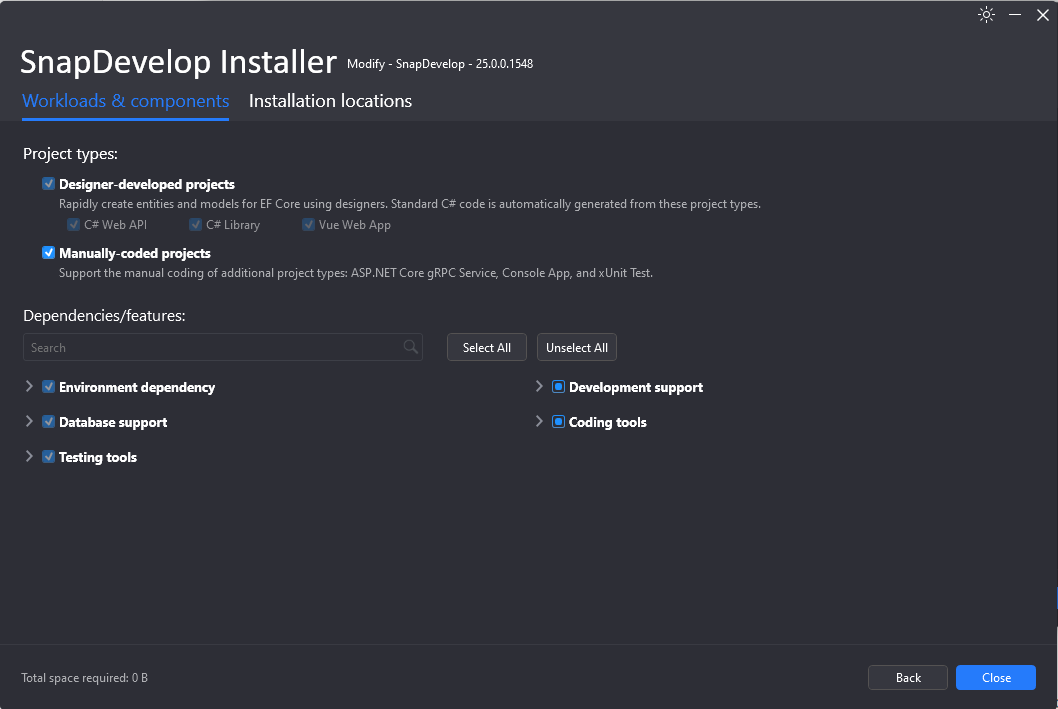
Step 4: Select the project types, dependencies, and features to install in the Workloads & components tab.
When installing SnapDevelop, the workloads/components required for rapidly creating EF Core entities are automatically selected for installation. For example, some items under the Designer-developed projects, Environment dependency, Database support and Testing tools categories are automatically selected.
The SQLite database support and SQL Server database support are selected for installation by default.
Besides SQLite and SQL Server, you can also select to install support files for MySQL, Oracle, and PostgreSQL.
Step 5: In the Installation locations tab, specify the location where you want to download and install the product.
You can select the option Keep the download cache after the installation if the downloaded file will be used in another installation. It is unchecked by default to ensure that downloaded files will be removed to free up the disk space.
Step 6: Click Install to start the installation.
Step 7: After the installation is complete, read the status messages carefully to ensure that the installation was successful.
After successful installation, you can directly click the Launch button on the installer to start SnapDevelop. Or start SnapDevelop from the Windows Start menu.
Offline installation
Offline installation helps users install the product on the machine where Internet connection is not available.
Downloading Offline Installer
The offline installer can be downloaded from the SnapDevelop Installer. Launch the SnapDevelop Installer, select Download offline packages from the More option list, and then select the workloads or components to download (by default all available workloads and components are selected).
When the download is complete, click Open Folder (the default folder is C:\ProgramData\SnapDevelop\EN) to get the standalone installation package (the offline installer). Now you can distribute the offline installer to any computer to install the product.
Starting Offline Installer
To launch the downloaded offline installer:
Step 1: Exit any programs that are running.
Step 2: Run the Installer.exe file in the offline package (you must have administrator privileges to run the installer).
The installation options and process are exactly the same as the online installation.
Activating SnapDevelop
You need to use your SnapDevelop cloud account to log in and activate when you open SnapDevelop IDE. If you do not have a SnapDevelop cloud account, you can register one for free when you log in to the IDE.
Uninstalling SnapDevelop
If you plan to reinstall, first back up files that may be reused later (e.g. databases, source code files).
Uninstall the product by either of the following methods:
Open Control Panel from the Windows Start menu and double-click the Add/Remove Programs button. In the Install/Uninstall page, select SnapDevelop.
Run the SnapDevelop Installer. Select Uninstall from the More drop-down list.
Handling Antivirus False Positives
This section applies to the SnapDevelop installer as well as the SnapDevelop EXE files (such as SnapDevelop.exe). It is possible that some anti-virus software will falsely detect a virus or problem in the installer. You can be affirmed that the installer files, as well as the the files to be installed by the installer, are digitally signed by “Appeon Inc.”, and have undergone pre-release security checks, ensuring they are free of adware, spyware or any form of malware. If your anti-software is having issues with the SnapDevelop installation or any of the SnapDevelop EXE files, please read through this section for a feasible solution.
False Detection Symptoms
Depending on the anti-virus software you use, the following are possible false detection symptoms you may be experiencing:
- Norton 360: The installer files are blocked during the installation and uninstallation process. The files will run only after you turn off Data Protector in the Norton Antivirus window.
- Avast/AVG: The installer is quarantined for scanning, although despite the error messages, the installation can still proceed after the scan.
- McAfee: The installer is blocked by WebAdvisor, but it can still be downloaded successfully if you click “Accept the risk” or "Access" in the prompt message.
Resolution
When the installer fails to run, we recommend that you can take these steps:
If the antivirus or Windows Defender SmartScreen gives you the “Run Anyway” option or allows you to add the blocked file to the exceptions list, you can take the option and proceed with the installation.
Obtain the latest malware definitions of the antivirus or Windows Defender SmartScreen.
For example, with Windows Defender SmartScreen, you can follow the steps below to clear cached detection and obtain the latest malware definitions.
- Open command prompt as administrator and change directory to c:\Program Files\Windows Defender
- Run “MpCmdRun.exe -removedefinitions -dynamicsignatures”
- Run "MpCmdRun.exe -SignatureUpdate"
Change the settings in your anti-virus software to add the files from the installer to the exceptions list. If you are not familiar with how to add exceptions, you may need to contact the anti-virus software support or check the relevant documentation.
Report the issue to the anti-virus software support and request them to remove the false positives. You may also contact SnapDevelop Support for assistance.