Source Control
SnapDevelop currently supports two types of source control systems:
- Git
- Subversion
This section describes how you can perform source control using Git or Subversion in SnapDevelop.
Note: (1) To use Subversion, please make sure you have TortoiseSVN 1.10 or higher version installed; (2) The source code control operations with Git and Subversion are consistent with the standard Git and Subversion operations. If you want to learn more about the meaning of each Git or Subversion operation, you can also refer to the corresponding documentation on the Internet.
Configuring source control plug-in
Two source control plug-ins, Git and Subversion, are provided by default when you install SnapDevelop. In SnapDevelop IDE, You can use Git plugin or Subversion plugin to add solutions (rather than individual projects) to the corresponding Git or Subversion source control.
For detailed source control configuration, please refer to Source Control.
Working with Git source control using Git
Git source control allows you to push a solution to the local and remote repositories. You can work on the local repositories and push to the remote repositories later; you can create private local branches; you can quickly switch from one branch to another to pivot among different variations of your codebase. Then, you can merge, or publish the branch.
Creating a Git repository
Manage a SnapDevelop solution in Git by creating a repository for it. Later you can connect this Git repository to a remote Git repository to share your work with others.
Take the following approaches to create a Git repository for a solution:
Step 1: Select the Add to Source Control at the right bottom of the IDE, and then click Git:

Step 2: Select the menu item Tools > Git > Create Git Repository...
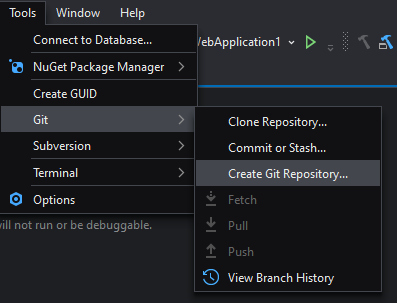
Push to local Git repository only
If you choose to push the current solution to the local Git repository, select Local only on the left side of the Create a Git Repository window, specify the path where you hope to place the local Git repository, and click Create. This will create a new local Git repository for your solution.
If you use the default value for the Local Path, the local Git repository path is the directory of the solution. After the creation, the solution is under local Git source control.
If you specify a different local path, after the creation, a new Git repository is created, but the solution is still not under Git source control.
Push to an existing remote Git repository
If you choose to connect your local repository to a remote Git repository to share your code, select Existing Remote on the left side of the Create a Git Repository window:
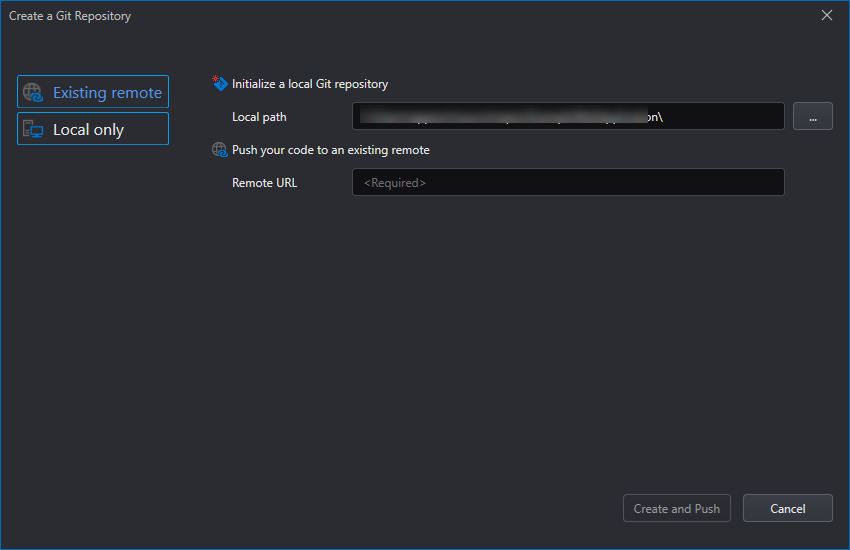
Enter the path where the local Git repository will be created, and specify the remote repository URL (It must be an existing URL. To create a new remote repository, please complete the repository creation on the Git server first), click Create and Push. This will push your solution to a remote Git repository, and the source control will be implemented by the remote Git server.
Clone an existing Git repository
You can copy an existing Git repository to your local computer in the following three ways.
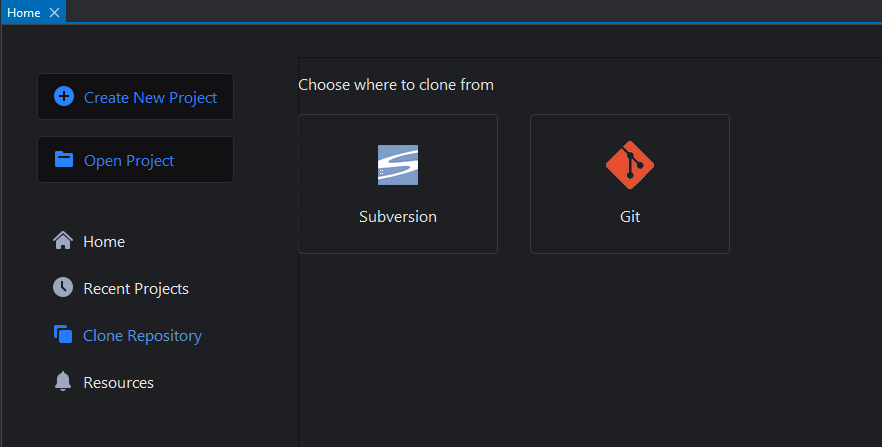
In the Home screen, click the Clone Repository button and choose the Git icon.
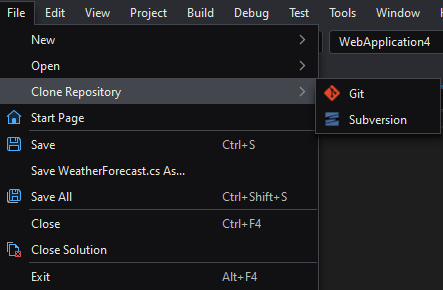
Select File > Clone Repository > Git from the menu.
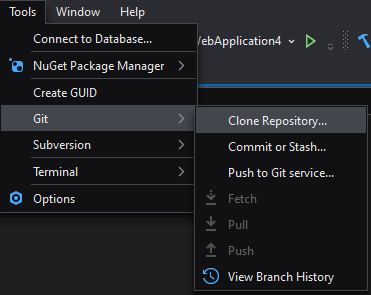
Select Tools > Git > Clone Repository... from the menu.
Enter a Git repository URL in the Clone a repository panel and click Clone to confirm to clone the repository to the specified path.
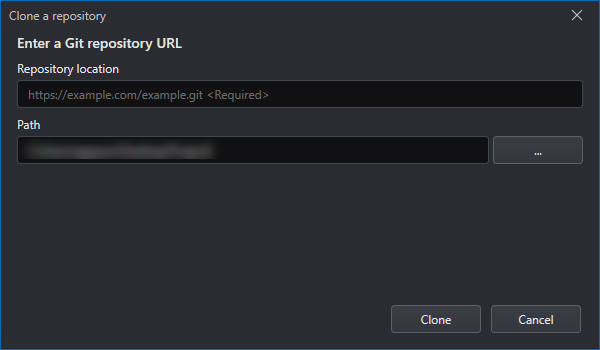
Repository location -- The URL of the repository you wish to clone.
Path -- Specifies the local path to save the content of the cloned repository.
Commit, stage and modify
Once you have finished editing the file in Solution Explorer, you can select Tools > Git > Commit or Stash... from the menu to commit the changed file to the local repository or save the changes in the staging area.
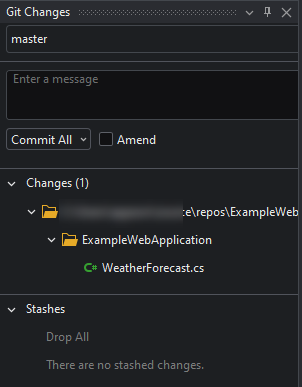
You can click the down arrow in the Commit All button, and select the commit method:
- Commit All
- Stash All (--include-untracked). That is, stash the local content as a draft and restore the local workspace to unmodified state;
- Stash All and Keep Staged (--keep-index). That is, stash the local content as a draft, while keeping the changes already staged in the local workspace.
You can also click the green + icon at the right of the listed item (Stage), to add the changes to the staging area.

After staging, the commit method changes to Commit Staged.
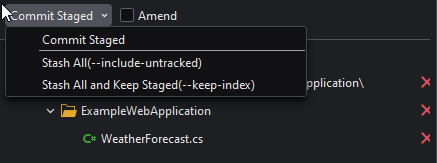
Whether you choose to commit or stage, if you select the Amend option beside the Commit All/Commit Staged button, the current changes will be directly applied to the last commit.
Using Git branches
Git branches allow you to isolate changes to features or bug fixes from the master branch, which makes it very easy to change what you're working on by simply changing the current branch. You can create multiple branches in a repository and work on one without affecting others, and you can share branches with team members without merging changes into the master branch.
Since branches are lightweight and self-contained, it's easy to switch between branches in the same repository. When using branches, instead of creating multiple copies of the source code, Git recreates files on the branch using the historical information stored in the commits.
Create a Git branch
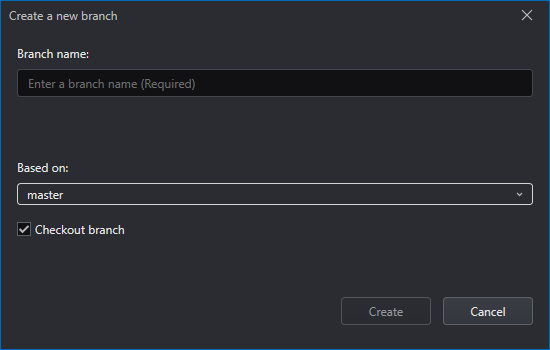
Follow these steps to create a Git branch:
Step 1: In the lower right corner, click the current branch name, and then select New Branch...
Step 2: Enter the branch name in the required field and select Based on as the basis for the change.
Step 3: (Optional) Check the Checkout branch box (SnapDevelop will automatically check out to the newly created branch) and click Create.
Delete a Git branch
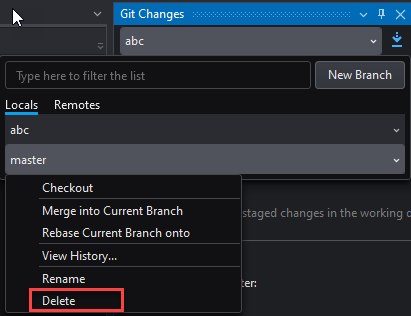
Perform the following steps to delete the Git branch:
Step 1: On the Git Change interface, click the currently displayed branch name (such as master) to expand the branch drop-down box.
Step 2: Find the branch you plan to delete. Make sure the branch is not checked out, as you cannot delete a branch that is currently in use.
Step 3: Click the branch name and select Delete from the drop-down box.
View the branch history and create tags
Git manages the complete history of your development by using the history reference information stored in each commit. Commit history allows you to determine when file changes were made, who made the changes, and what differences existed between commits of different versions. In SnapDevelop, you can create tags for history:
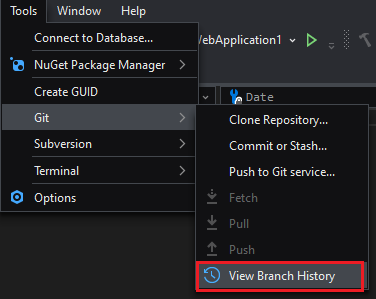
Step 1: Select Tools > Git > View Branch History from the menu bar.
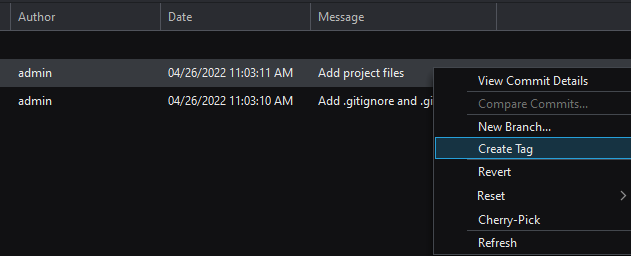
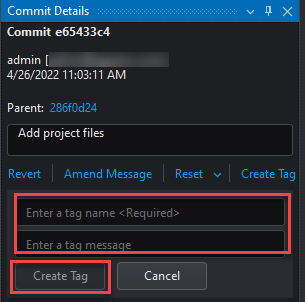
Step 2: Right click the mouse at a history record, and select Create Tag.
Step 3: Specify the tag name and message, and then click Create Tag.
Fetch, pull and push
Git keeps local branches in sync with remote branches through fetch, pull, and push operations.
In the Git changes window, there are three buttons to the right of the current branch: Fetch, Pull, and Push. The corresponding name is displayed as you hover over each icon. If you create a local Git repository, only the Push icon is available.

Fetch -- Check (and only check) if any remote changes should be incorporated into local changes;
Pull -- Synchronize content of the remote branch to the local branch;
Push -- Synchronize content from local branch to remote branch.
Merge or rebase branches
When you're using Git branches to work on different features, at some point, if you want to create a new branch after merging the two branches, you can do this by "merging branches"; If you want to move all modifications on one branch to the other, you can do this by rebasing the branch.
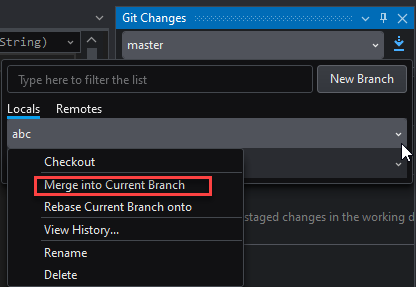
Perform the following steps to merge a branch into the current branch:
Step 1: Open the Git Change interface Step 2: Click the drop-down box of the current branch name (eg master), select the branch you want to merge (eg abc) from the local variable, then click the drop-down box next to the branch name and select Merge into Current Branch. Then the selected branch (such as abc) can be merged into the current branch (such as master).
Perform the following steps to rebase the current branch to another branch:
Step 1: Open the Git Change interface Step 2: Click the drop-down box of the current branch name (for example, master), select the target branch from the local variable, click the drop-down box next to the branch name, and select Rebase Current Branch onto. Then you can rebase the current branch (such as master) to the target branch in the drop-down box.
Revert changes
Use Revert to undo all changes to an existing commit. The Revert command creates a new commit that undoes the changes made to the previous commit. Revert doesn't rewrite repository history, so it's safe to use when collaborating with others.
To revert the changes, right-click on the commit you want to undo and select Revert from the context menu.
Reset branch to previous state
Use Reset to roll back the current branch back to the selected commit. This operation simply discards all changes since the specified commit.
To reset a branch, right-click the commit on which you want to reset the branch to and select Reset from the context menu.
Reset - Keep Changes (--mixed): Reset the selected commit for both the local repository and staging area, but keep the changes in the editor.
Reset - Delete Changes (--hard): Reset the selected commit for the local repository and staging area, and delete the changes in the editor.
Working with Subversion source control using Subversion
Subversion source control system maintains all your files, including a complete history of all changes to the files, in a central database called repository. With Subversion in SnapDevelop, you can save changes to your repository with commits, show what changes are made to the repository and who makes the changes, merge various revisions, update your code to a particular revision, and resolve conflicts, if any.
If you plan to use Subversion, please make sure you have TortoiseSVN 1.10 or higher installed, because the main features in Subversion are implemented through TortoiseSVN.
Importing code into a Subversion repository
To use Subversion for source control, you need to select Add to Source Control in the bottom right corner of the SnapDevelop IDE and then select Subversion.

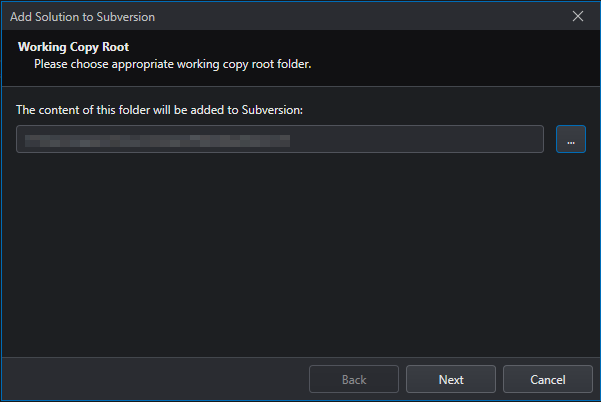
Then, verify the working copy root.
Importing code into a new repository
If you want to import your solution to a new repository, you should:
Step 1: Select the New Repository radio button.
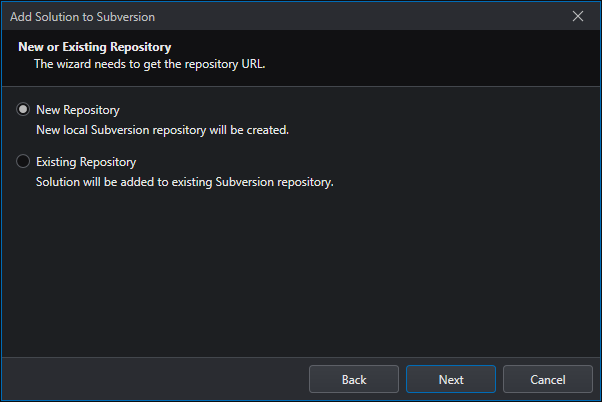
Step 2: Specify the location of the new repository. The new repository can be created on the local disk or on a remote server.
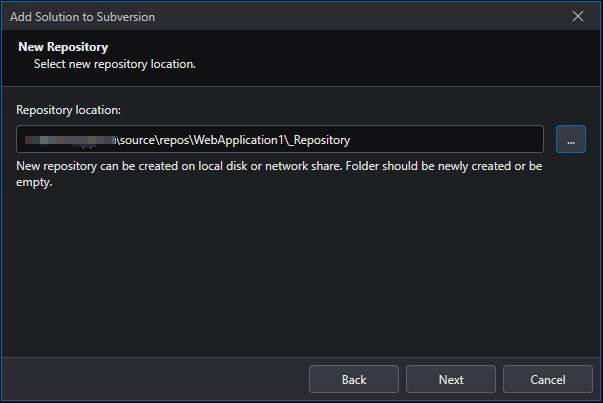
Step 3: Select Import to add your solution to the new repository.

Step 4: Select Finish to close the Add Solution to Subversion dialog box.

Importing code into an existing repository
If you want to import your solution to an existing repository, you should:
Step 1: Select the Existing Repository radio button.

Step 2: Enter the URL of the existing repository.

Step 3: Select Import to add your solution to the existing repository.
Step 4: Select Finish to close the Add Solution to Subversion dialog box.
Checking out a working copy
You can check out a working copy of a solution from an existing Subversion repository by selecting Tools > Subversion > Get Solution from Subversion from the menu.

In the dialog box that appears, specify the URL of the repository, the solution name, and the checkout location, and click OK.

Note that if it is the first time for you to connect to the Subversion server that hosts the repository, you will be prompted to enter the username and password.
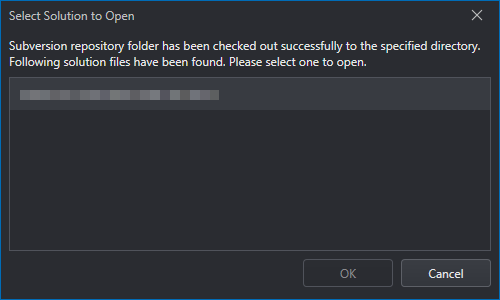
After the files in the repository URL are checked out to the specified location, you can select the solution you want to open from the pop-up window, click OK to open it.
Committing changes to the connected repository
When you have checked out a working copy from the repository, you can edit and modify the files in Solution Explorer. When you have finished modifying a file, you can commit your changes to the remote repository so that other team members can see your changes and update the changes to their own local working copy.
Note: It is recommended that you always commit the whole project or solution folder instead of a single file or folder. If you commit a single file or folder, it is possible that another user fails to get the updated version correctly.
To save changes with commits, you simply select the modified project, or solution and then select Commit from the right-click context menu.

Then, you will see the Commit dialog box, which displays the changed files, such as versioned, non-versioned, added, and deleted files. The changed files are selected by default. If you don’t want a changed file to be committed, you can simply uncheck that file. If you want to commit a non-versioned file, you can check that file. You can quickly check or uncheck files by clicking the links immediately above the list of displayed items. In addition, you need to enter a message that describes the changes you have made so that your team members can know what happened.

Updating your local working copy
When working on a project involving multiple developers, you should periodically ensure that the changes made by your team members are updated into your local working copy.
Note: It is recommended that you always update the whole project or solution folder instead of a single file or folder. If you update a single file or folder, it is possible that you may fail to get the updated version correctly.
Two update options are offered in SnapDevelop: update to the latest revision and update to a non-latest revision.
Updating to the latest revision
To update your local working copy with the latest changes from the remote repository, you simply select a desired project, solution, or directory, and select Update from the right-click context menu.

Updating to a non-latest revision
To update your local working copy with the changes from a specific earlier revision, you need to:
Step 1: Select a desired project, solution, or directory.
Step 2: Select Subversion and then Update to Revision from the right-click context menu.

Step 3: Specify the specific revision.

Reverting changes
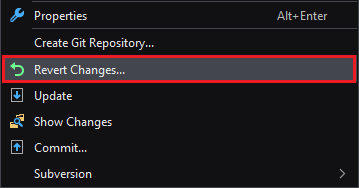
If you change a file in your solution and you find that the changes are not appropriate, you can undo the changes by right-clicking the modified file and selecting Revert Changes. Note that you can revert changes only when they are not committed to the Subversion repository.
Refreshing status
After a project is loaded into the SnapDevelop IDE, it might be changed outside the IDE. For example, if a developer merges certain changes from the other revisions, such changes will not be detected by the SnapDevelop IDE. Therefore, you need to reload the project into the IDE by selecting an affected file, folder, project or solution and selecting Refresh Status from the tool bar of the solution explorer.

Showing change lists
When you have modified the files, you can view the changes by selecting a modified file, project, or solution and then Subversion > Show Changes from the right-click context menu before committing the changes to the Subversion repository.

Showing revision logs
For every change you make and commit, you should provide a log message so that you can later figure out what changes you made and why you made such changes.
To view the file revision logs, you need to select a particular file, folder, or project (excluding solution) and then Subversion > Show Log from the right-click context menu.

The Show Log function provided by Subversion will open the log window from TortoiseSVN.
Specifying Subversion properties
You can read and set the Subversion properties in the Subversion property page. To go to this page, select a particular file, folder, project or solution and Subversion > Properties from the right-click context menu.

The Properties function provided by Subversion will open the property configuration window in TortoiseSVN, so please refer to the TortoiseSVN user documentation for the related property settings.

Merging
Branches are used to maintain separate lines of development. At some stage of development, you need to merge the changes made on one branch back into the trunk, or vice versa.
To merge branches in Subversion, please select the particular file, folder, or project (excluding solution) and then Subversion > Merge from the right-click context menu. Subversion will directly open the merge function from Tortoise SVN.

Resolving conflicts
Conflicts may occur when more than one developer is changing the same lines of code in the same file and committing the changes to the shared repository.
If any conflict occurs, you will see the name of the conflicted file(s) and a warning message.

In Solution Explorer, the conflicted file(s) will be marked with a little red dot. You have to resolve the conflict(s) manually if you want to synchronize the code successfully.

Locking
No file is locked by default and any team member who has commit access can commit changes to any file in the repository. If you lock a file, only you can commit changes to that file, and commits by other team members will be rejected until you release the lock. A locked file cannot be modified in any way in the repository.
Getting a lock
To lock a file, you simply select the file in your working copy and then select Subversion > Get Lock.

Then, you will see the Lock Files dialog box, where you can optionally enter a message so that your team members can see why you have locked the file. If you want to steal the locks from someone else, you can check the Steal the locks box.

Releasing a lock
To release a lock, you should first know which file is locked. Locked files are displayed in the commit dialog box and selected automatically. If you proceed with the commit, the locks on the selected files are removed even if the files haven’t been modified. If you don’t want to unlock particular files, you can uncheck them. If you want to keep a lock on a file you have modified, you have to check the Keep locks box before committing your changes.

You can release a lock manually by selecting the locked file in your working copy and then selecting Subversion > Release Lock.

Tracking changes with Blame
Blame displays the author and revision information for the specified files or URLs. Each line of text is annotated at the beginning with the user name and the revision number for the last change to that line.

Showing disk-browser and repo-browser
The repository browser allows you to view the structure and status of the repository and to work directly on the repository without checking out a working copy.
To display the repository in your local disk, select a file, folder, project or solution and Subversion > Disk-Browser.


To display the repository in the repository browser, select a file, folder, project or solution and Subversion > Repo-Browser.


Excluding from Subversion/adding to Subversion
Sometimes you don’t want to commit all edited files into the central Subversion repository. In the event that you want to selectively commit the edited files, you can do this by selecting the files you don’t want to include in the repository and selecting Subversion > Exclude from Subversion.

When you have excluded a file from Subversion, the little (yellow or green) dot preceding the file in Solution Explorer disappears. You can add the file to Subversion by selecting the file and then Add to Subversion from the right-click context menu.
