DB First Development Tutorials
The following tutorials demonstrate the database first approach. For tutorials using the code first approach, see Code First Development Tutorials.
Creating a Web API demo
This tutorial will show you how to generate entities from an existing database, configure the entities using the visual designers, and generate the back-end Web APIs.
In this demo, the back-end Web APIs can be generated and called to provide the following features:
- Add, edit, delete, view departments
- Add, edit, delete, view employees
- Search for employees
This tutorial will complete the development process in the following stages:
Stage 1: Create entities from existing databases
Stage 2: Generate basic Web APIs (for adding/getting/editing/deleting departments and employees)
Stage 3: Design filters and generate filter Web APIs (for filtering employees)
Stage 4: Generate C# projects from the design project
Stage 5: Run and test the Web APIs
Stage 6: Modify the database connection (optional)
Stage 1: Create entities from existing databases
You can create entities from existing databases (SQLite, SQL Server, MySQL, Oracle, and PostgreSQL). The database schema will be automatically imported to the entity.
You can use either of the following methods to create entities from database tables/views:
Right click the design project, select Add > New Item, and then select the "Entity Design (from Database)" item.
Right click the design project, select Add > New from Database.
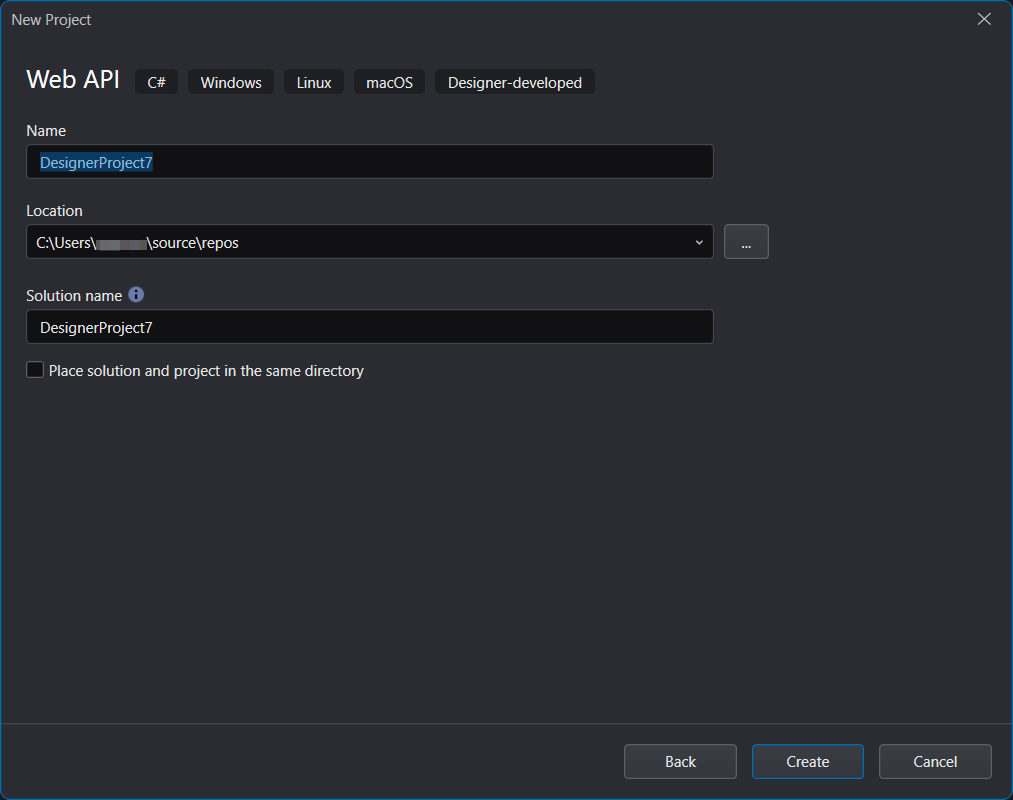
Step 1: Create a design project by selecting “Web API”.
In SnapDevelop, select File > New > New project, select the Designer-developed tab, and then select Web API and click Next.
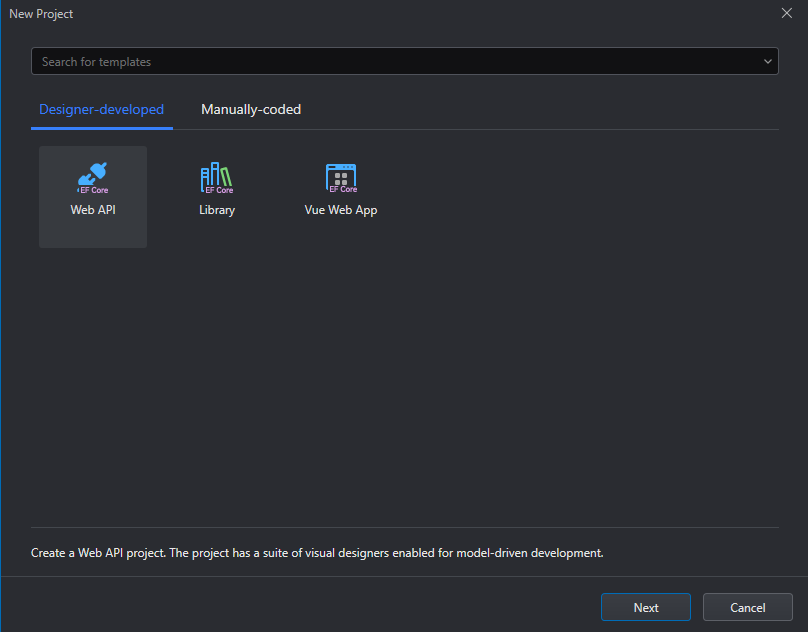
Use the default settings and click Create.
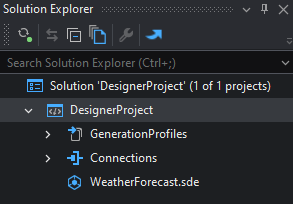
The project displays in the solution explorer.
The project contains an entity design file WeatherForecast.sde which has the basic configurations.
Step 2: Right click the project, select Add > New from Database.
(Or select Add > New Item, and then select Entity Design (from Database) in the Add New Item dialog.)
Step 3: Select an existing database connection, or click New to create a new database connection.

Example 1: to create a SQLite database connection,
Click New.
Select SQLite from the Data Provider list, select the database file, click Test Connection to make sure the connection is successful, and then click OK.
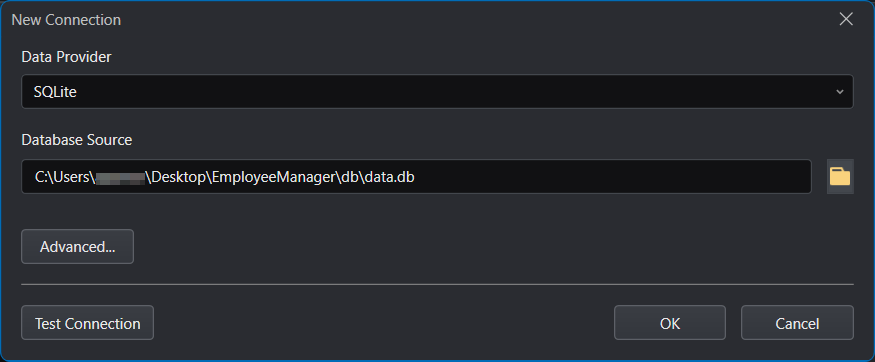
Select the SQLite database connection from the Connection list.
Example 2: to create a SQL Server database connection,
Click New.
Specify the settings for connecting with the SQL Server database, click Test Connection to make sure the connection is successful, and then click OK.
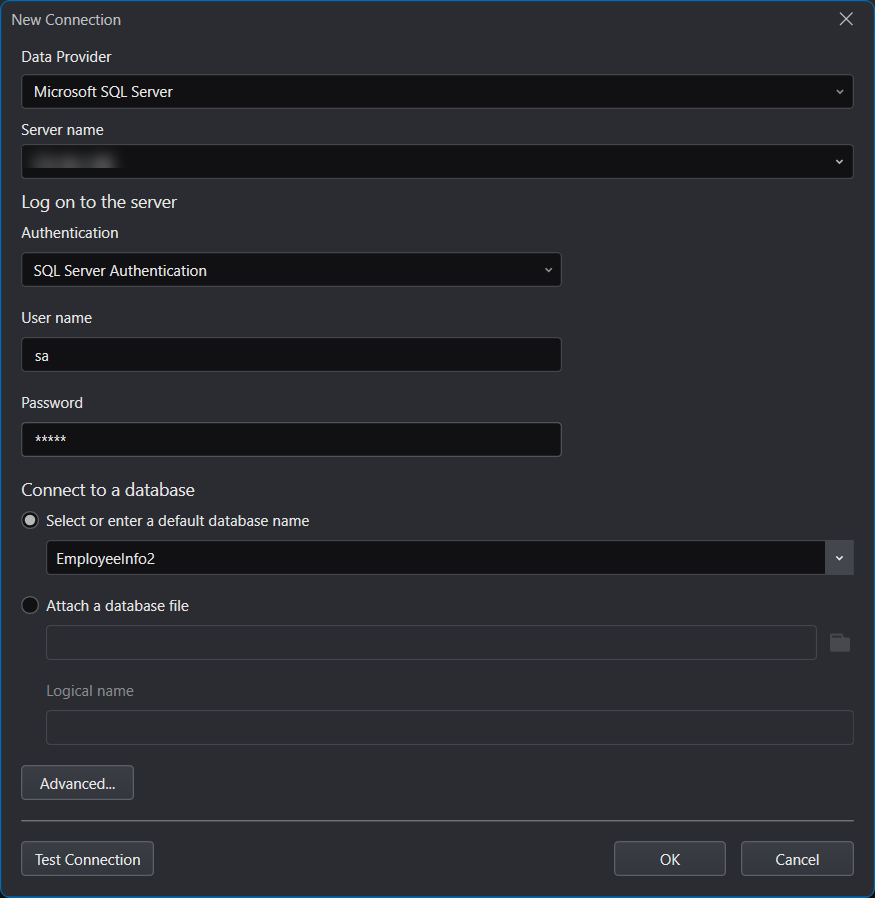
Select the SQL Server database connection from the Connection list.
Step 4: Select one or multiple database tables/views to create the entity. If the list is long, you can search for the name of the table or view.
When you select a table or view, the associated fields and the corresponding table/view will be automatically selected by default.
For example, selecting the department table will automatically select the employee table.
You can adjust the columns and references in the selected tables and views.
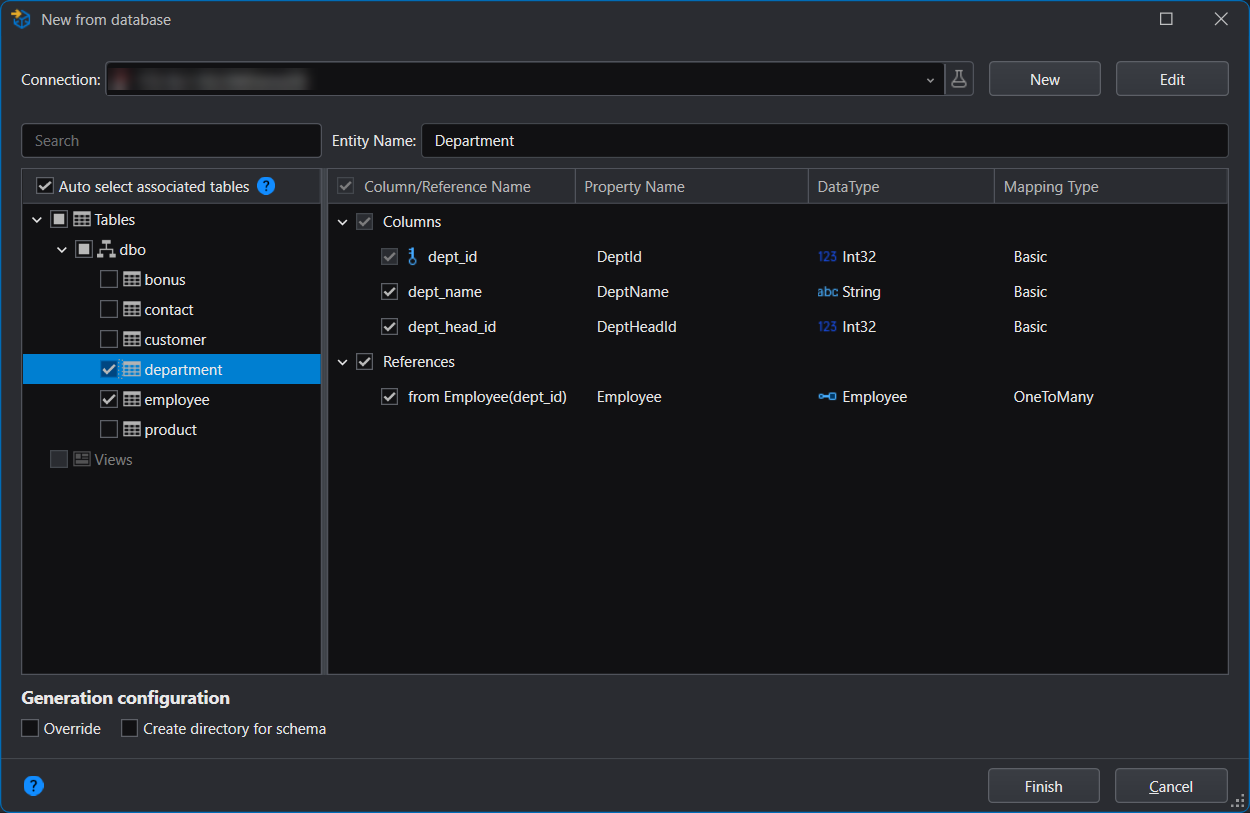
- Override -- This option determines whether to override an existing entity with the same name.
- Create directory for schema -- This option determines whether to create a folder using the name of the schema and store the entity files in this folder.
Step 5: Click Finish.
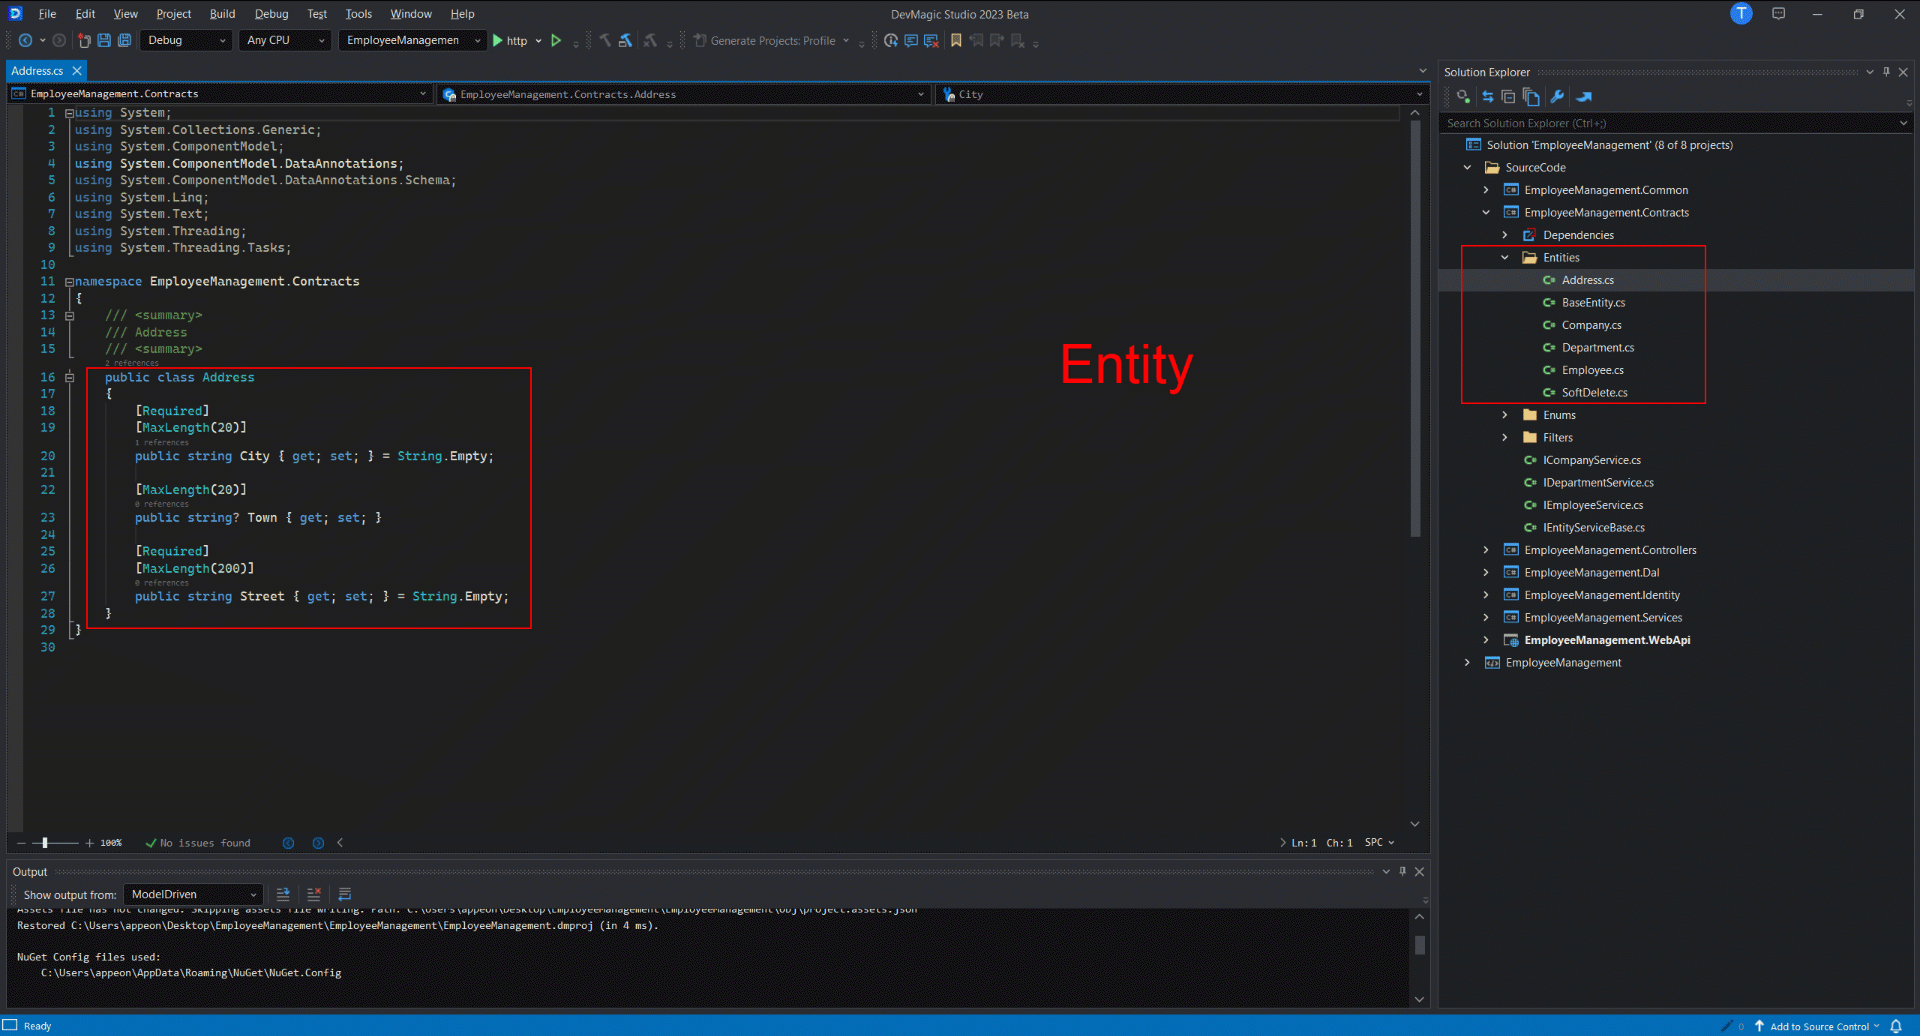
The entities are automatically created based on the selected database tables/views.
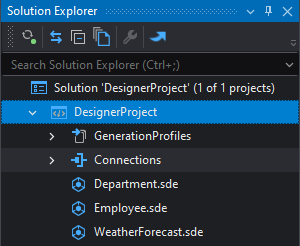
You can double click the Department.sde and then the Employee.sde file to load the entity settings in the Entity Designer.
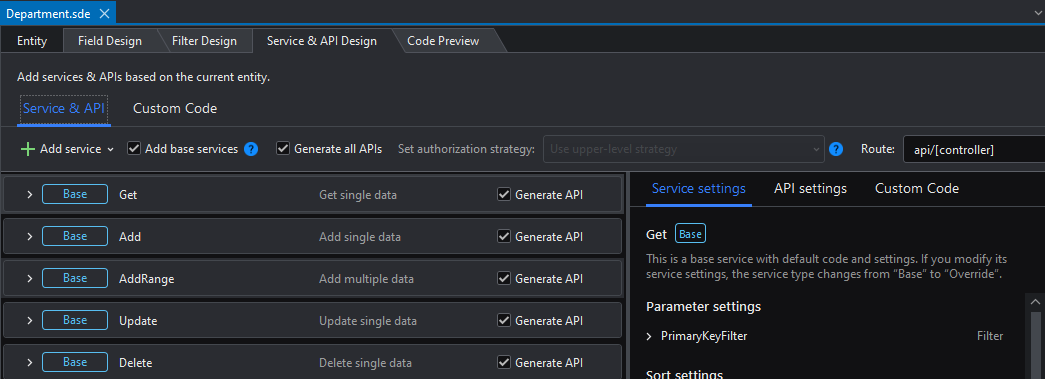
The Entity Designer contains 4 tabs: Field Design, Filter Design, Service & API Design, and Code Preview. The Field Design tab contains the settings for fields; the Filter Design tab contains the settings for data filters and conditions; the Service & API Design tab specifies the services and APIs to be generated; the Code Preview tab allows you to view the automatically generated C# code in different modes (by category or by target).
Stage 2: Generate Web APIs
Now we can generate Web APIs for the entity. APIs include Get, GetList, GetPage, Add, AddRange, Update, Delete, and DeleteRange which can be called to perform CRUD operations such as adding/getting/editing/removing data.
Step 1: Open the Department entity (Department.sde).
Step 2: Select the Service & API Design tab, and then select Generate all APIs to generate APIs for all services at a time.
You can also select to generate API for certain services only (by selecting the Generate API option after each service).
Step 3: Open the Employee entity (Employee.sde).
Step 4: Select the Service & API Design tab, and then select Generate all APIs.
Step 5: Save both entities.
Stage 3: Design filters and generate filter Web APIs
Next we will generate the filter Web APIs for the entity. Filter APIs can be called to search for the data that match with the input criteria.
Step 1: Open the Employee entity (Employee.sde).
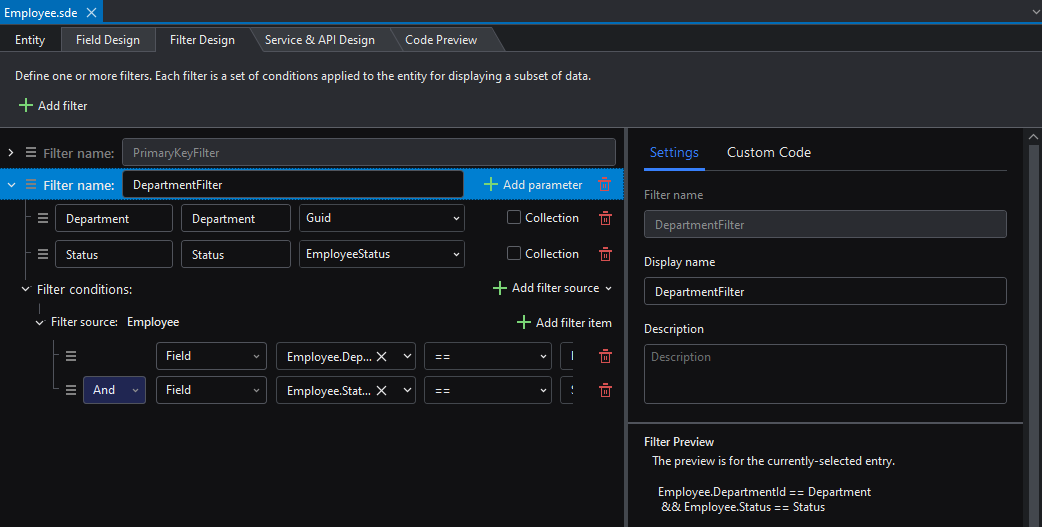
Step 2: Select the Filter Design tab, click Add filter to create a new filter.
(A PrimaryKeyFilter is pre-defined by default, which filters the employee by ID.)
Step 3: Specify the filter condition as shown below.
When you design the filter, you can preview the filter syntax at the bottom of the right panel.
Step 3: Select the Service & API Design tab, add the filter API: GetPageByDepartmentFilter (by clicking Add Service > Get paged data > With DepartmentFilter).
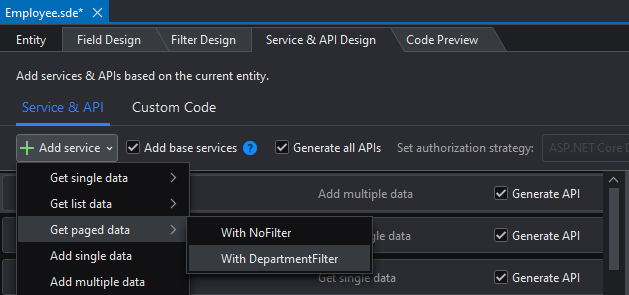
Make sure the Generate API option is selected.

Step 4: Save the entity.
Stage 4: Generate C# projects
Step 1: Click the Generate Projects: Profile button in the toolbar or right click on the project node and then select Generate Projects > Profile to start the generation process using the default profile.

You can also select New generation profile to configure and create a new generation profile first, or modify an existing profile by double-clicking the profile under the GenerationProfiles folder in the designer project.
At the bottom of the Profile wizard, select a database connection. By default, a SQLite database (data.db) will be generated in the root folder of the [project].WebApi project.
Recommended: the database should be the same type as the database from which entities are generated, as the entity may contain some database type-specific settings.
The database table will be generated from the entity settings later when Web APIs runs. If you have made changes to the entity settings, you will need to specify an empty database instead of an existing database, as the entity settings will not overwrite the existing database tables.
After the projects are generated successfully, they will be loaded into the solution:
- [project].Common: the development toolkits and extension functions that are referenced or dependent by the Contracts or Identity projects.
- [project].Contracts: the contract layer which defines the contract for the service.
- [project].Controllers: the controller layer which defines the controller for the service.
- [project].Dal: the data access layer such as EF Core which contain the database-related configurations (repository, unit of work, DbContext) and data initialization (value comparers, value converters).
- [project].Identity: the authentication service layer which authorizes the user registration and login internally. This project will be generated only when you enable the authorization.
- [project].Services: the service layer which implements the contracts.
- [project].WebApi: the representation layer which sends data to users.
These projects are standard C# projects which you can open and modify in any C# editor.
However, it is not recommended to modify these projects directly, because these projects are generated automatically each time when Generate Projects is executed. If you directly make changes to the files, the changes will be overwritten next time when the projects are generated again.
If you want to add your own code to the generated projects, you can consider the following options:
- Use the Custom code tool provided by the product.
- Create a new project and put your scripts in the new project and make references between this new project and the auto-generated projects.
- Create a new class file in the generated project and put your scripts in the new class file.
Stage 5: Run Web APIs
After the C# projects are generated successfully, you can run and test the Web APIs.
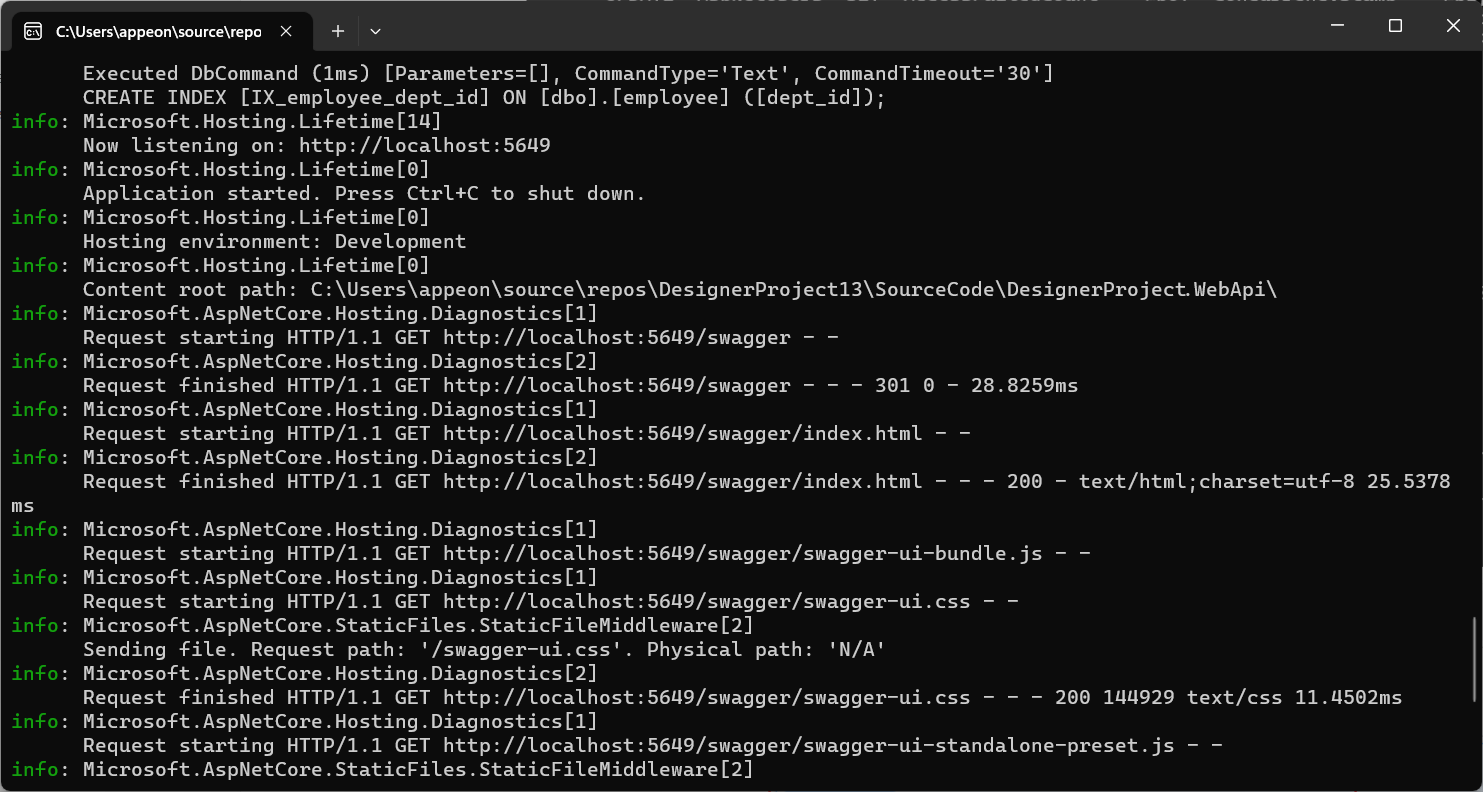
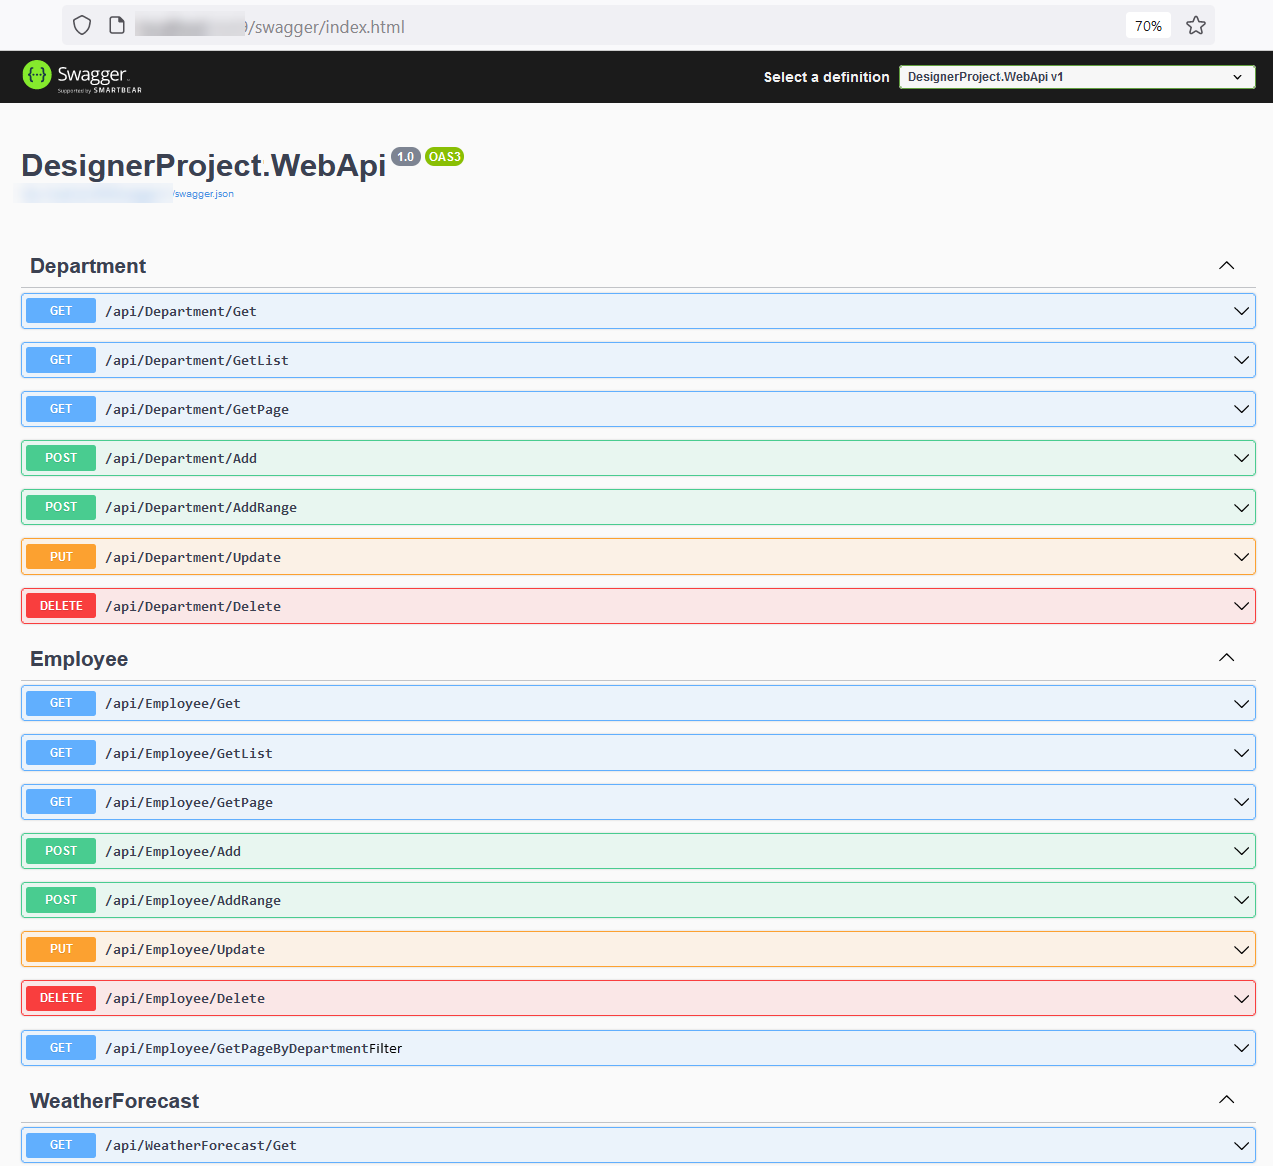
Run the [project].WebAPI project to start the Web APIs and the Swagger UI.

When the Web APIs runs successfully, you will be able to see the Swagger UI and test the basic APIs and the filter APIs on the Swagger UI.
Stage 6: Modify database connection
This stage is required if you have made changes to the entity settings.
If you modify the following field settings in the entity, you will need to generate a new database or update (manually migrate) the existing database, in order to keep the table schema in sync with the entity, otherwise, the changes in the entity may conflict with the existing table schemas and will cause data operations fail to work.
- Field Name
- Field Type
- Collection
- Nullable
- Key
- Column name
- Column type
- Set concurrency check
- Index
- Index > Unique
To manually migrate the existing database, refer to Updating the database after entity changes.
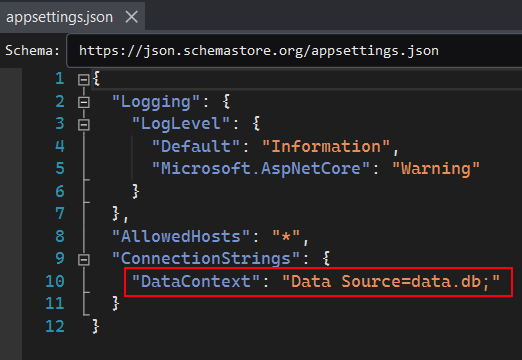
To generate a new database, you can configure a new database connection in the Generate Projects wizard and generate projects again, or directly change the "DataContext" setting in the appsettings.json file in the [project].WebApi project. Take SQL Server for example. You can set "Initial Catalog" to a new empty database or a non-existent database and then run the [project].WebApi project again.
"DataContext": "Data Source=172.25.13.3,1434;Initial Catalog=EmployeeInfo_new;User ID=sa;Password=<pwd>;Trust Server Certificate=True"
Note: If you want to generate a new database, it is recommended that the new database should be the same database type as the old one, because when you create entities from the database, the entity settings may contain DB type-specific settings.
Managing and updating database connections
Selecting a database connection (in Generate Projects wizard)
When you generate standard C# projects from a design project, you can select a database connection in the Generate Projects wizard, so that a database will be generated from the entity when the C# project runs.
Step 1: Right click the design project and select Generate Projects > New generation profile.
Step 2: Go to the bottom of the Profile wizard, select an existing database connection and click the edit icon to modify the database configuration. Or select Add a connection to create a new database connection.
By default, a local SQLite database (data.db) will be created in the root folder of [project].WebApi.

Step 3: Save the profile and then click Generate Projects to generate the projects.
The database provider will be automatically downloaded from the NuGet website to the [project].Dal project.
The connection string of the database will be stored in the appsettings.json file in the [project].WebApi project.
When a SQLite database connection is selected, the connection string looks like this:
When a SQL Server database connection is selected, the connection string looks like this:

Note: If you specify an existing SQL Server database, make sure the database has no table schema, otherwise, the entity settings will not overwrite the existing table in the database. In such case, you can set "Initial Catalog" to a non-existent database; then the database will be automatically created with the entity settings.
Setting a different database connection (in config file)
The projects generated from the design project are standard C# projects, so you can also modify the database connection in the project configuration file, in the same way as in any other C# projects.
Updating the database after entity changes
After you create entities (from an existing database or from scratch), you may change the entity settings frequently; and each time the entity changes, you can choose to create a new database (of the same type) so that the new database and table schema will be in sync with the entity settings; or you can choose to keep using the existing database if you don't want to lose the data. To keep using the existing database, you will need to manually update the database schema according to the entity changes.
This section gives you the possible options for updating the database at entity changes.
Option #1: Drop and recreate the database (for development environment)
While you are at the development stage, if you think it is valueless to keep the existing database tables, you may just completely drop the database or the table. Then, when you run the project again, the new database or table will be created.
With SQLite, it is easy. You can directly remove the data.db file in the [project].WebApi project to completely drop the entire database.
With the other databases, you can execute the DROP DATABASE statement to drop the entire database or use the DROP TABLE statement to drop the table:
DROP DATABASE database_name;DROP TABLE table_name;Alternatively, you can add script in the [project].Dal to remove existing tables and recreate new ones when running the Web API. With this approach, you must remember to comment out the script after the entity design is stable and not subject to further changes.
In the [project].Dal > DalExtensions.cs, find the following script in the TryMigrateDatabase method:
context.Database.EnsureCreated();Change it to:
try
     {
       context.Database.EnsureDeleted();
      }
catch
      {
  		//
       }
context.Database.EnsureCreated();
Option #2: Apply migrations to the existing database (for production environment)
When your project/app is running in the production environment, you may want to keep using the existing database all the time, instead of using a new database each time the entity is changed. In this case, you can consider using the EF Core migrations feature to update the existing database schema instead of creating a new database.
The complete methodology is provided in the EF Core documentation. The following highlights the main steps required.
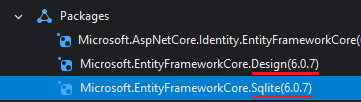
Step 1: Install the EF Core command-line interface tools.

Step 2: Install the Microsoft.EntityFrameWorkCore.Design package in the [project].Dal project. Note that the version should be identical to the corresponding database provider for EF Core.
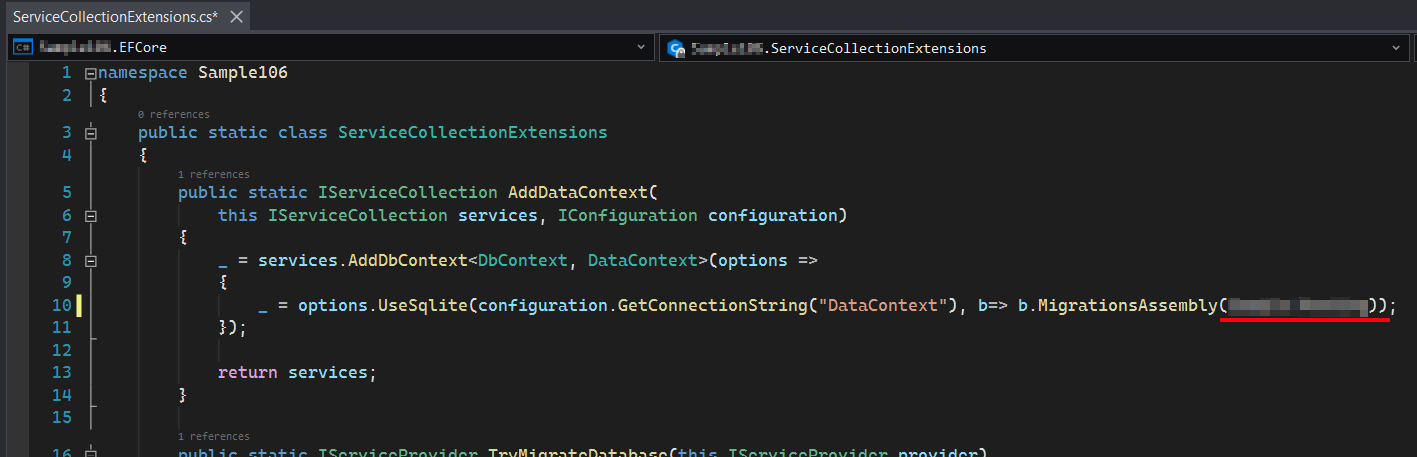
Step 3: Change the migrations assembly to [project].WebApi.
Step 4: Open command prompt and navigate to the root folder of [project].WebApi, and execute the appropriate comments for the migrations.
For example, you may execute this command to add a new migration.
dotnet ef migrations add initsample001
Execute this command to update the database to a specified migration.
dotnet ef database update
For the complete list of commands, please refer to https://entityframeworktutorial.net/efcore/cli-commands-for-ef-core-migration.aspx.