Quick Start Guide
Creating a Weather Forecast App
This tutorial is designed to help you quickly understand the basic functionalities and UI of SnapDevelop's visual designers. Therefore, this tutorial only introduces the core functions of SnapDevelop's visual designers and demonstrates simple operations to help you complete basic tasks. For more help, please refer to SnapDevelop's other user documents.
This tutorial will guide users to quickly create a weather forecast data maintenance scenario (front-end is Vue Web pages, back-end is C# Web APIs) using SnapDevelop's visual designers.
During the demonstration, the Vue Web App (Empty) project type will be selected to create an application from scratch.
Creating a designer project
Step 1: Create a Vue Web application designer project.
From the IDE, select the menu File > New > New Project, select the Designer-developed tab; then select Vue Web App (Empty) and click Next.
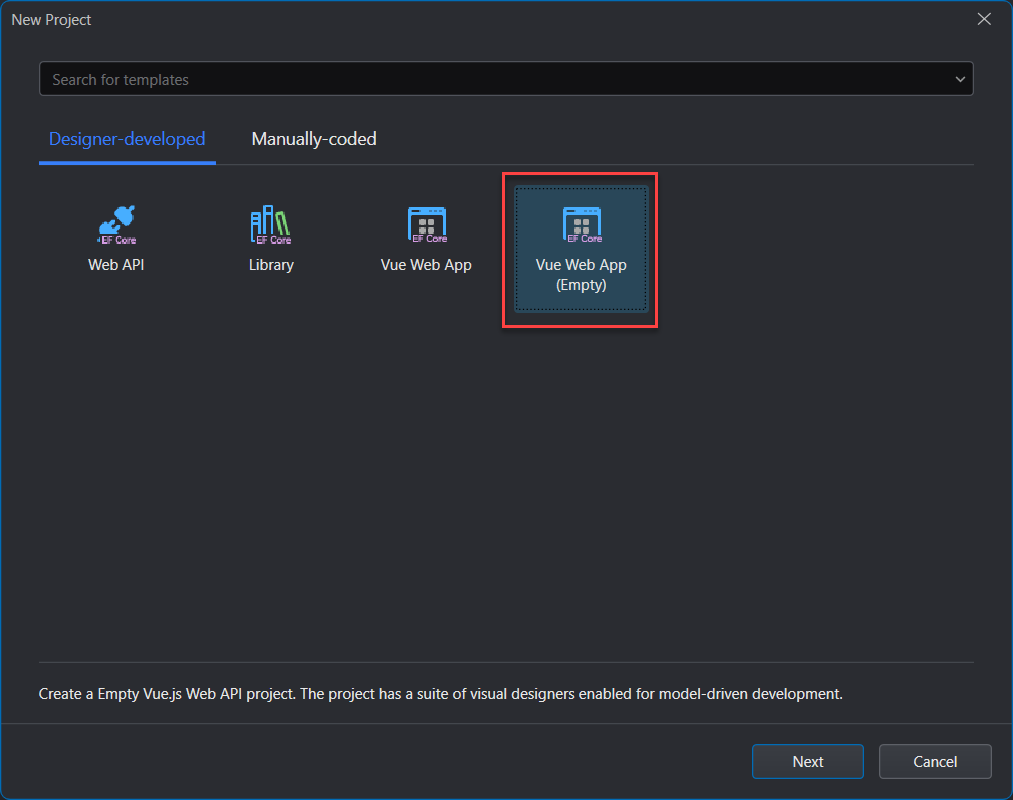
Set Name to WeatherForecastDemo and click Create.
The project is displayed in the Solution Explorer.
Creating enumerations and entities
Step 1: Create an enumeration file
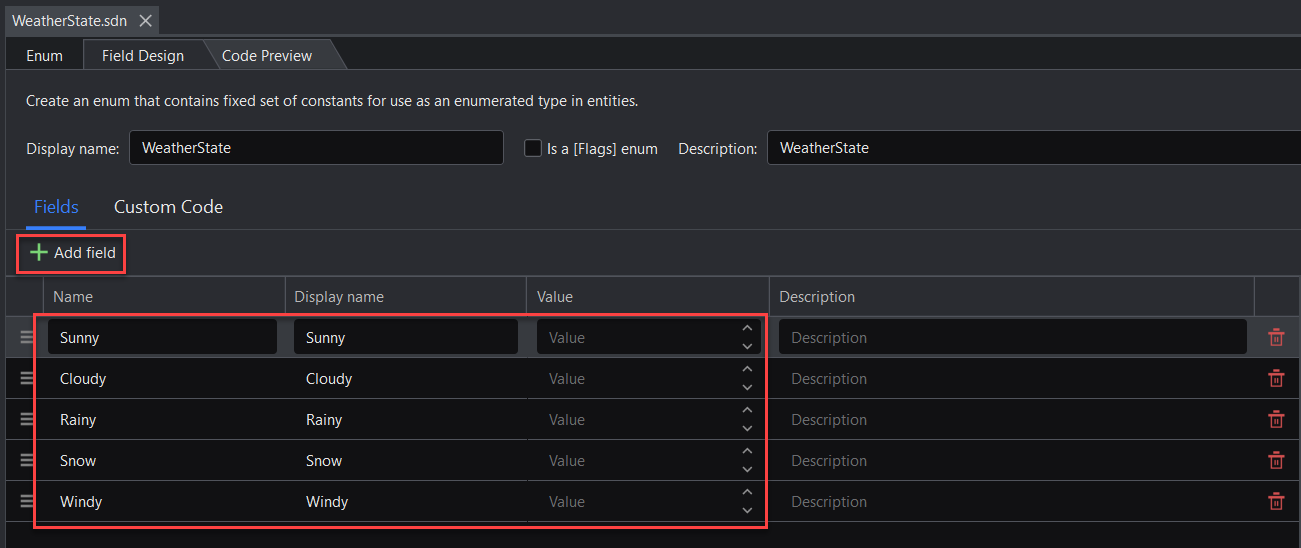
This enumeration file is used to represent weather conditions: sunny, rainy, snowy, cloudy, windy.
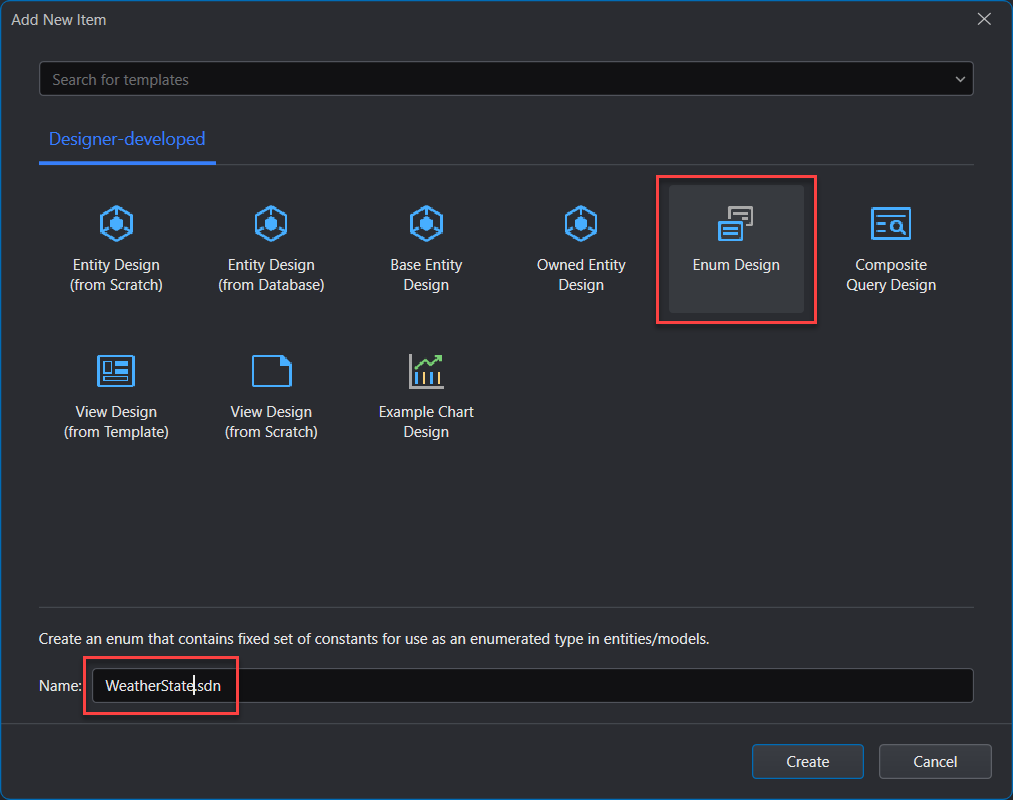
From the IDE, select the menu Project > New Item, select Enum Design, specify the name as WeatherState, and click Create.
In the WeatherState enumeration, add the following fields:
Step 2: Create an entity file
This entity file is used to represent the basic information required for weather forecast: city, date time, weather state, temperature, etc., and generate the CRUD services required by the Web API backend.
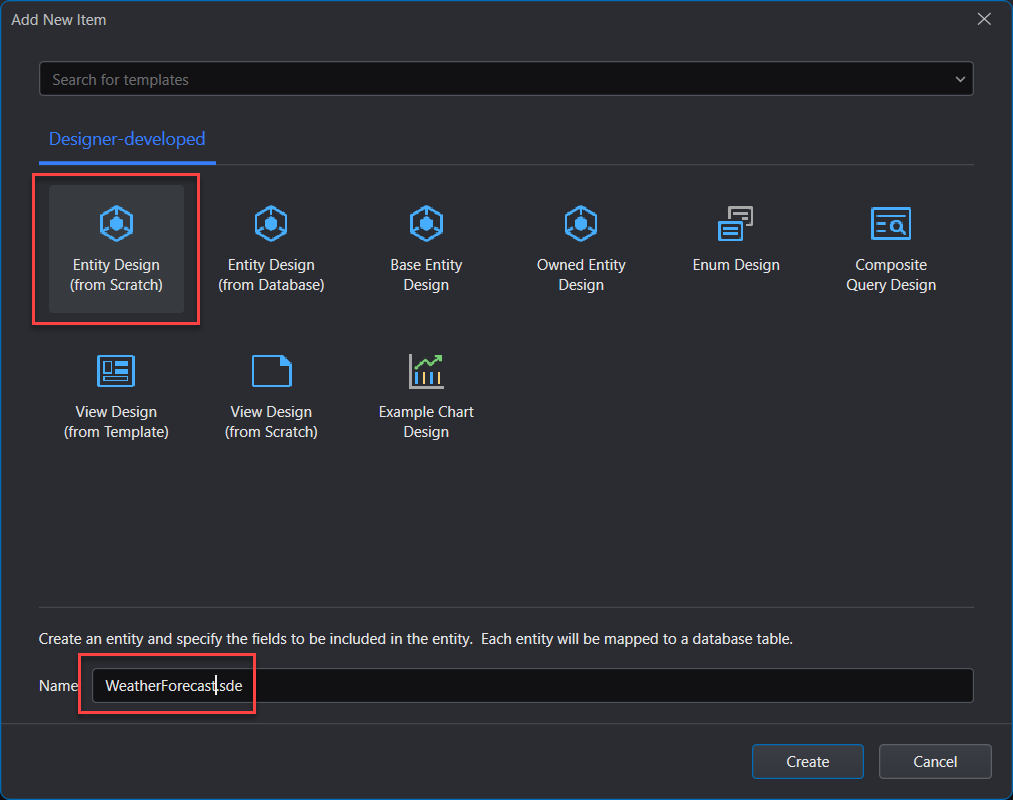
Step 1: From the IDE, select the menu Project > New Item, select Entity Design (from Scratch), specify the name as WeatherForecast, and click Create.
Step 2: In the WeatherForecast entity, add the following fields:
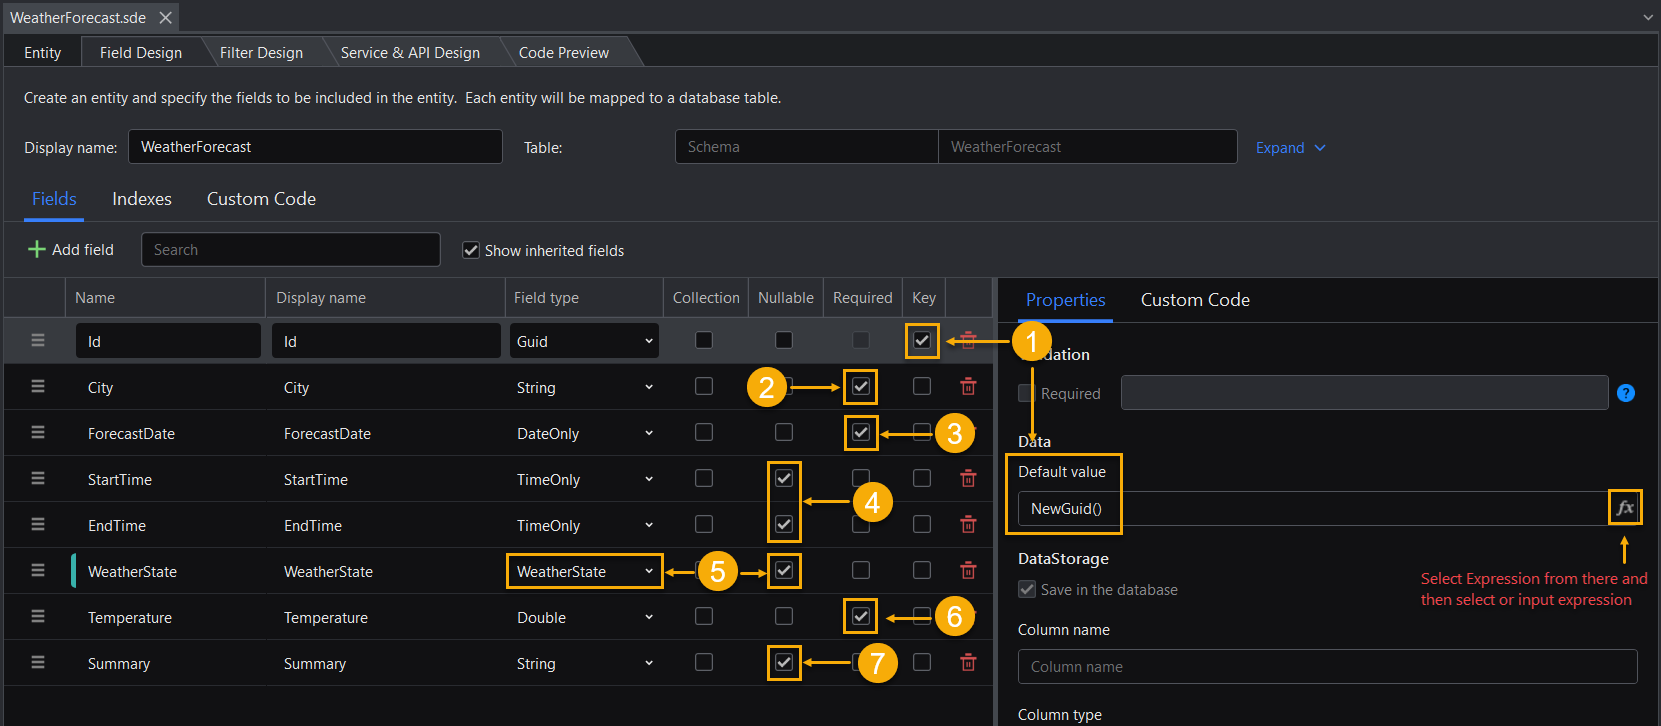
- Set the Id field as the primary key, and set its default value to the expression:
NewGuid()in the Properties tab on the right. (①) - Set City as a required field (②), and specify its Length maximum value as 20 in the Properties tab on the right.
- Set ForecastDate as a required field. (③)
- Set StartTime and EndTime as nullable fields. (④)
- Set the WeatherState field type to the newly added enumeration type WeatherState and then select Nullable. (⑤)
- Set Temperature as a required field. (⑥)
- Set Summary as a nullable field (⑦) and specify its maximum length value to 300 in the Properties tab on the right.
- For other field types, please refer to the image above.
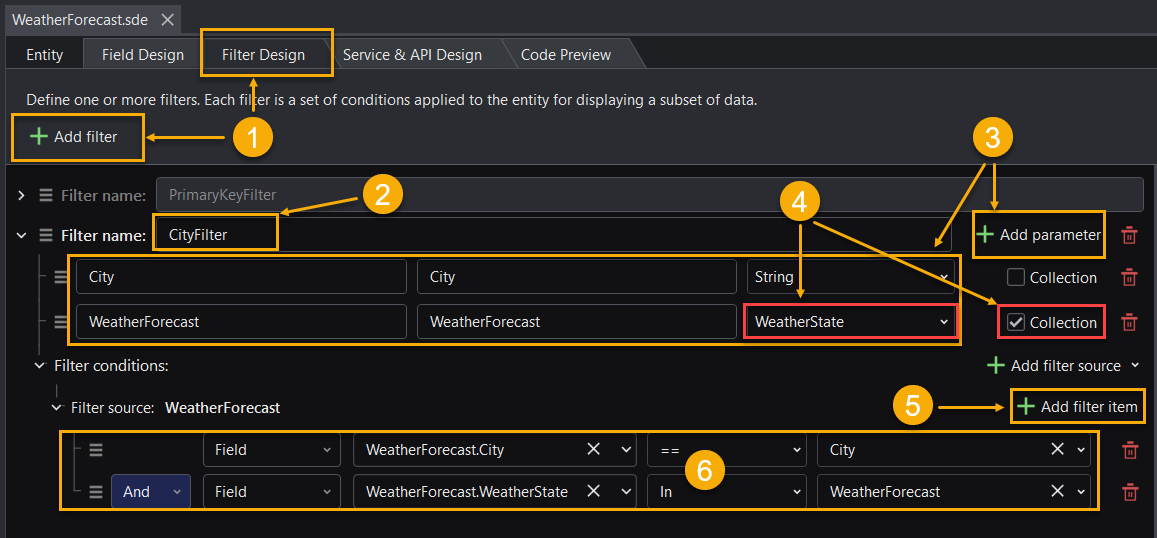
Step 3: In the WeatherForecast entity, add a filter to filter data by city and/or weather state(s).
In the Filter Design tab, click Add filter. (①)
Set Filter name to CityFilter. (②)
Click Add parameter to add two parameters: City and WeatherForecast. (③)
Set the WeatherForecast parameter value to the enumeration WeatherState and select Collection. (④)
Click Add filter item (⑤) and add two fields: WeatherForecast.City and WeatherForecast.WeatherState.
Set the value of the WeatherForecast.City field to the newly added parameter City, and set the value of the WeatherForecast.WeatherState field to the newly added parameter WeatherForecast. (⑥)
Step 4: In the WeatherForecast entity, add the API service.
In the Service & API Design tab, click Add base services to automatically generate the base service.
Click Add service > Get paged data > With CityFilter to generate the query service GetPageByCityFilter.
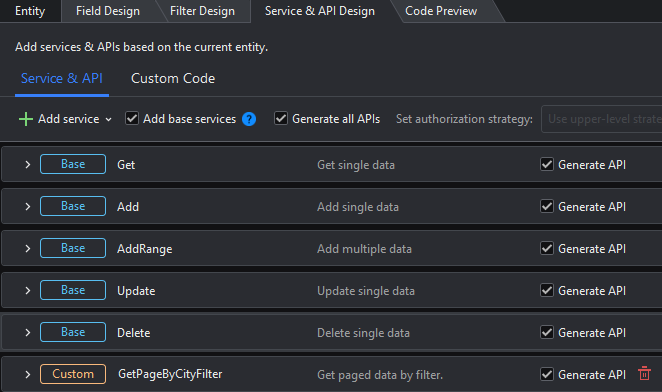
At this point, the backend service design of the weather forecast app is complete. You can generate projects and test the backend add, delete, modify and query services through Swagger UI.
Creating views
Step 1: Create four view files
The view files are used for the front-end page display of data addition, deletion, modification and query.
(Optional) First, add a directory to the project in the solution explorer to store these view files.
Then, from the IDE, select the menu Project > New Item, select View Design (from Template), specify the name as CreatePage, and click Next.
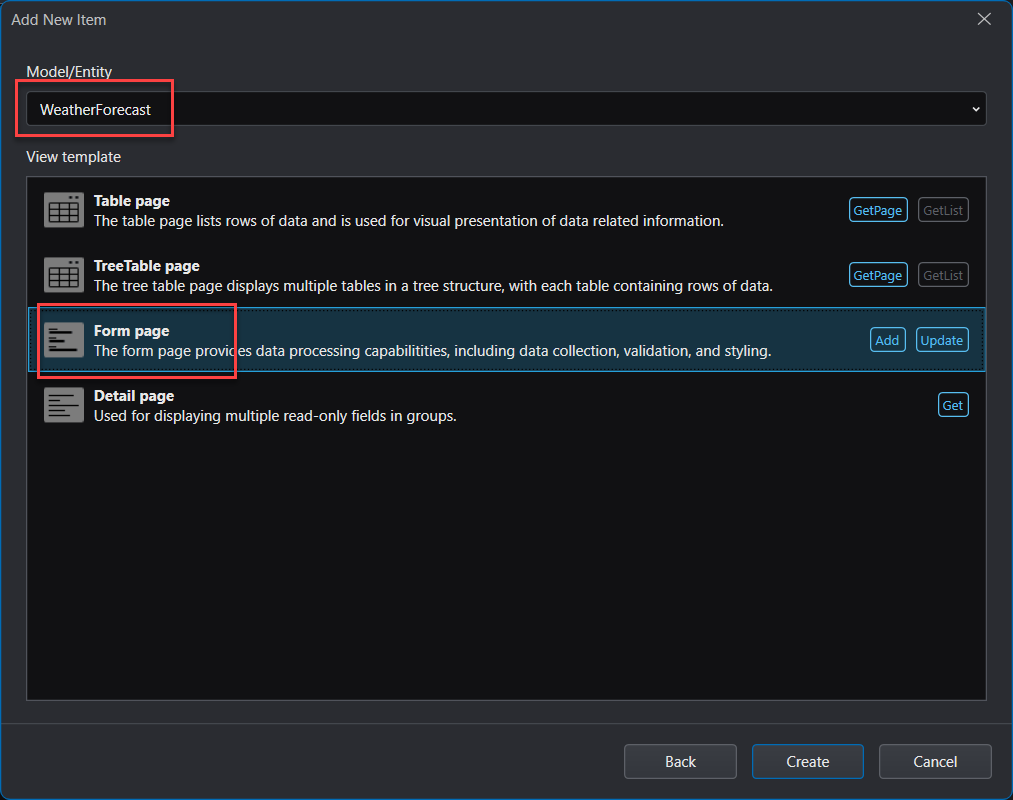
Select the WeatherForecast entity, select Form page, and click Create. The first view file CreatePage is created successfully.
Repeat the above steps to create the second view file: UpdatePage.
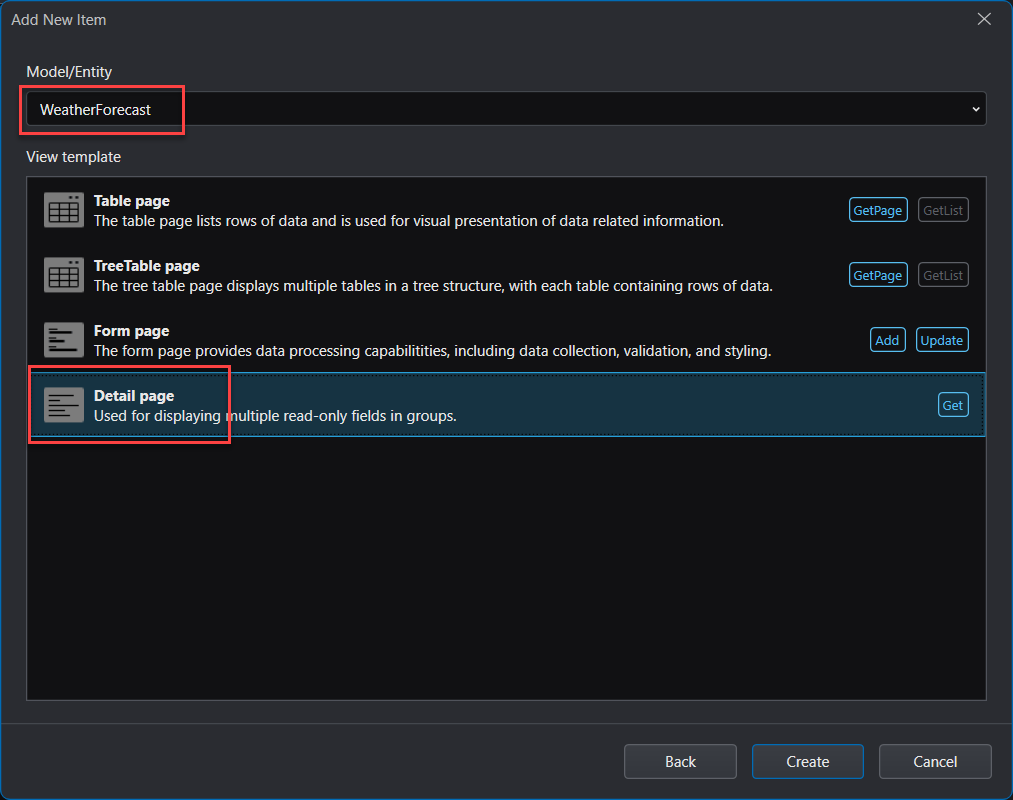
Create the third view file: DetailPage. Unlike the previous two files, this file needs to select the Detail Page view template.
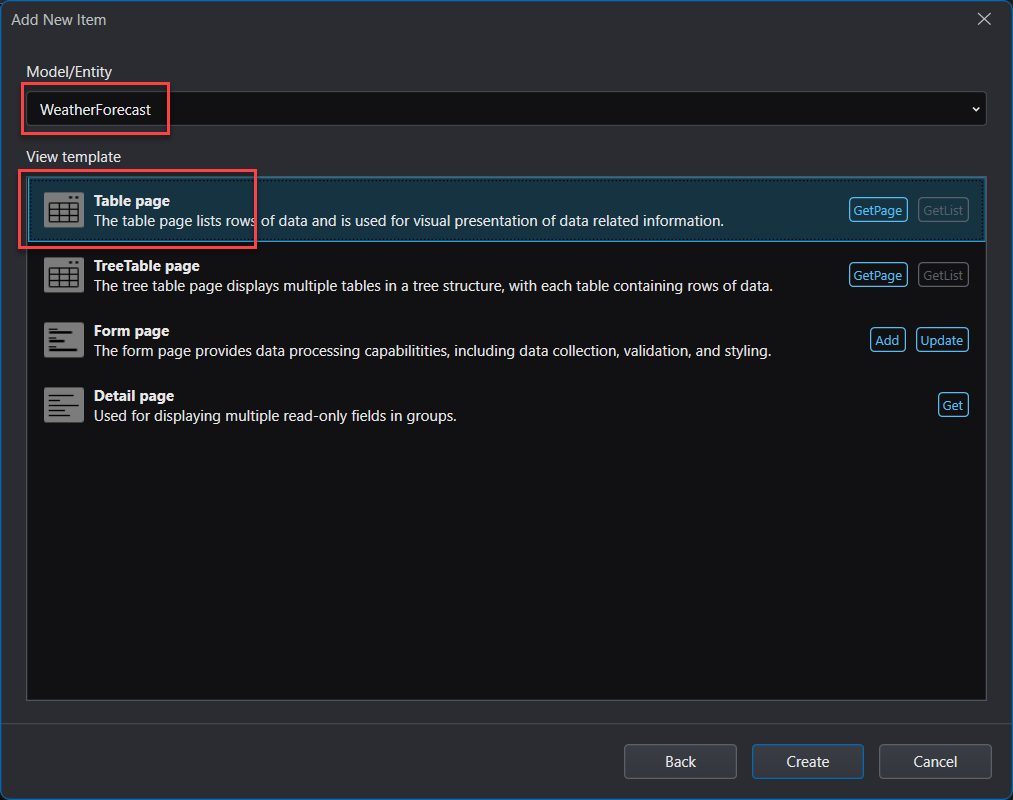
Create the fourth view file: ListPage. This file needs to select the Table Page view template.
Step 2: Configure the view file
CreatePage and DetailPage views
Use the default settings.
UpdatePage view
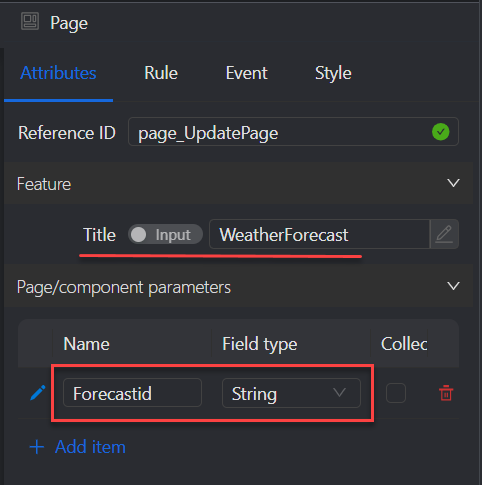
Open the UpdatePage view, select Page in the Outline tree on the left, and then add a parameter named Forecastid in Page/component parameters in the Attributes tab on the right. Modify the title if necessary.
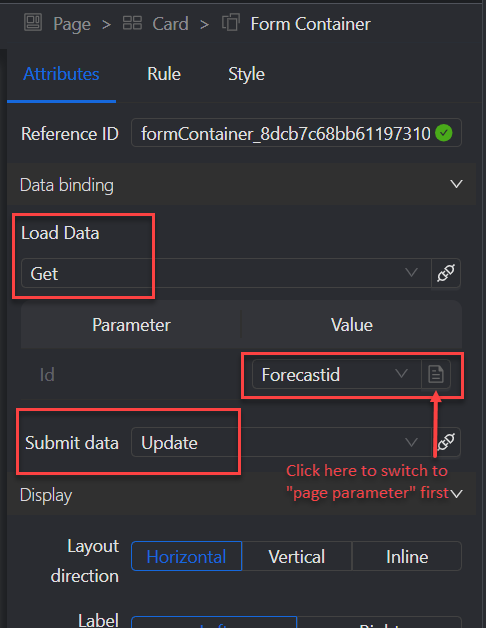
Select Form container in the Outline tree on the left, and then in the Attributes tab on the right, change Load Data to the Get interface of the WeatherForecast entity, specify the value of the parameter Id to the page parameter Forecastid just created, and change Submit Data to the Update interface of the WeatherForecast entity (the default is Add). (Select "No" when the "Whether to update form item" message pops up.)
ListPage view
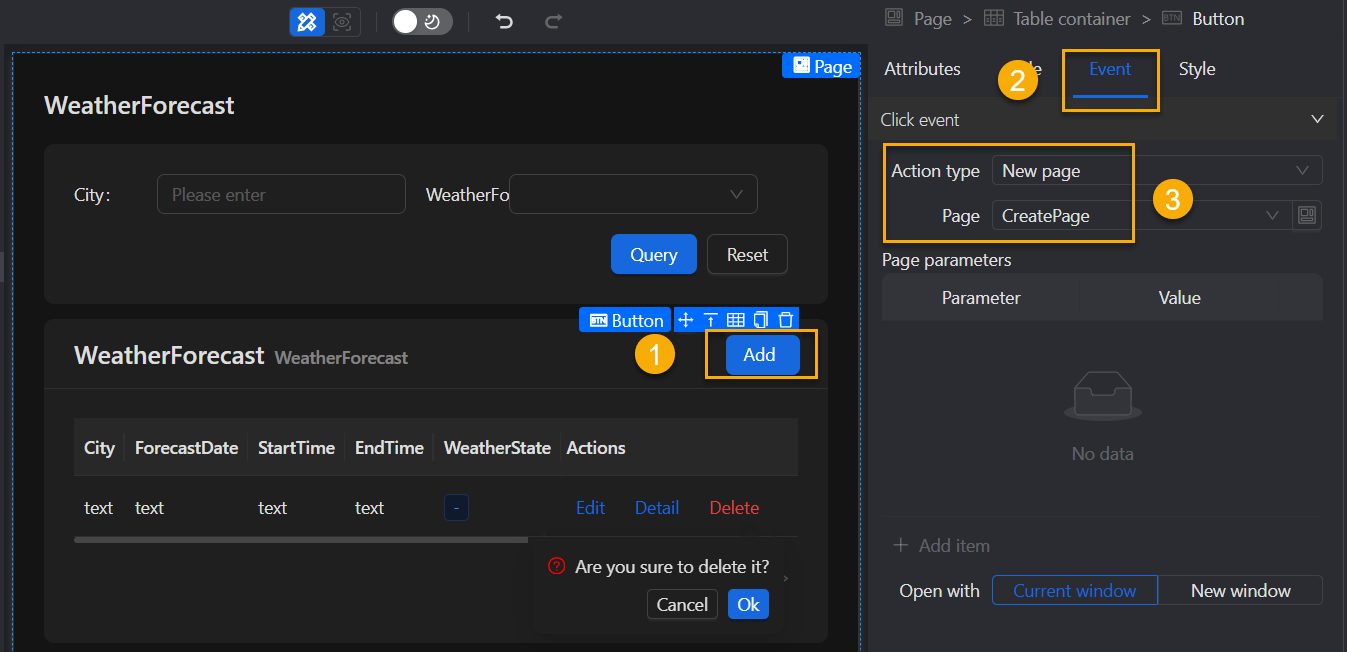
In the ListPage view, select the Add button, and then in the Event tab on the right, set Action type to New page, and set Page to CreatePage view.
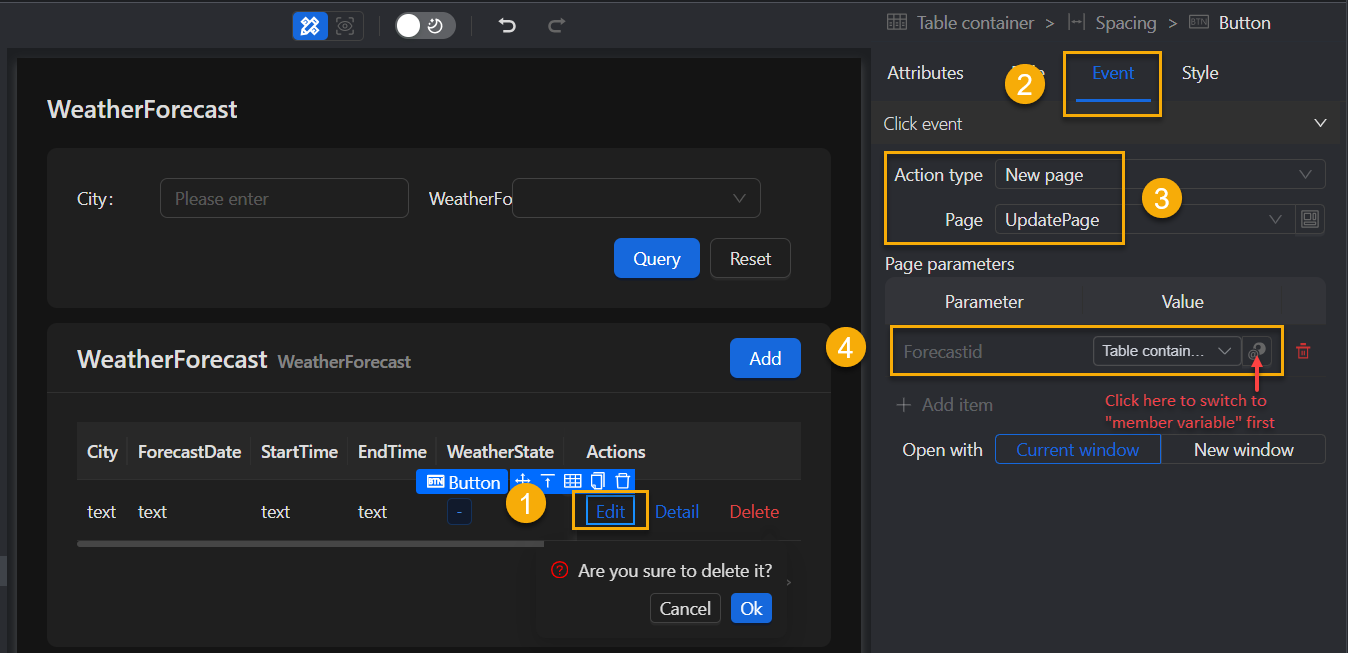
In the ListPage view, select the Edit button, and then in the Event tab on the right, select Action type to New page, and set Page to UpdatePage view. Set the Forecastid parameter value to Member variable: Table container > Current row > Id.
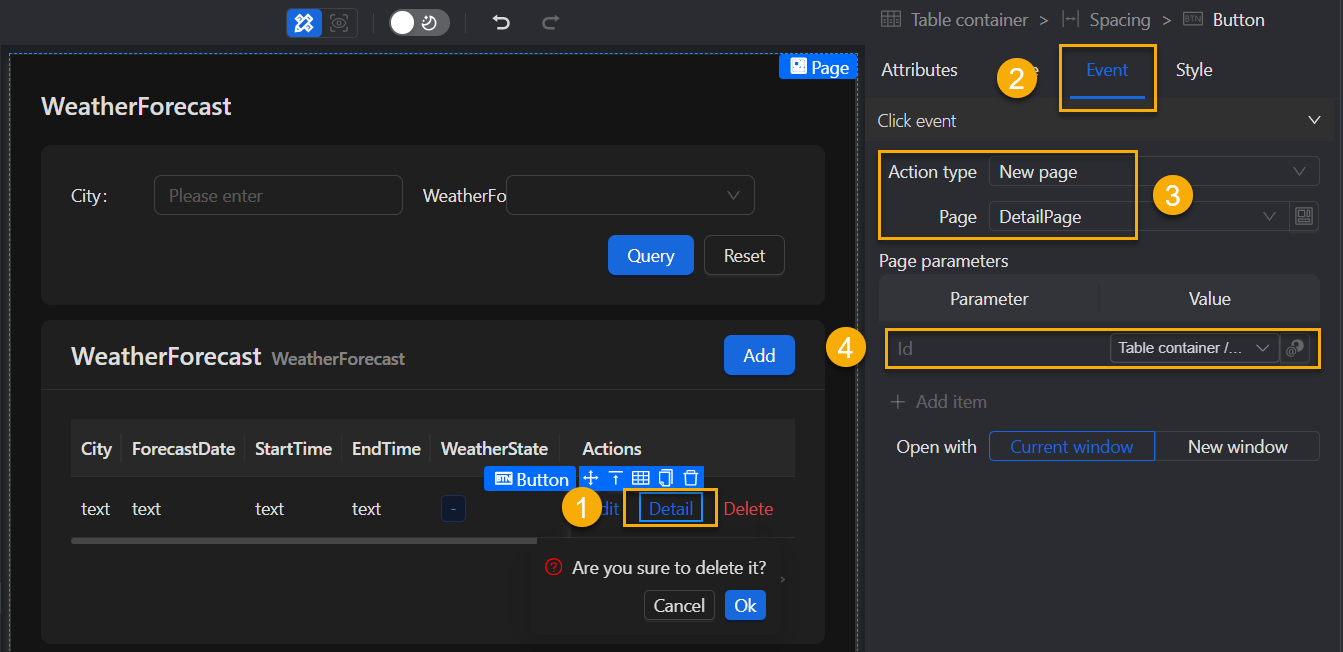
In the ListPage view, select the Detail button, and then in the Event tab on the right, set Action type to New page, and set Page to DetailPage view. Set the Id parameter value to Member variable: Table container > Current row > Id.
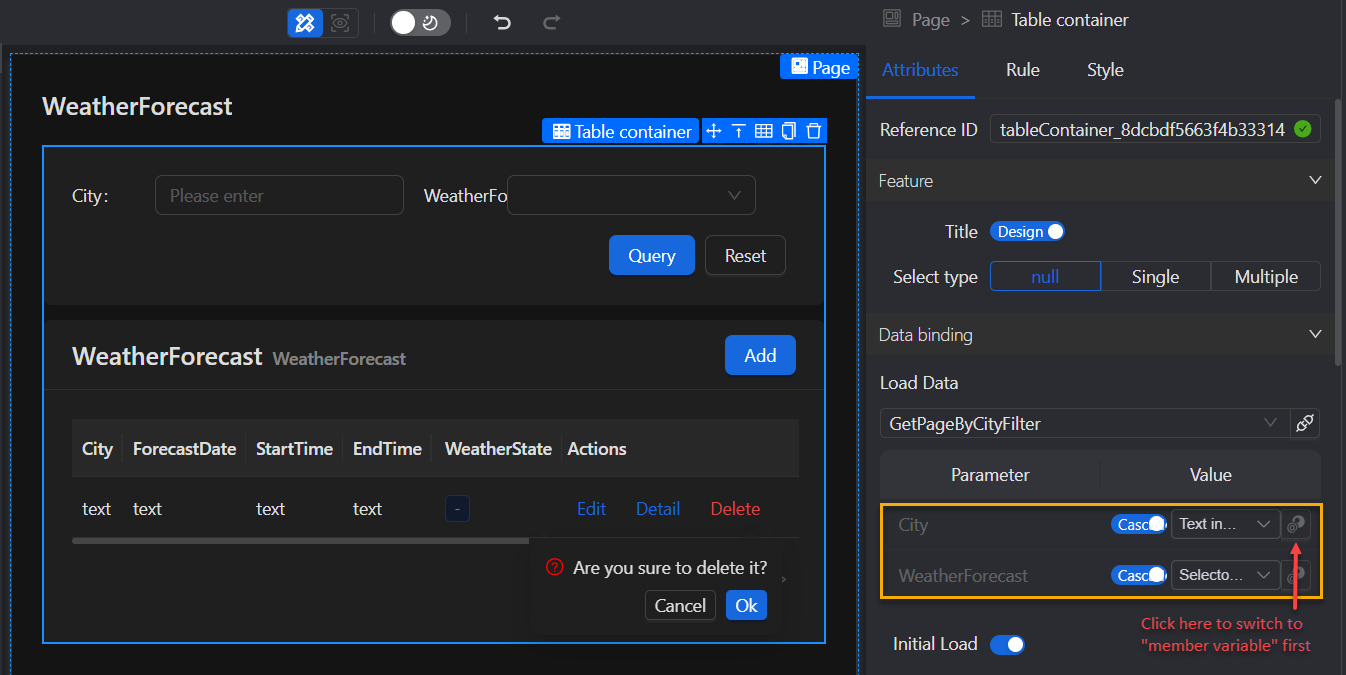
Select Table container in the Outline tree of the ListPage view. In the Attributes tab on the right, set the value of the City parameter to Member variable: Text Input > Bind value, and set the value of the WeatherForecast parameter to Member variable: Selector > Bind value.
Step 3: Configure the navigation page
Double-click the Layout.sdv file to open the navigation view.
Select Menu Layout in the Outline tree on the left. In the Attributes tab on the right, click Add Item to add a new menu item: Weather, and set the value to ListPage view.
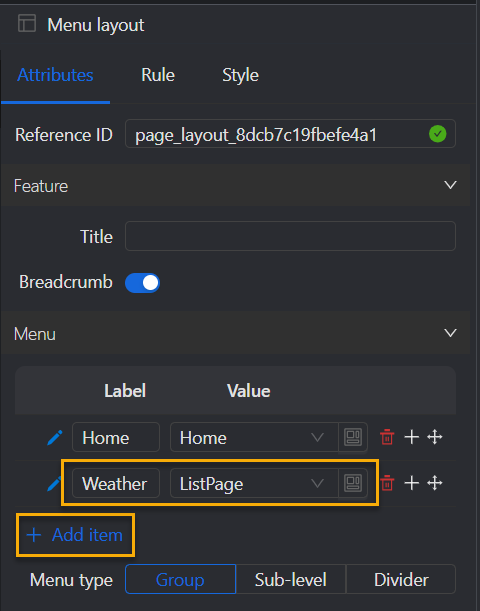
At this point, the front-end and back-end of the weather forecast app is complete. You can generate and run projects to view the front-end and back-end.
Generating and running projects
Step 1: Generate code and projects from the designer project.
In Solution Explorer, right-click the project node and select Generate Projects > Profile.
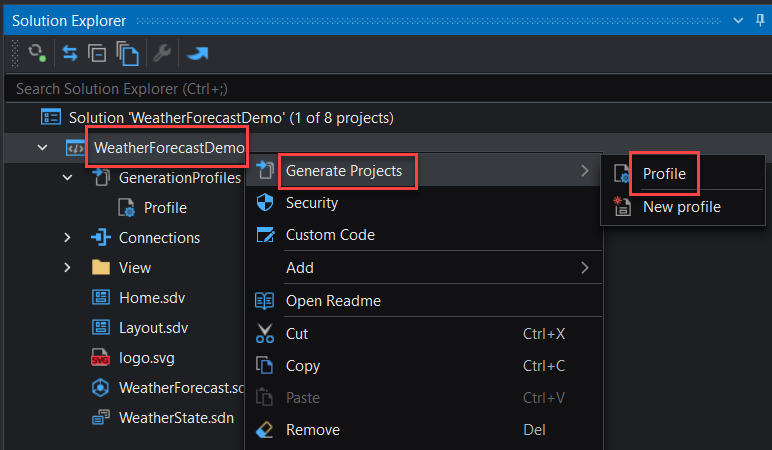
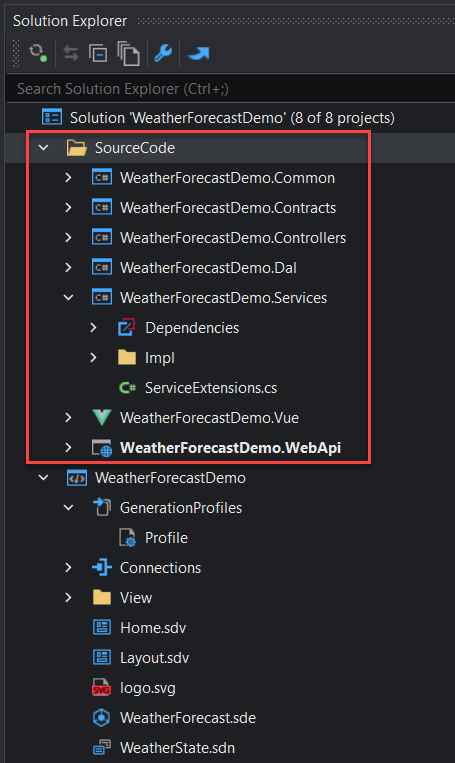
The following projects are generated:
Step 2: Run the project.
Run the WeatherForecastDemo.WebApi project to start the Web API.

Web API started successfully:
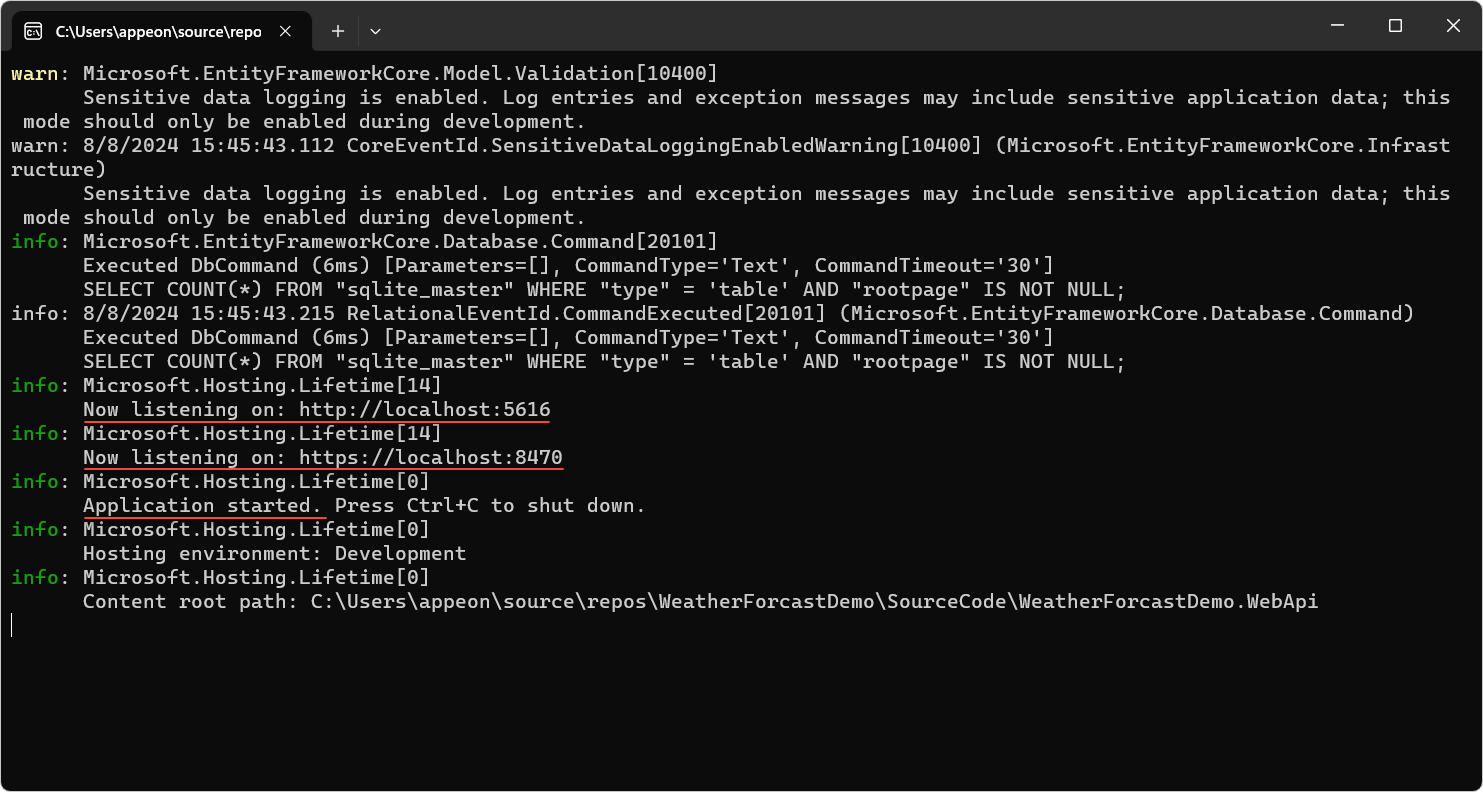
When the Web API runs successfully, you will see the Swagger UI and be able to test the base API and filter API on the Swagger UI (Note: If https access is restricted, you can try using http, as shown below).
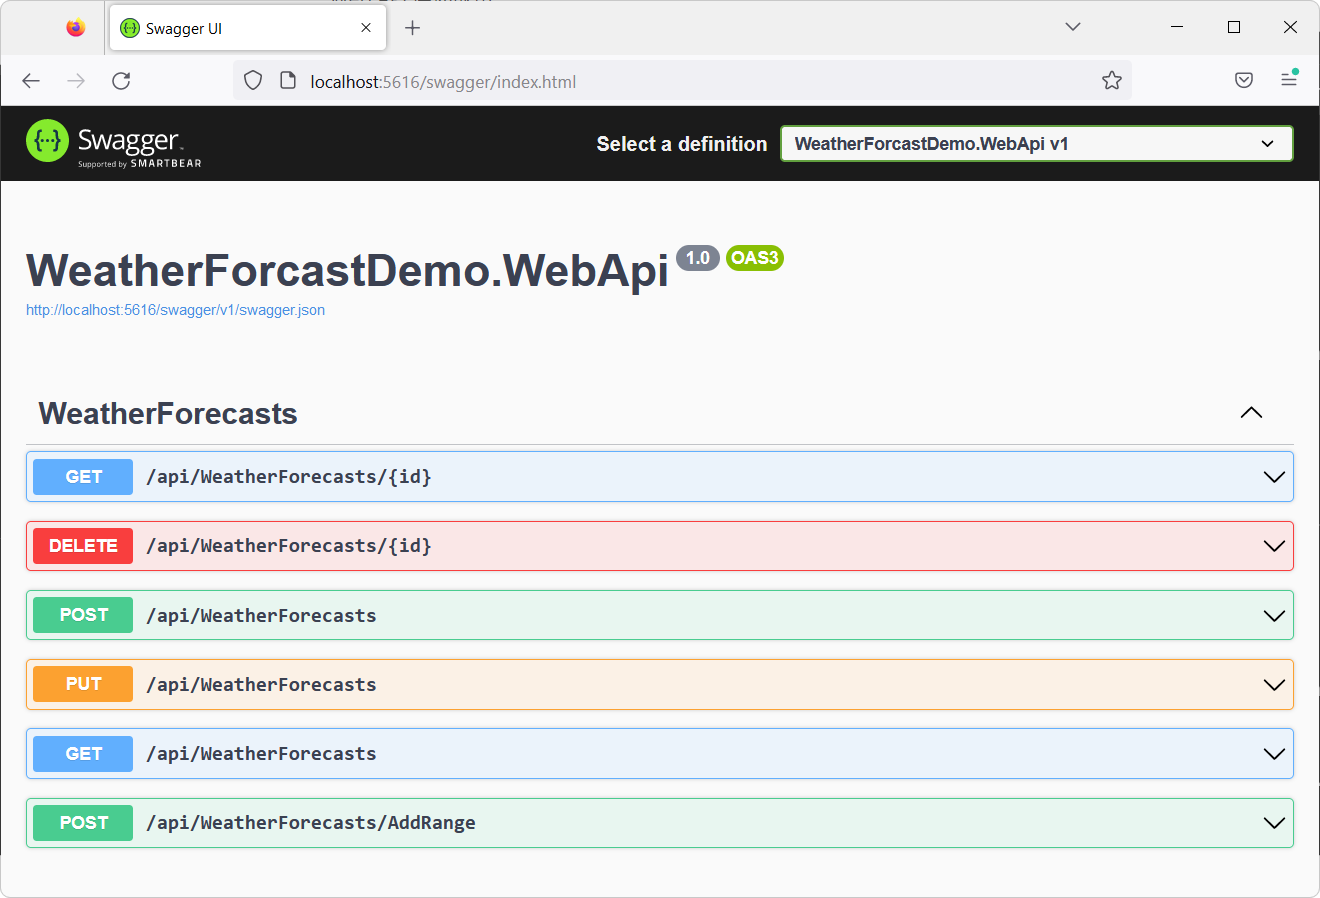
After starting the Web API, you can run the WeatherForecastDemo.Vue project to start the Vue Web application.

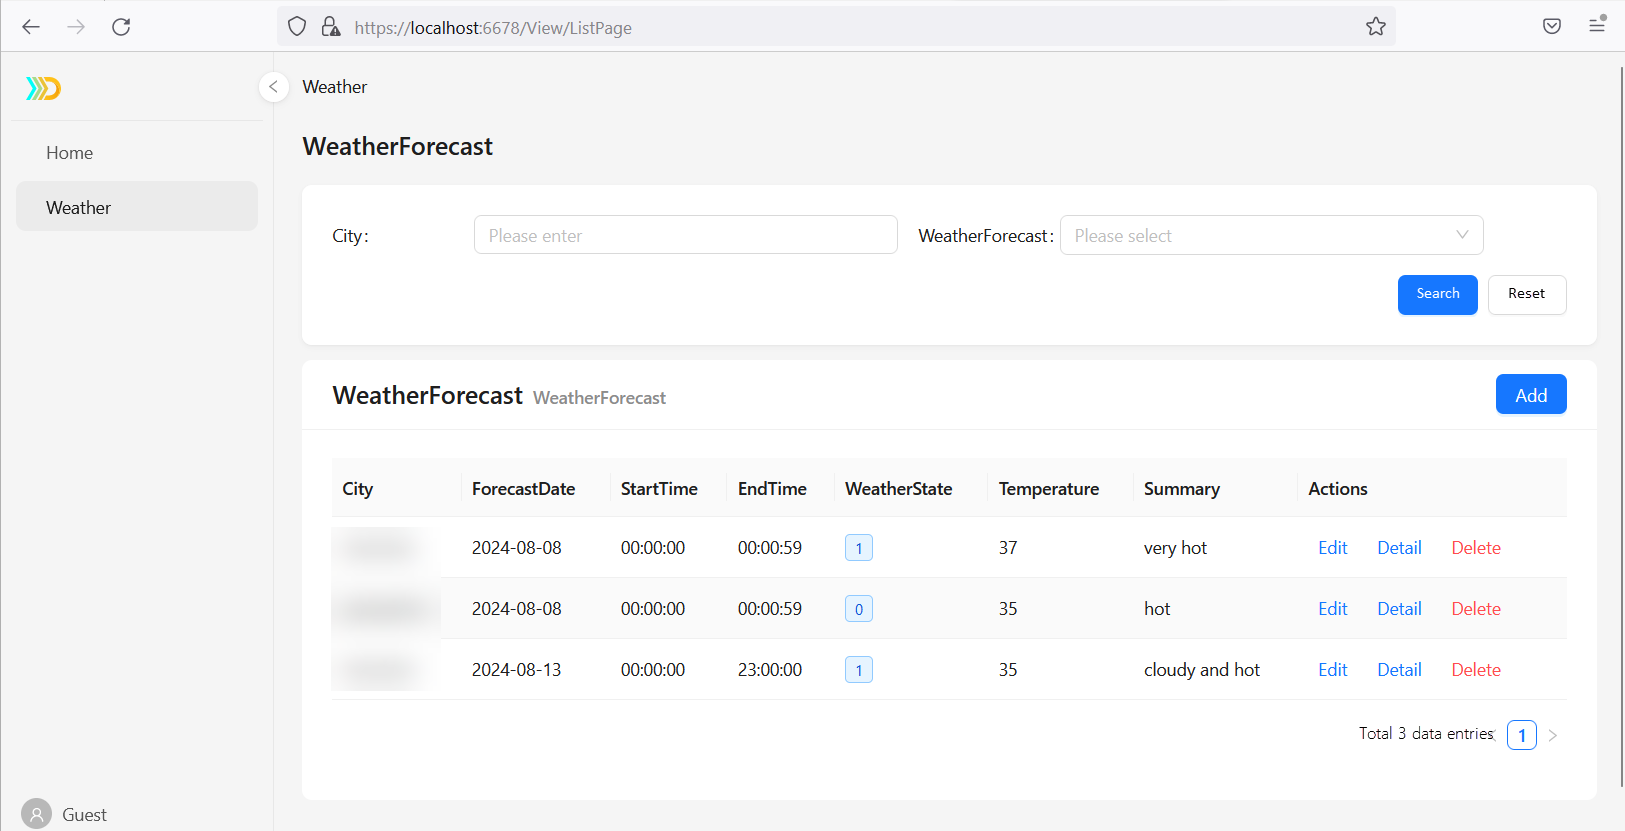
After the application is running, click the Weather menu in the navigation bar on the left and test with the data addition, deletion, modification and query functions on the right page.
Optimizing the view UI
Next, we will make some preliminary optimizations to each view UI (mainly interface layout and visual effects) to improve the user experience. You can further adjust and optimize according to your needs and preferences to achieve the best results.
Below is the UI before optimization:

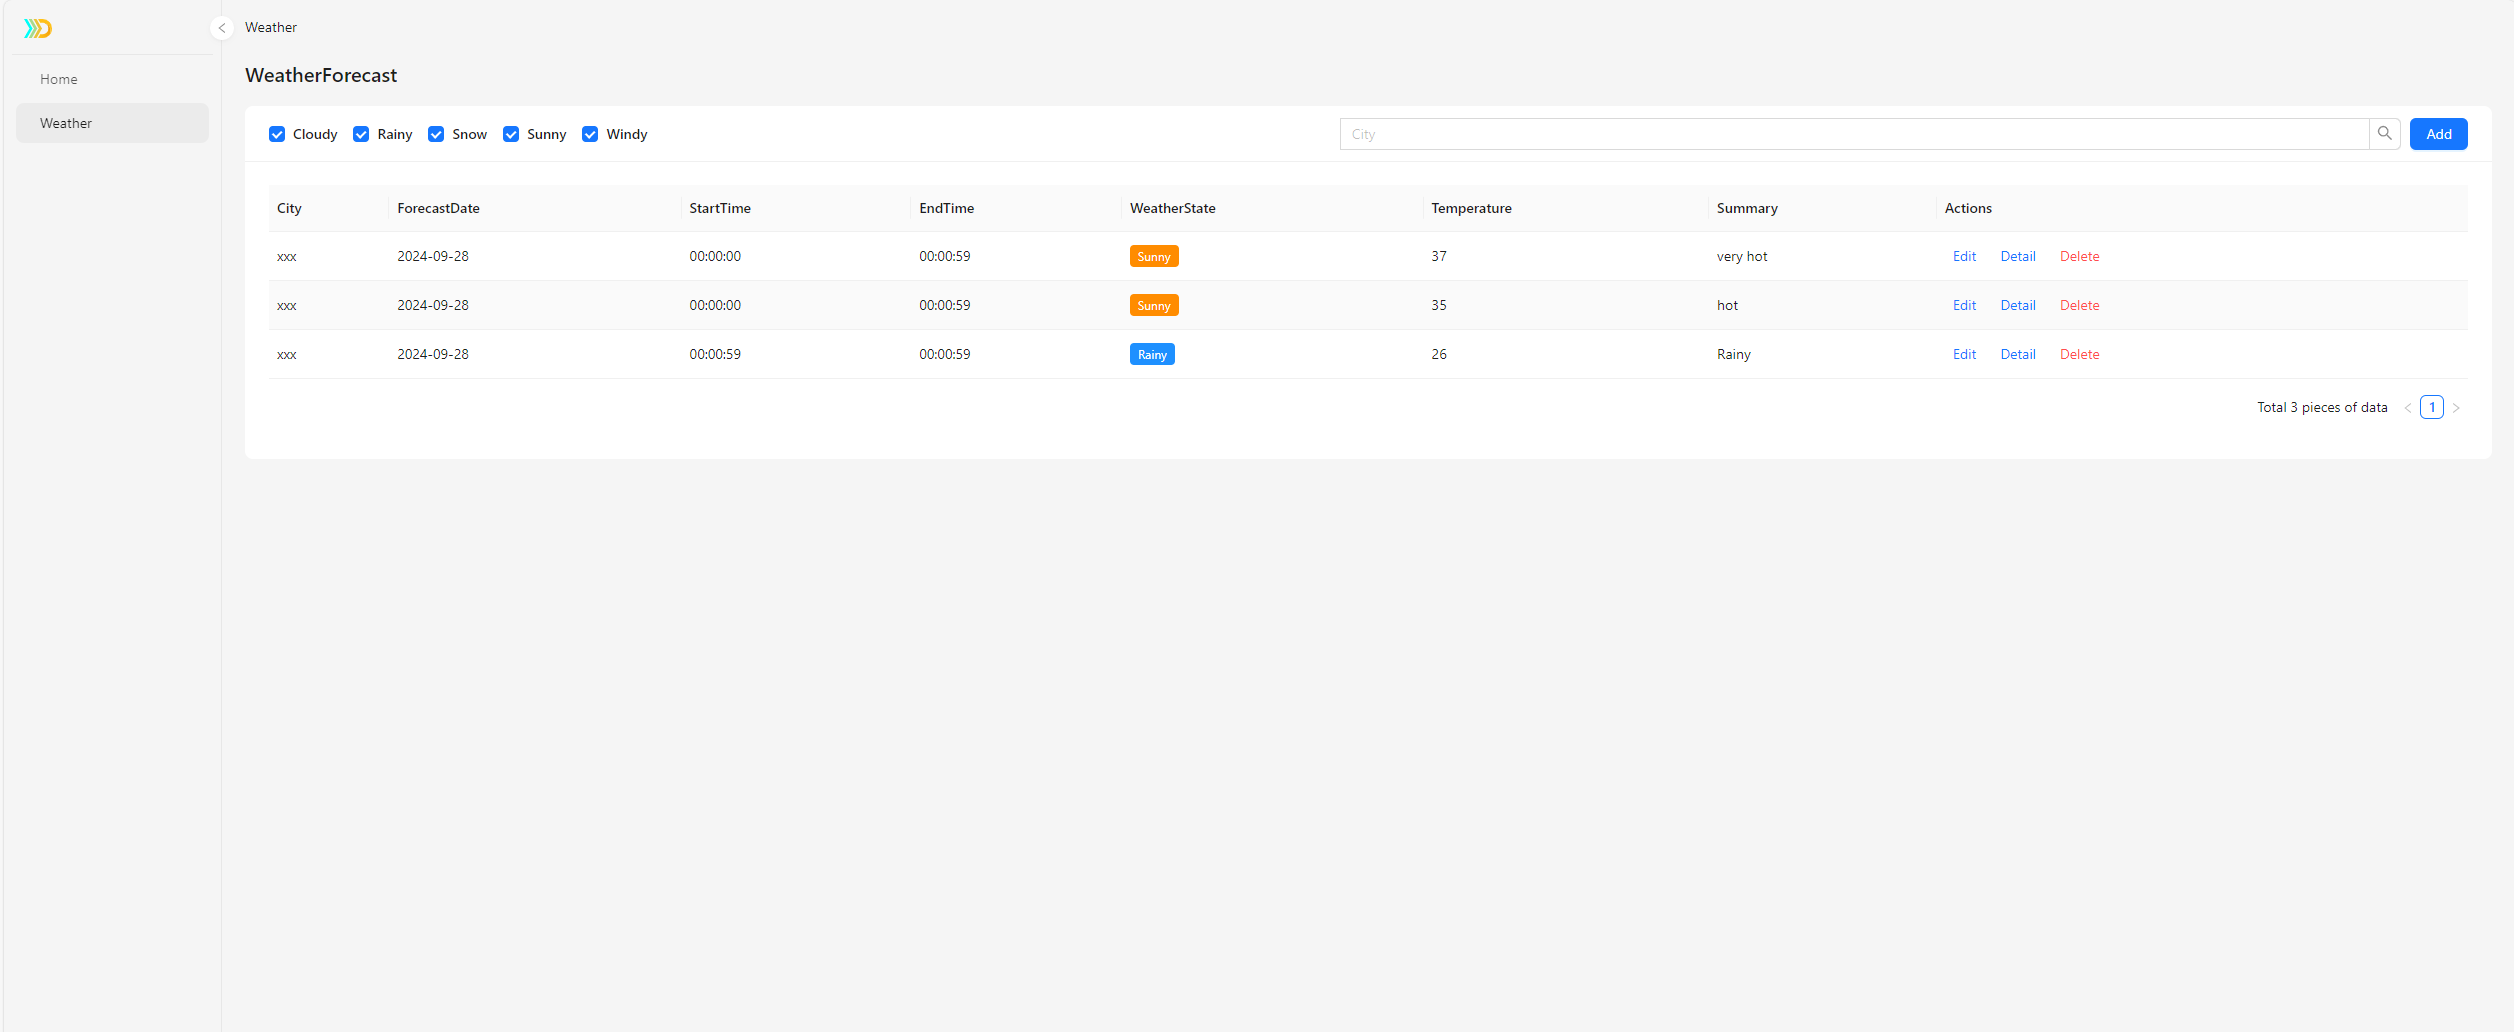
Below is the UI after optimization:
CreatePage view
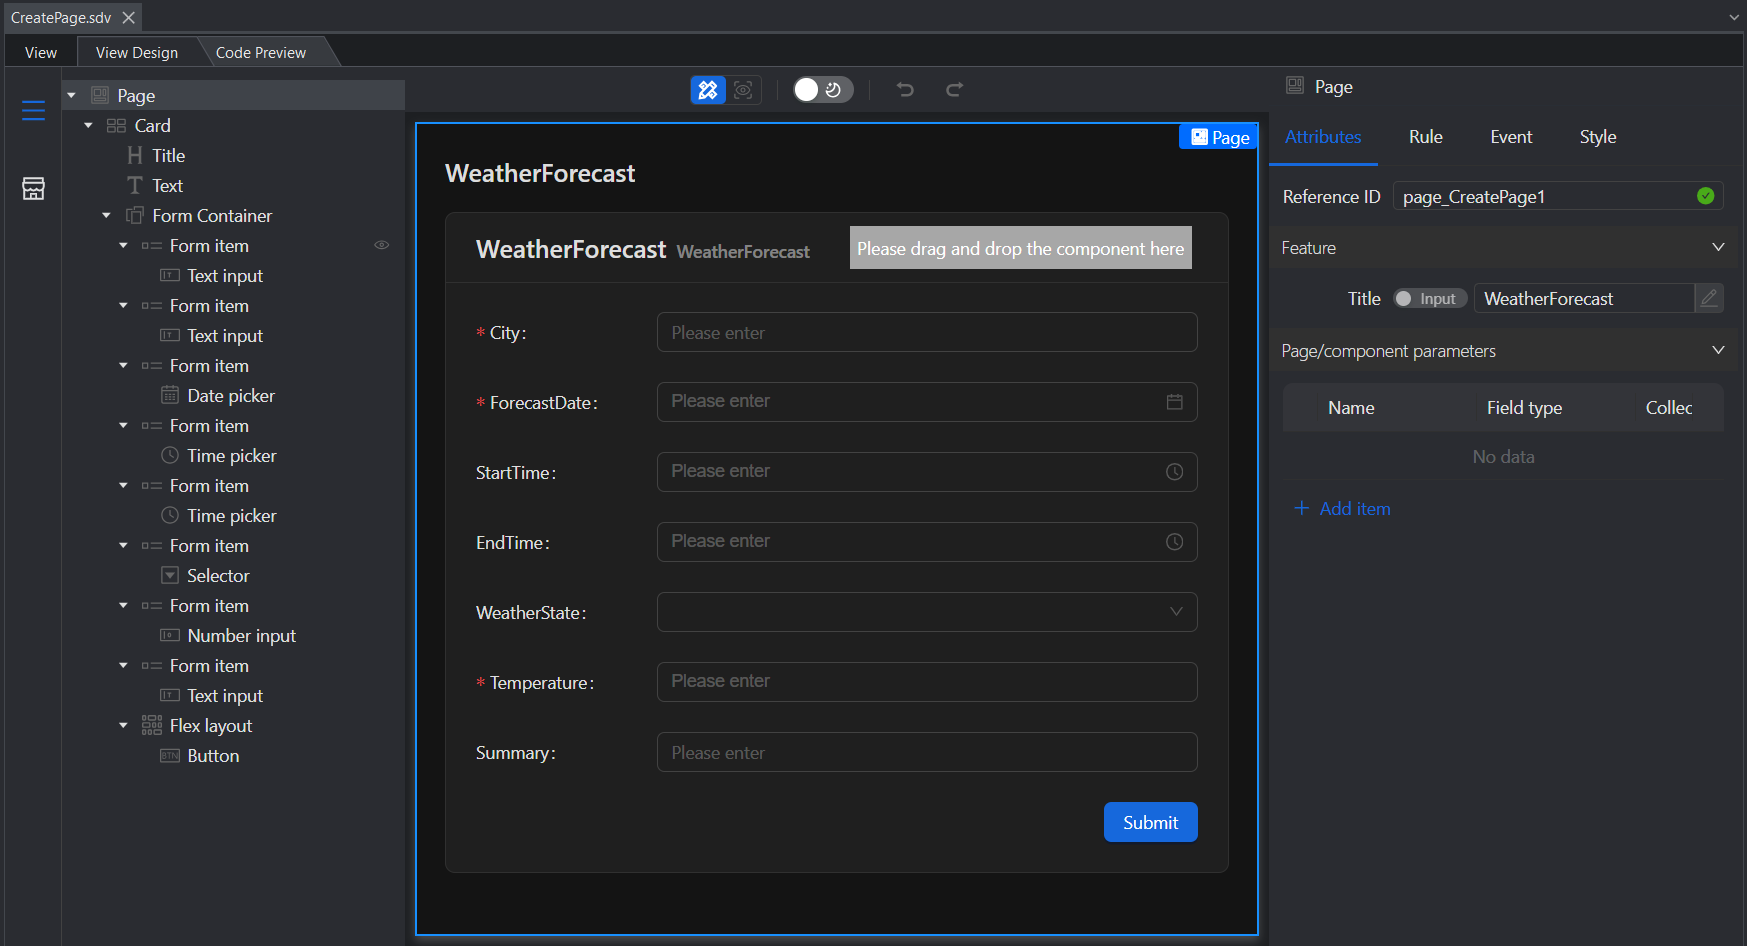
The default UI of the CreatePage view is as follows. Let's make three optimizations next:
Merge the three data items of ForecastDate, StartTime, and EndTime into one item.
Change the selector component of WeatherState to a radio button group.
Display the temperature suffix ℃ after the number input box of Temperature.
Merge the three data items of ForecastDate, StartTime, and EndTime into one item.
Delete the StartTime and EndTime form items. After selecting Form item, select the last icon to delete the form item.
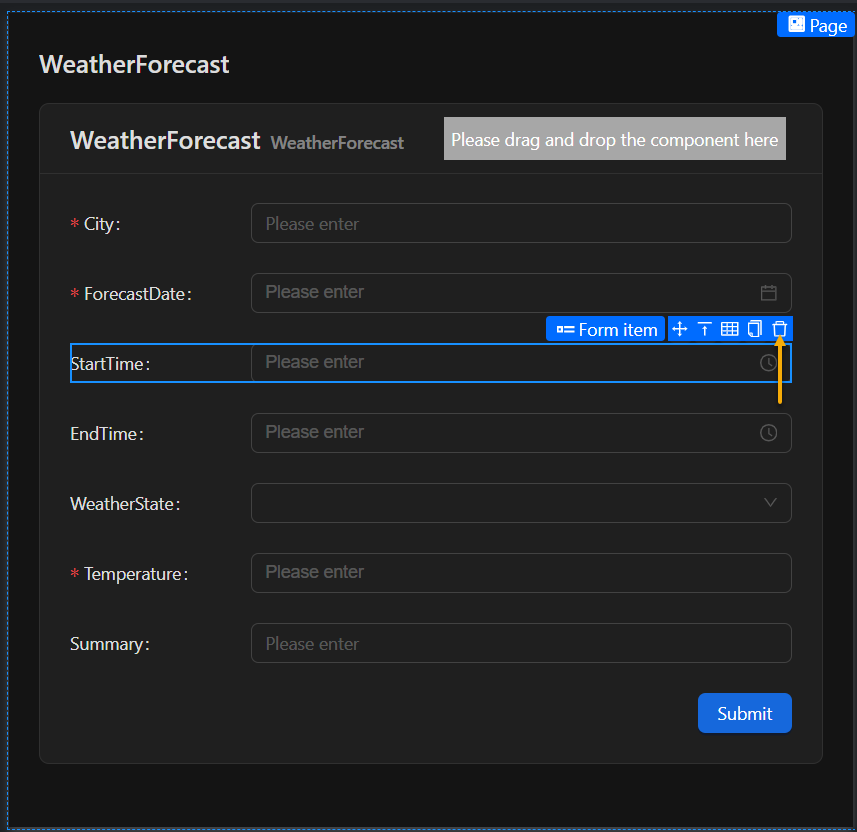
Delete the Date picker of the ForecastDate field.

Select Combination from the Material library and drag it to the ForecastDate field indication.
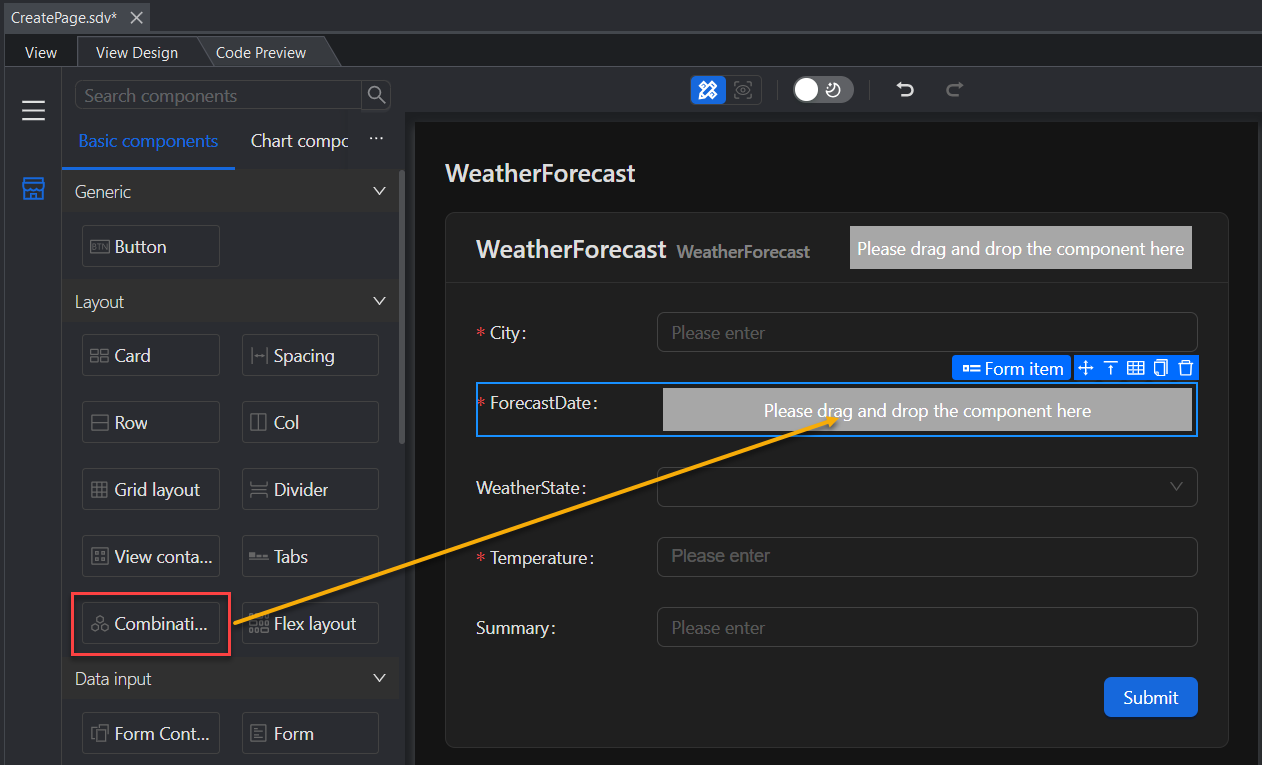
After that, you will see the Combination component.
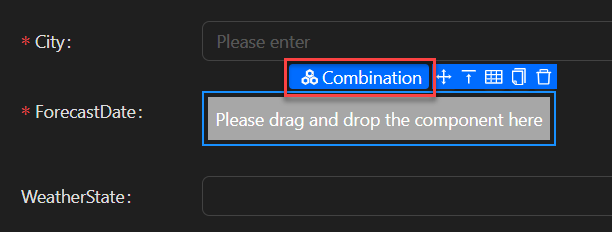
Drag the Date Picker and Time Range components into Combination one after another.

Select Combination in the Outline tree on the left, and then select Block in the Attributes tab on the right. This will make the components in the combination automatically occupy the full size of the combination component.

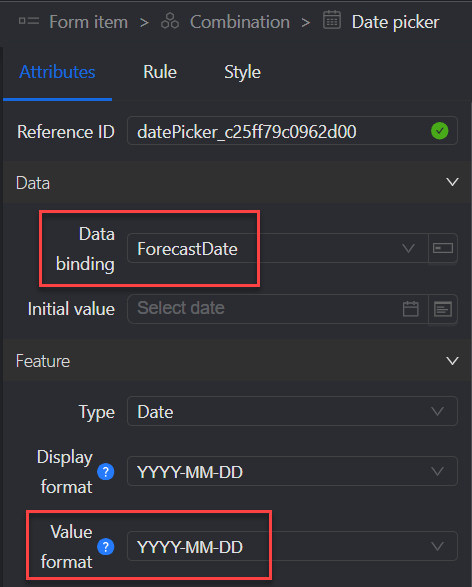
Bind data columns to the newly added components: bind Date picker to the ForecastDate field; set Value format to YYYY-MM-DD; bind Start time in Time range to the StartTime field, and End time to the EndTime field.
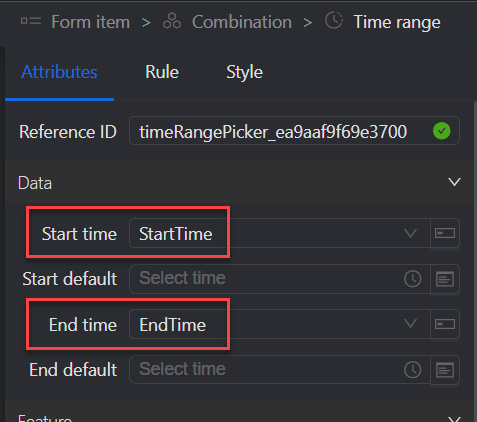
Change the WeatherState selector component to a radio button group.
Delete the WeatherState selector component.

Select the Radio button group from the Material library on the left and drag it to the WeatherState field indication, then click Click edit JSON in the Attributes tab on the right.
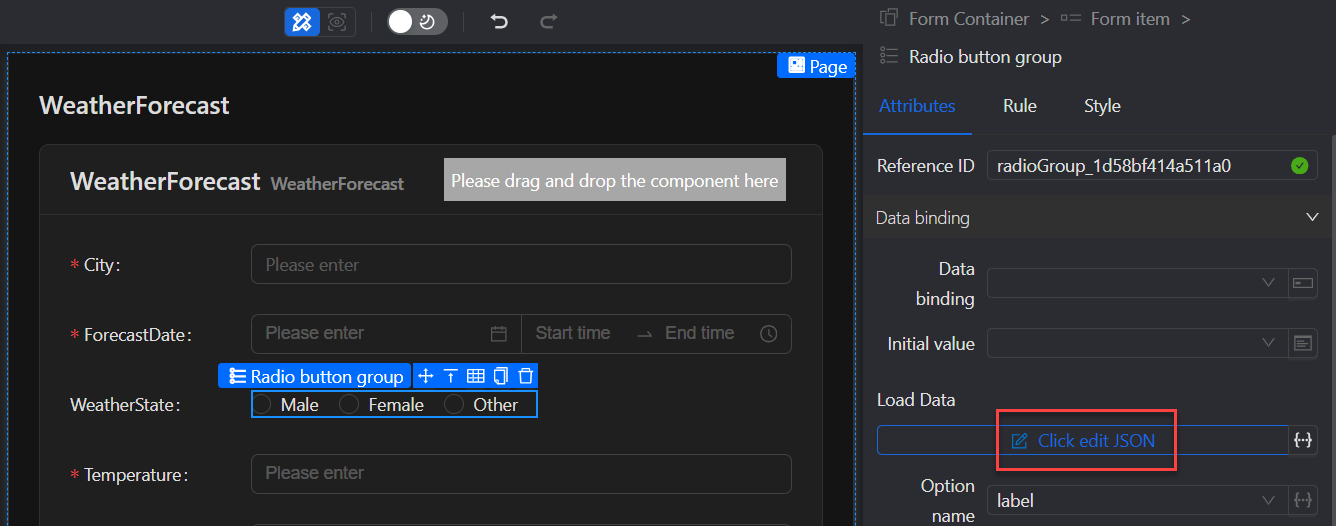
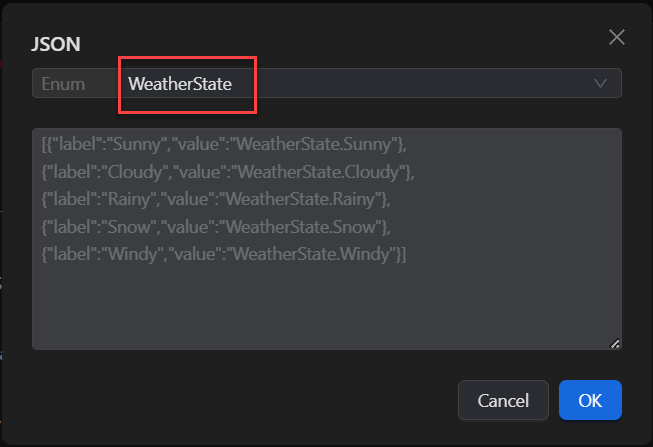
Select the WeatherState enumeration in the JSON dialog box.
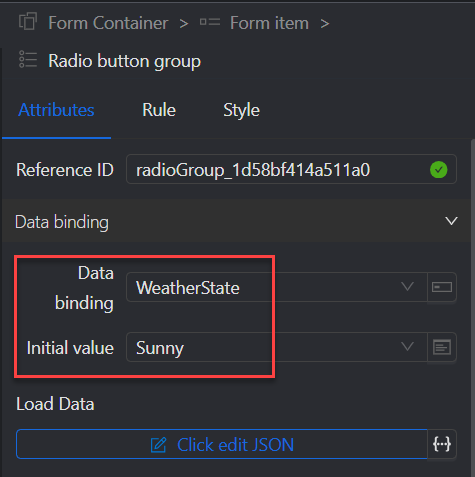
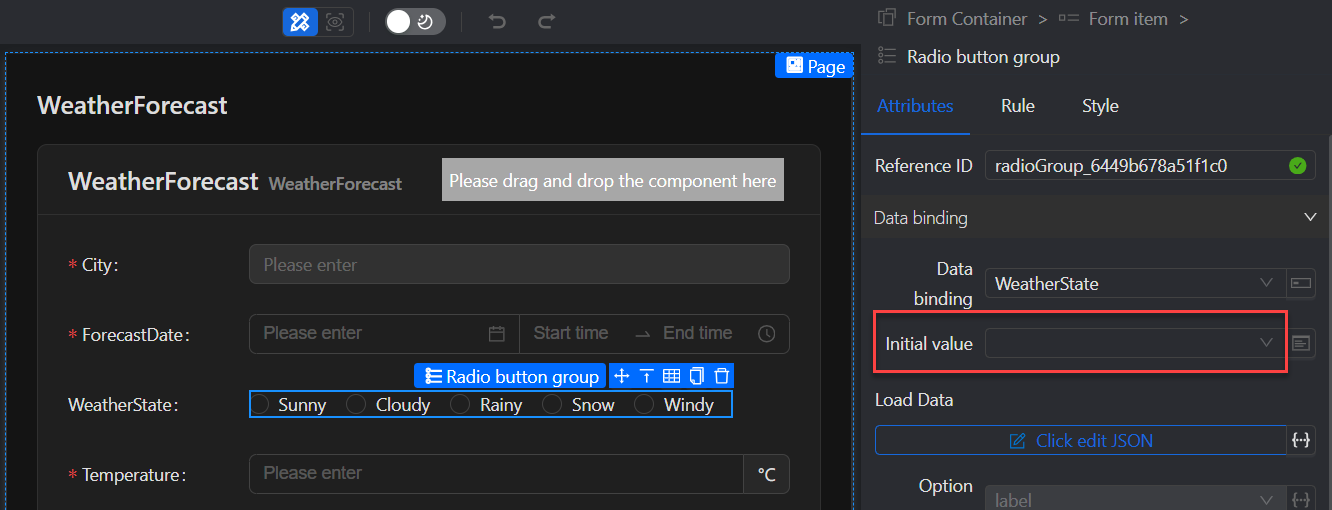
Set Data binding to WeatherState and Initial value to Sunny.
Display the temperature unit ℃ after the number input box of Temperature.
Select the number input box of Temperature and enter ℃ in the Suffix tag in the Attributes tab.
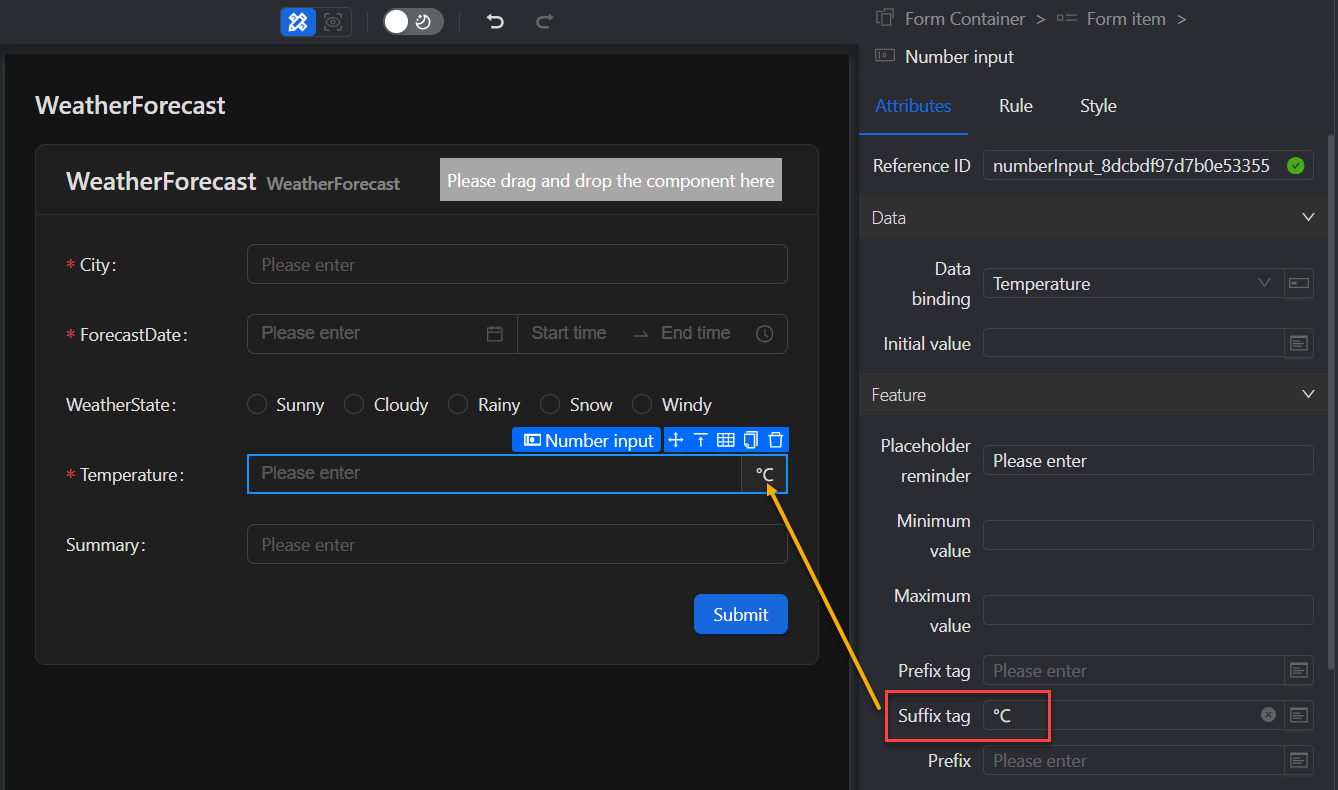
UpdatePage view
The UpdatePage view is similar to the CreatePage view. You can first refer to the CreatePage view for optimization, and then make the following optimizations:
Remove the initial value of WeatherState, because the UpdatePage view will get the value from the database.
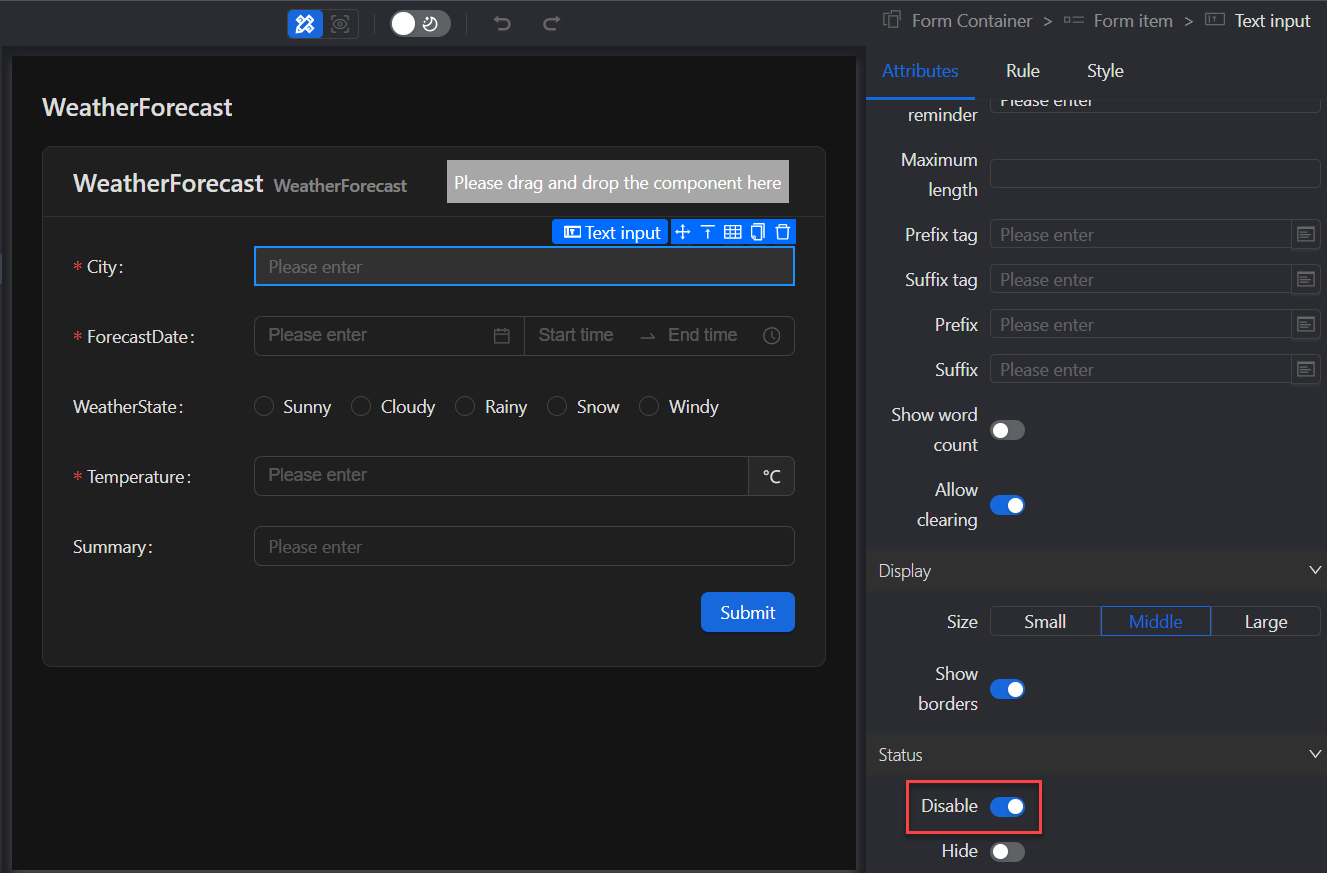
Set City to be disabled for editing.
DetailPage view
The default UI of the DetailPage view is as follows. We will make three optimizations next:
Combine the three data items of ForecastDate, StartTime, and EndTime into one item.
Adjust the column size of Summary.
Set the labels of different enumeration values of WeatherState to display different colors.
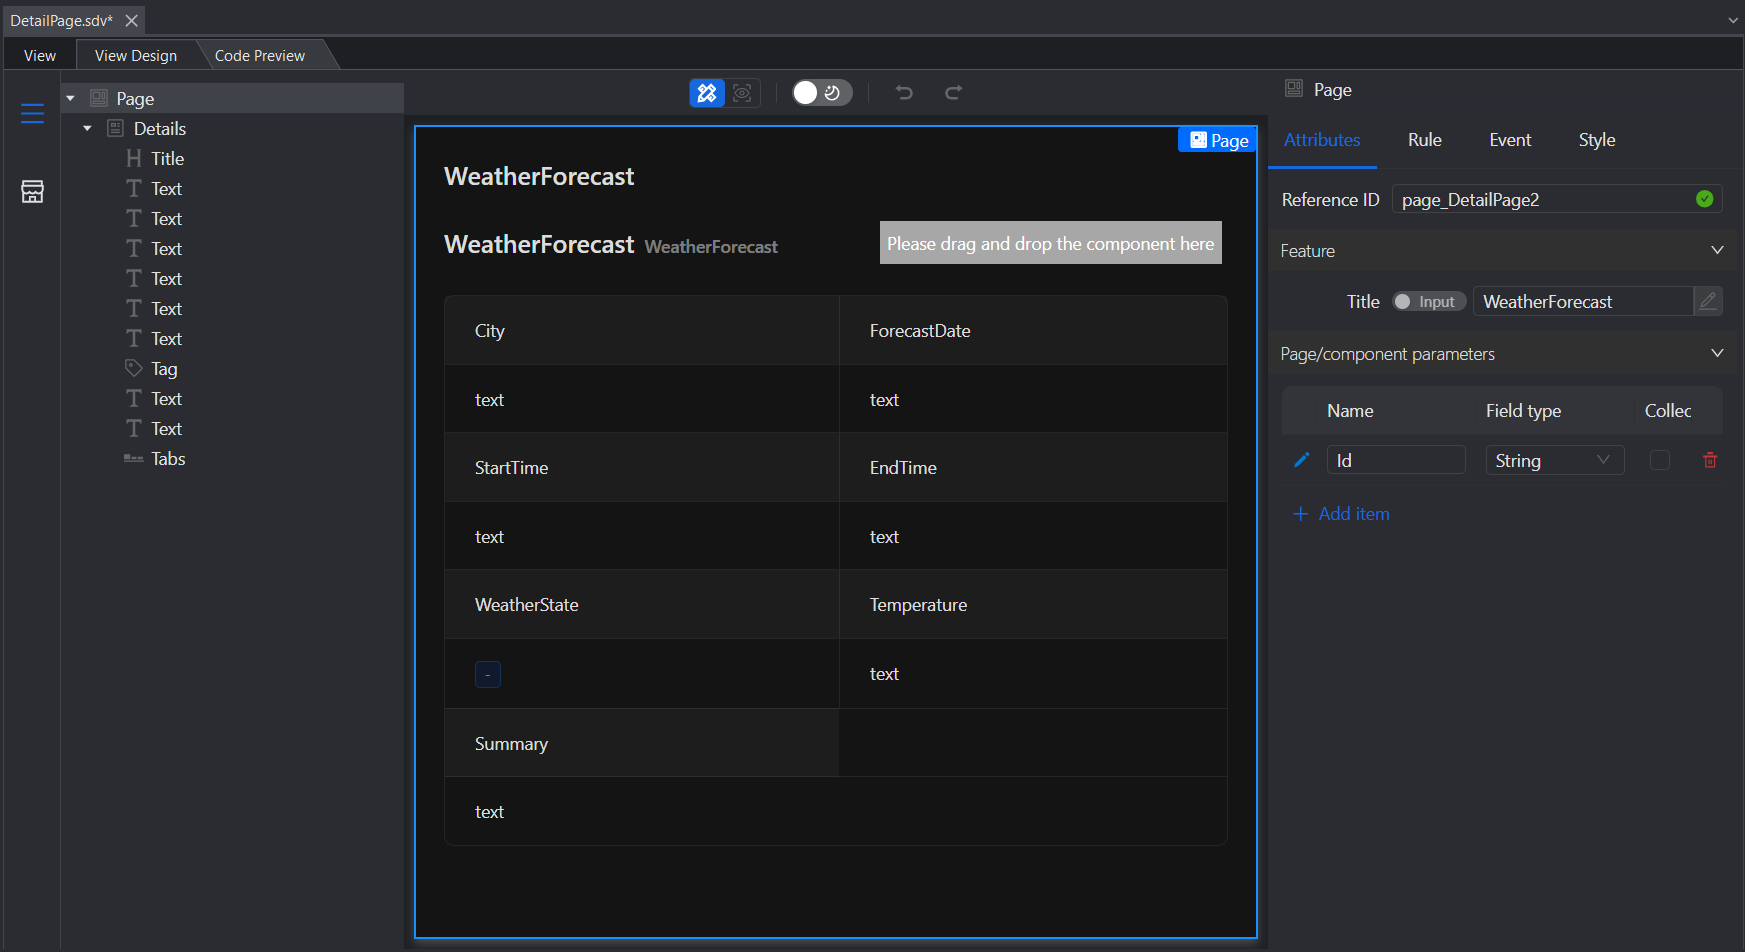
Combine the three data items ForecastDate, StartTime, and EndTime into one item.
Select Details in the Outline tree on the left, and delete StartTime and EndTime in the Attributes tab on the right.
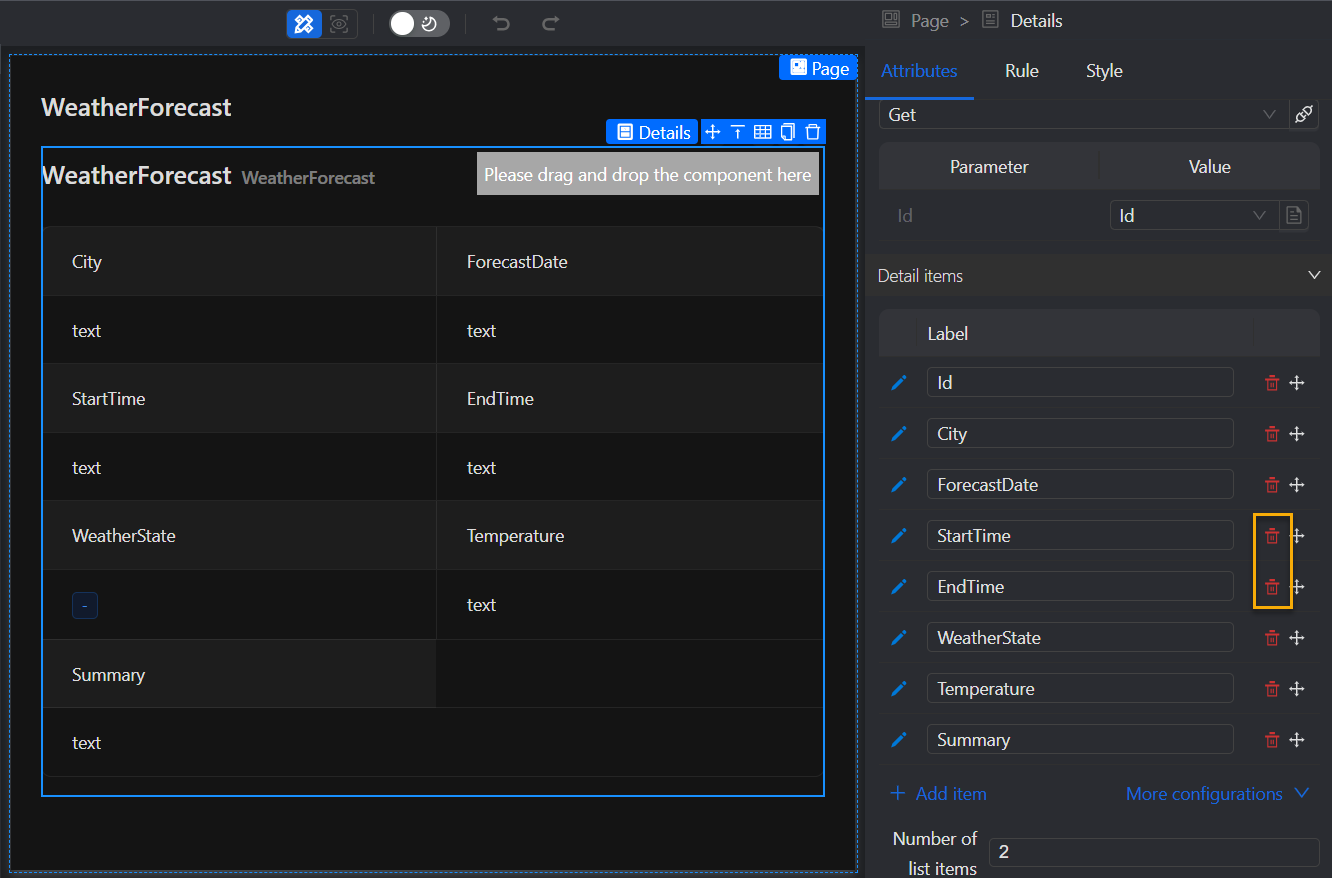
In the UI designer, delete Text in the ForecastDate field, then add Combination, and add three Text in Combination.
Set the three texts separately. Set the first text's Data binding to ForecastDate, the second text's Data binding to StartTime, Prefix to "(", Suffix to "-", and the third text's Data binding to EndTime, Suffix to ")".
Adjust the columns occupied by Summary.
There are two fields in each row, but there is only one Summary field in the last row. In order to make the UI more beautiful, we can adjust the width of the Summary field so that it occupies two columns.
Select Details in the Outline tree on the left, click the setting icon next to Summary in the Attributes tab on the right, and then set Number of columns contained to 2.
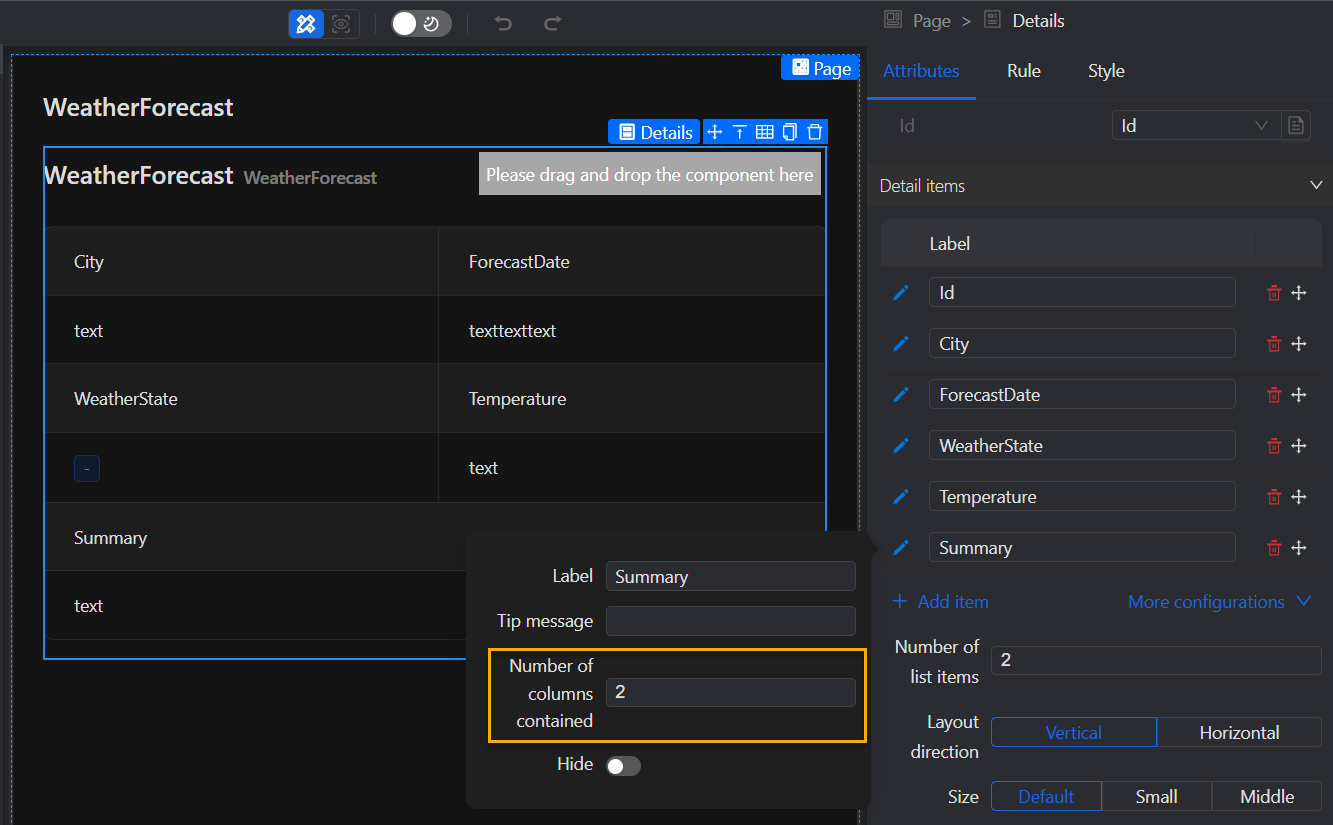
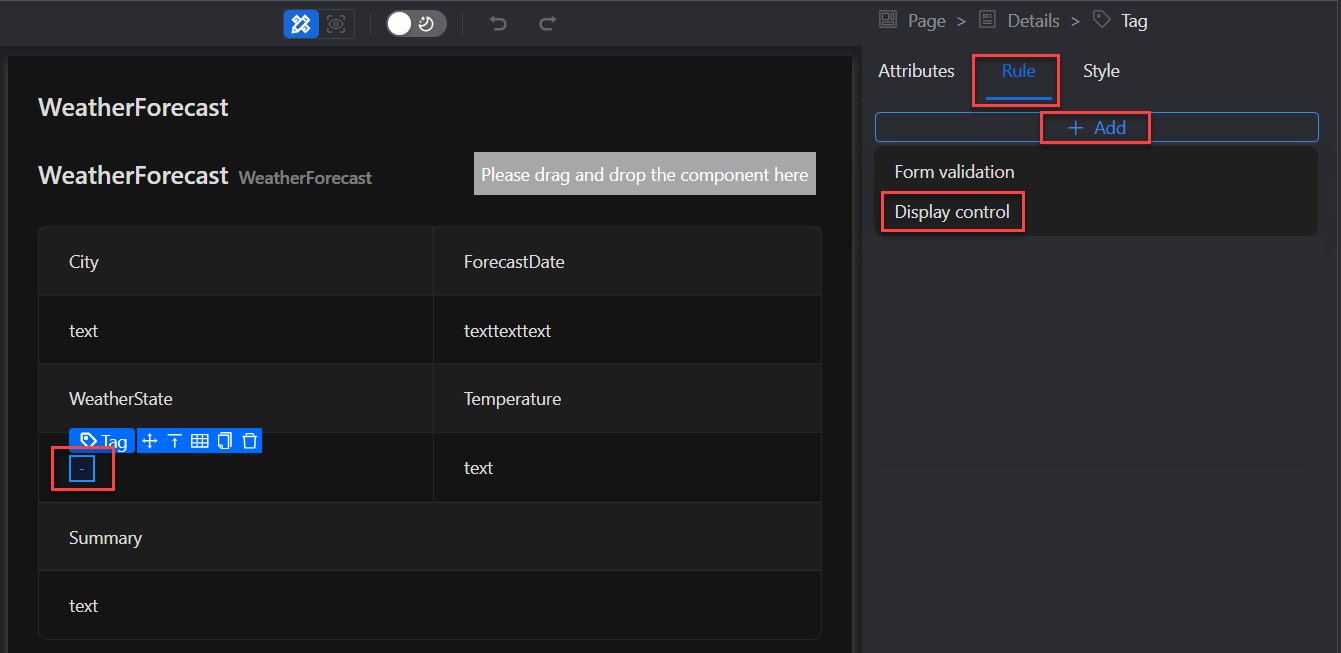
Set the labels of different enumeration values of WeatherState to display different colors.
Select the tag of the WeatherState field, click Add in the Rule tab on the right, and then select Display Control.
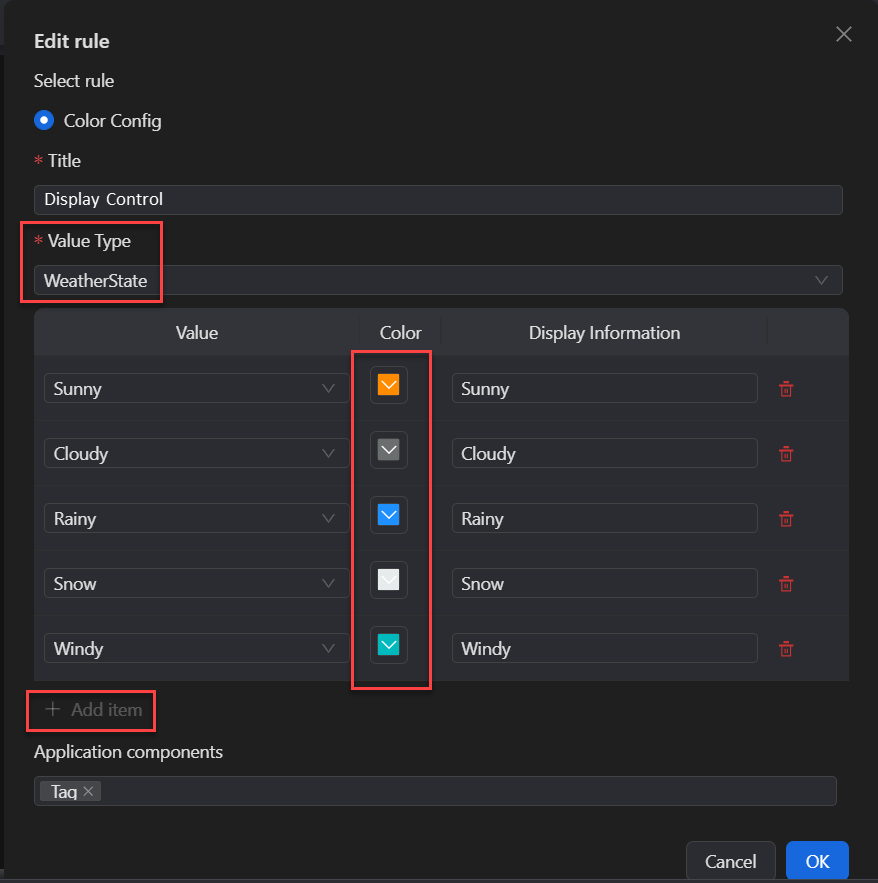
Set Value Type to WeatherState enumeration, click Add item to add the enumeration value one by one, and set a different color for each enumeration value.
ListPage view
Next, we will make the following optimizations to the ListPage view:
Customize the search function.
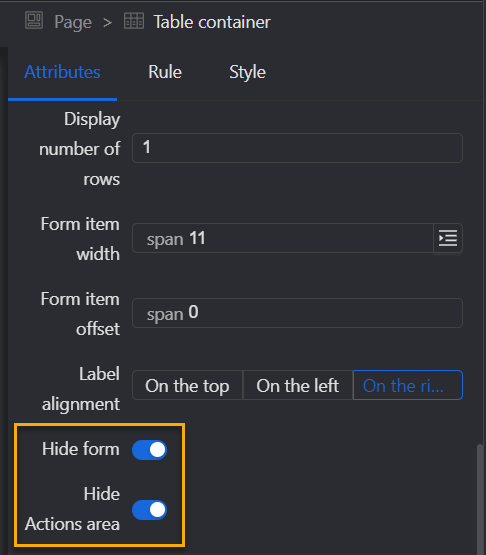
Hide the original search area: Select Form container, select Hide form and Hide Actions area in the Attributes tab.
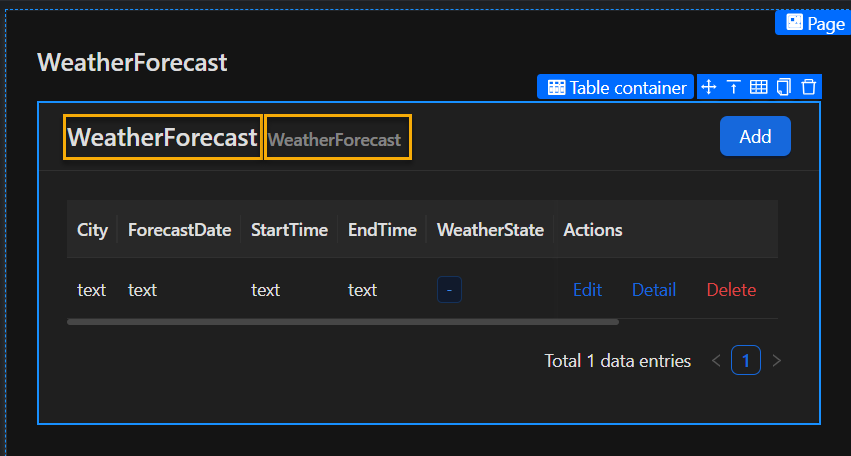
Delete Title and Text. We will define the new search area here.
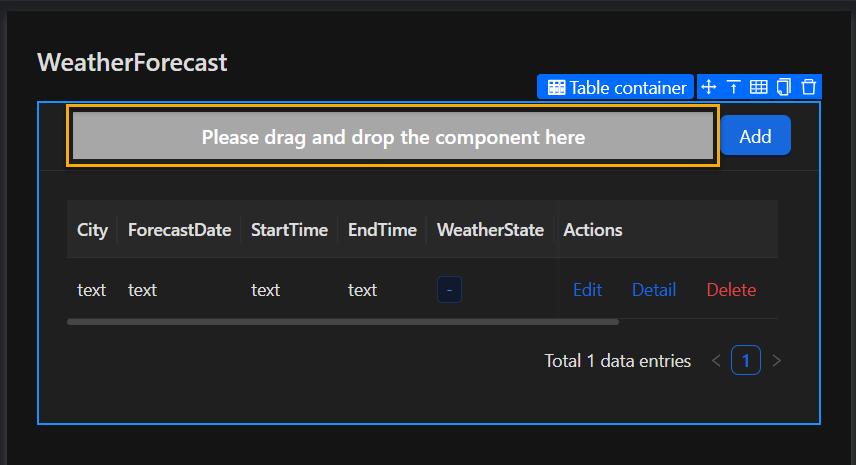
Drag components from the Material library: first add Combination, then add Checkbox Group and Search Input in Combination.
Select Combination, and select Block in the Attributes tab.
Select Checkbox Group, click Click edit JSON in the Attributes tab, select WeatherState enumeration, and then in the Initial value drop-down box, click to add the enumeration value one by one, indicating that all values are selected by default.

Select Search input, enter City in the Placeholder reminder under the Attributes tab.

Select Table container. In the Attributes tab, set the City parameter value to Member variable: Search input > Bind value, and set the WeatherState parameter value to Member variable: Checkbox group > Bind value. This is to bind the filter parameters to the newly added components.

Set the labels of different enumeration values of WeatherState to display different colors. Please refer to the method in the DetailPage view.