Entity designer
This section introduces available options in the Entity Designer, Base Entity Designer, Owned Entity Designer, and Enumerator Designer:
Entity designer: This designer opens after you select the "Entity Design (from Scratch)" or "Entity Design (from Database)" in Add New Item. It allows you to create and configure an entity that is compatible with EF Core, SQLSugar, Dapper, or other ORMs. Normally for each database table, you create one entity.
Entity (Base) designer: This designer opens after you select the "Base Entity Design" in Add New Item. It allows you to create and configure a base entity that can be inherited by the other entities.
Compared to a regular entity, a base entity has no Table/Schema and Inheritance mapping options; no Filter and Service & APIs; and it can only inherit from another base entity.
Entity (Owned) designer: This designer opens after you select the "Owned Entity Design" in Add New Item. It allows you to create and configure a new owned entity type. An owned entity is an entity to be embedded within its owner (another entity).
Compared to a regular entity, an owned entity has no Table/Schema and Inheritance mapping options; no Filter and Service & APIs; and it cannot inherit from any other entity.
Entity designer, Entity (Base) designer, and Entity (Owned) designer have similar options.
In the following sections, the shared options will be described below without mentioning which designer it belongs to, unless otherwise if the option is only available in one or some of them.
Field design
Entity settings
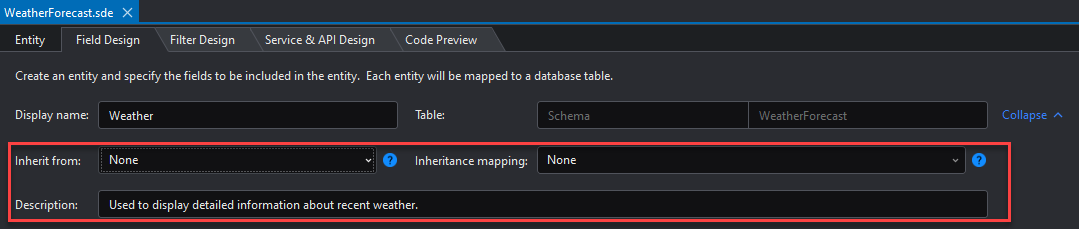
You can specify the following basic settings for the entity in the Field Design tab:
Display name: The display name of the entity. The [DisplayName] attribute will be generated in the C# code.
Table > Schema: If using a relational database, you will also need to specify the table schema. If no schema name is specified here, the default schema in the database will be used.
Table > Table: The database table to which the entity is mapped. Usually each entity needs to map with a data table. If no table name is specified here, the entity class name will be used as the table name.

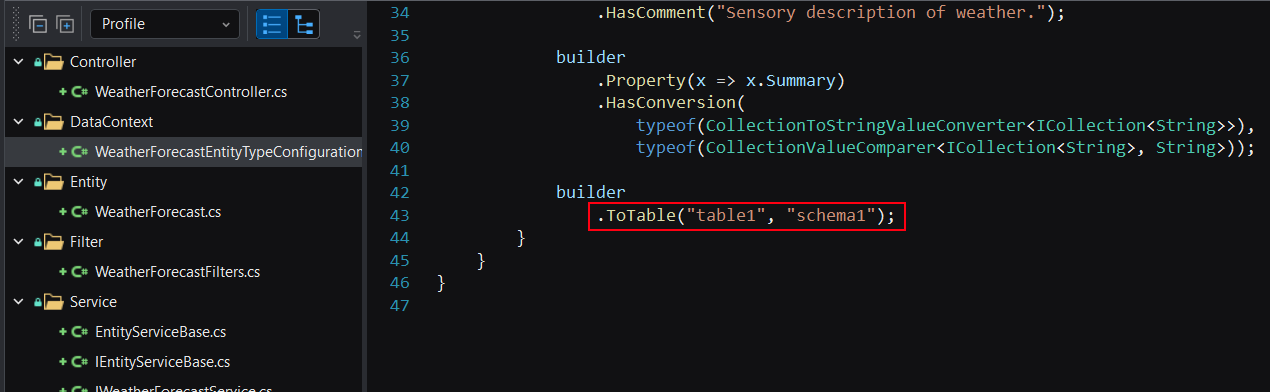
When the Table options are set, the following C# code will be generated:
Inherit from: Choose whether to inherit from another entity.
Inheritance mapping: Choose whether to map the inheritance using the following patterns: Table-per-hierarchy (TPH), Table-per-type (TPT), Table-per-concrete-type (TPC). For more information, refer to Inheritance strategy.
Description: The description of the entity. The description will be displayed as a comment in the C# code.
Inheritance strategy
Content of this article
Inheritance means that the subclass inherits the characteristics and behaviors of the parent class, so that the subclass object (instance) has the instance fields and methods of the parent class, or the subclass inherits the methods from the parent class, so that the subclass has the same behavior as the parent class. Currently, SnapDevelop supports three inheritance strategies: Table-per-hierarchy (TPH), Table-per-type (TPT), and Table-per-concrete-type (TPC). Please choose the inheritance strategy according to your business scenarios.
This article will briefly introduce the four options of inheritance mapping in the Entity Design file and their different manifestations in relational databases.
Note: No matter which inheritance strategy is selected, the root entity cannot be a base entity, and there can only be one inheritance strategy on the same inheritance chain, and the primary key and inheritance strategy can only be set in the root entity. Root entity indicates the top-level entity where inheritance strategy is set.
None
When "None" is selected, if the entity is inherited, the default strategy Table-per-hierarchy (TPH) will be used.
Table-per-hierarchy (TPH)
Table-per-hierarchy (TPH) indicates all fields of the root entity and sub-entity are listed in one table, and an identification column (Discriminator) is used to indicate which sub-entity data is stored in this row of data.
Let's try to understand Table-per-hierarchy (TPH) through the following scenarios:
Assume an educational administration system needs to be created. There are three roles in the system: students, parents, and teachers. The fields they each have are as follows:
Fields for students: name, age, gender, enrollment time, class Fields for parents: name, age, gender, contact number, occupation, education Fields for teachers: name, age, gender, teaching years, subject
All roles have these three fields: name, age, and gender. Create Person.sde and add these three common fields to it, and then create three entities for each role and add the remaining fields to different entities accordingly: Student.sde, Parents.sde, and Teacher.sde.
Set the inheritance mapping in Person.sde to Table-per-hierarchy (TPH), and set the Base entity of other entities to Person.sde.
After generating and running the project, a Person table will be generated in the database.
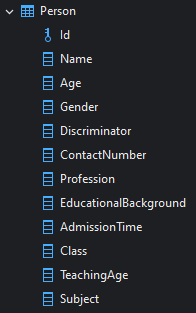
The Person table contains all the fields of the three roles and the automatically generated identification column (Discriminator). The Discriminator column will store the actual entity represented by the row of data, namely Student, Parents, or Teacher.
Table-per-type (TPT)
Table-per-type (TPT) indicates corresponding tables will be created for the root entity and each sub-entity, and the sub-tables will be associated with the parent table by setting the primary key of the sub-table as the foreign key associated with the parent table.
Let's continue to use the same scenario to explain Table-per-type (TPT):
Assume an educational administration system needs to be created. There are three roles in the system: students, parents, and teachers. The fields they each have are as follows:
Fields for students: name, age, gender, enrollment time, class Fields for parents: name, age, gender, contact number, occupation, education Fields for teachers: name, age, gender, teaching years, subject
Create Person.sde and add the common fields (name, age, and gender) to it, and create three entities for each role and add the remaining fields to different entities accordingly: Student.sde, Parents.sde, and Teacher.sde.
Set the inheritance mapping in Person.sde to Table-per-type (TPT), and set the Base entity of other entities to Person.sde.
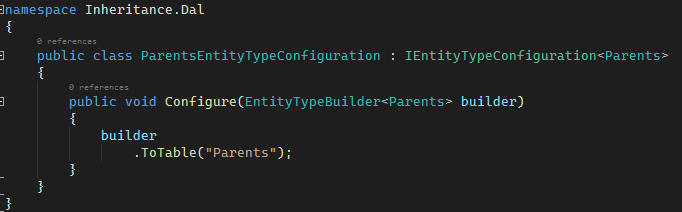
After [project].Dal is generated, under the Configurations folder of this project, the configuration files for the root entity and sub-entities each will have a "ToTable" method generated.
After running the project, four tables will be generated in the database.
The Person table stores the common fields, and the Student table, Parents table, and Teacher table store the fields of each role, and the primary keys of these three tables are all foreign keys associated with the Person table.
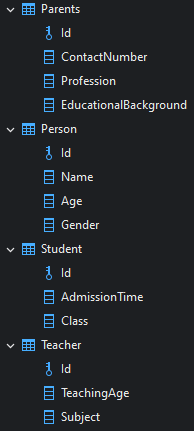
Table-per-concrete-type (TPC)
Table-per-concrete-type (TPC) indicates that tables will be created for the root entity and each sub-entity, but the sub-tables are NOT associated with the parent table, and the sub-table contains all necessary fields (including fields in the parent table).
Note: When using the TPC inheritance strategy in SnapDevelop, the primary key of the root entity must be of GUID type.
Now let's try to understand the Table-per-concrete-type (TPC) option using the same scenario:
Assume an educational administration system needs to be created. There are three roles in the system: students, parents, and teachers. The fields they each have are as follows:
Fields for students: name, age, gender, enrollment time, class Fields for parents: name, age, gender, contact number, occupation, education Fields for teachers: name, age, gender, teaching years, subject
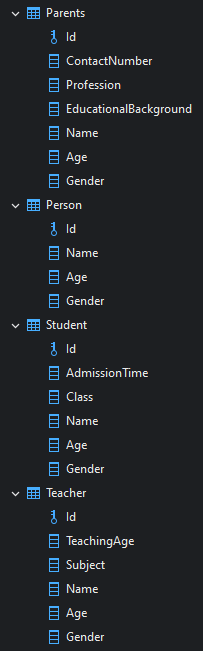
Create Person.sde and add the common fields (name, age, and gender) to it, and create three entities for each role and add the remaining fields to different entities accordingly: Student.sde, Parents.sde, and Teacher.sde.
Set the inheritance mapping in Person.sde to Table-per-concrete-type (TPC), and set the Base entity of other entities to Person.sde.
After [project].Dal is generated, under the Configurations folder of this project, the configuration files for the root entity and sub-entities each will have the following code generated:
builder
     .HasBaseType((Type)null);
After running the project, the following four tables are generated in the database: Person table, Student table, Parents table, and Teacher table. The Person table has the common fields: name, age, and gender, and the other three tables have all their fields (including the common fields), as follows:
Field management
You can manage the field in the Field Design tab:
- Add field: Adds a new field to the current field list.
- Search: Searches a field in the current field list by name.
- Show inherited fields: When this option is checked, the inherited fields will be displayed as read-only below the current field list.
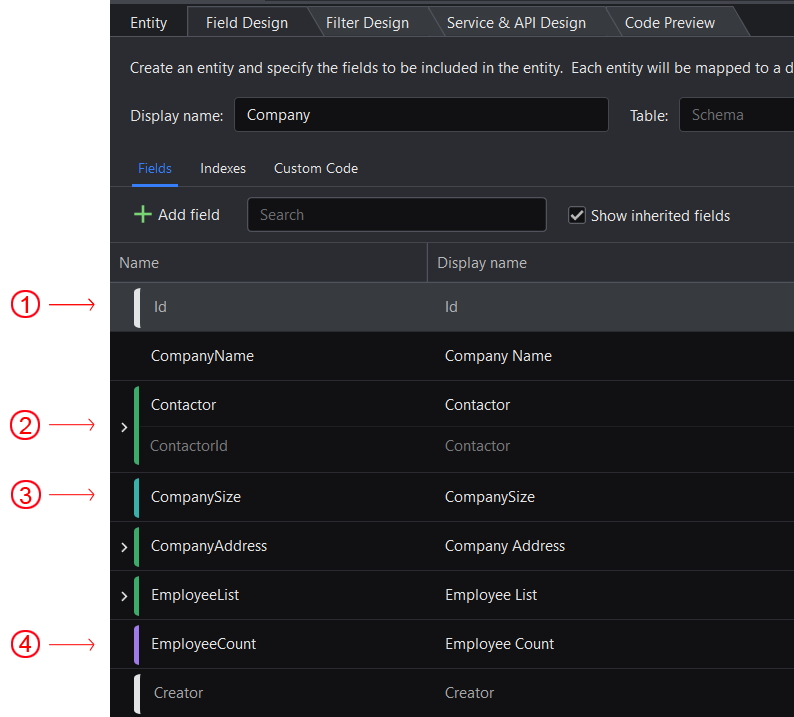
Field color
① White: The field is an inherited field.
② Green: The data type of this field is set to Entity type which makes reference to the other entity.
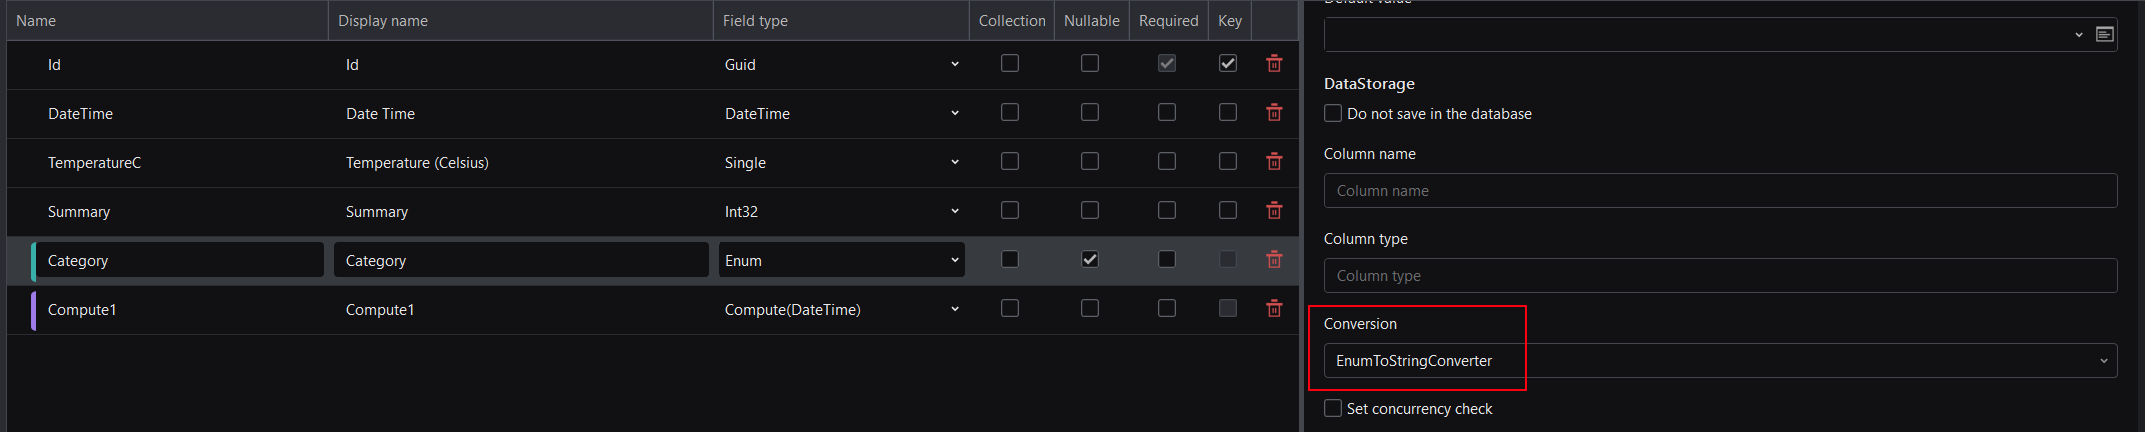
③ Blue: The data type of this field is set to Enum type which makes reference to the enumeration file.
④ Purple: The data type of this field is set to Compute.
Field settings
You can specify the following basic settings for the field in the Field Design tab:
Name: The name of the field.
Display name: The display name of the field. The [DisplayName] attribute will be generated in the C# code.
Field type: The data type of the field. For example, the
Int32data type will be defined as theinttype in the C# code.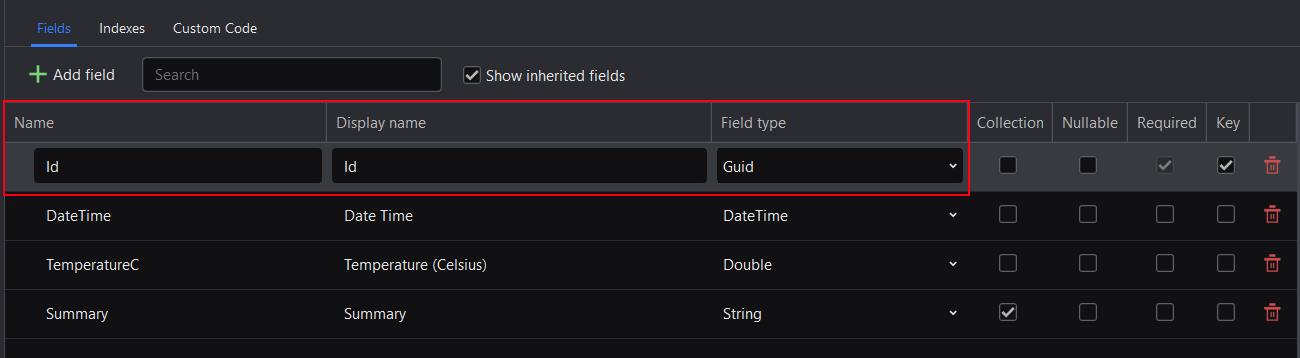
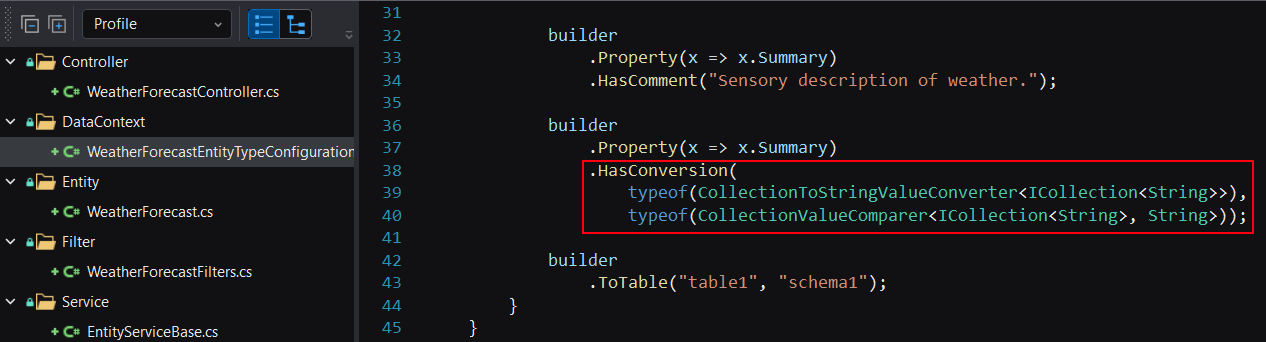
Collection
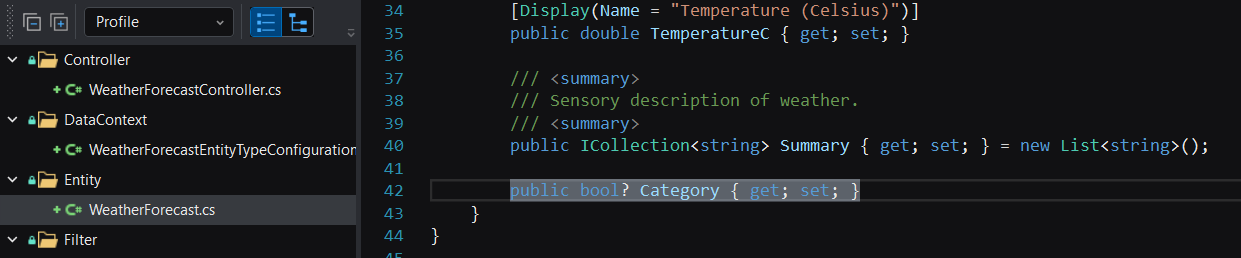
When the Collection option is selected for a field in the Field Design tab, the field will be converted to a collection type, for example: ICollection
If Collection is not selected, the following C# code will be generated: If Collection is selected, the following C# code will be generated: In addition, when Collection is selected, the Conversion option will be displayed in the DataStorage section and will be automatically selected as CollectionToStringConverter. The following C# code will be automatically generated, indicating that the current collection field (property) has been configured for value conversion (a collection field defined on an entity cannot be directly stored in the database, and a value converter must be used for data conversion before it can be stored. For example, a string collection List
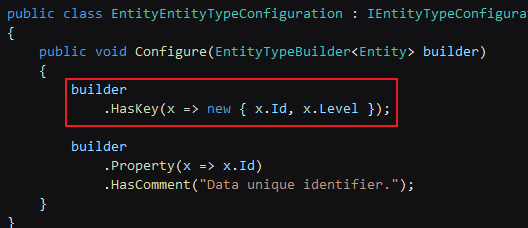
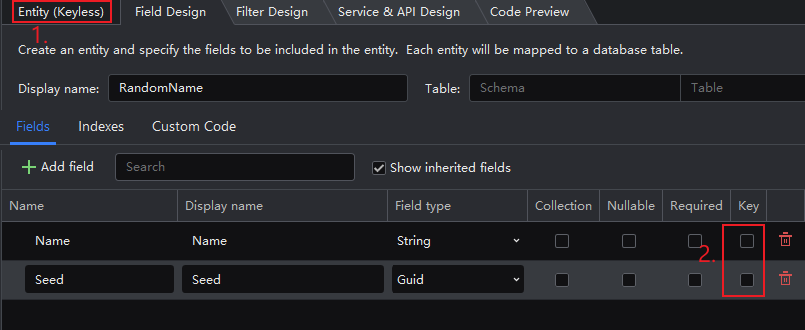
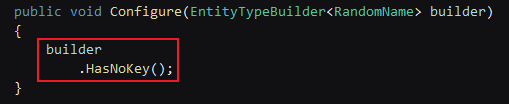
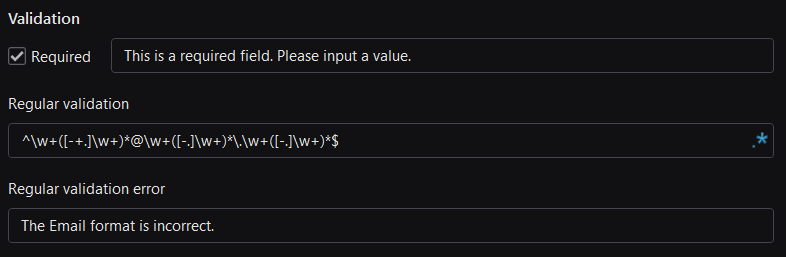
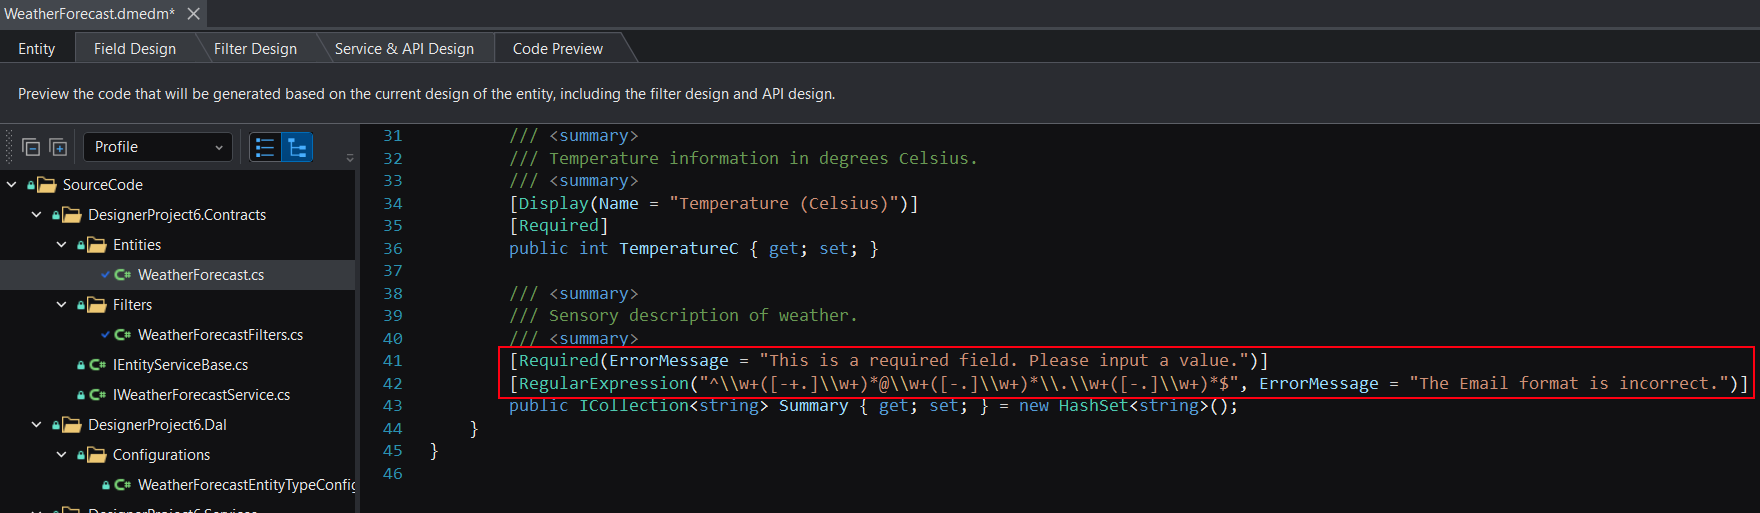
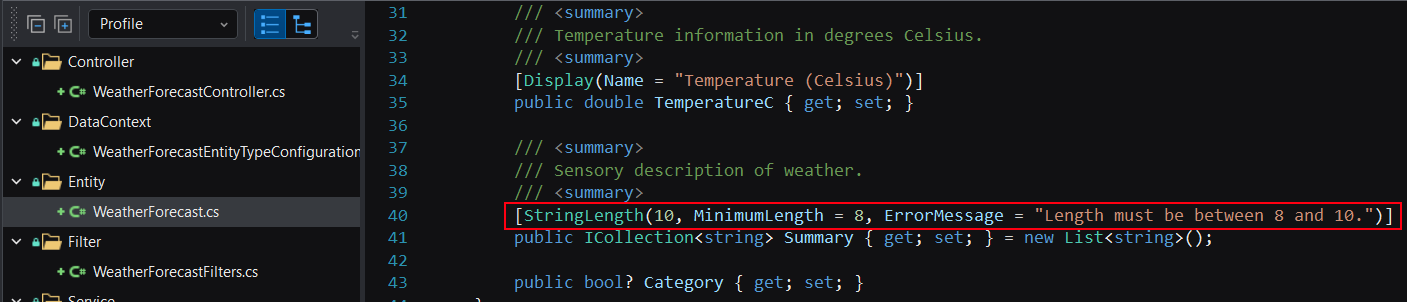
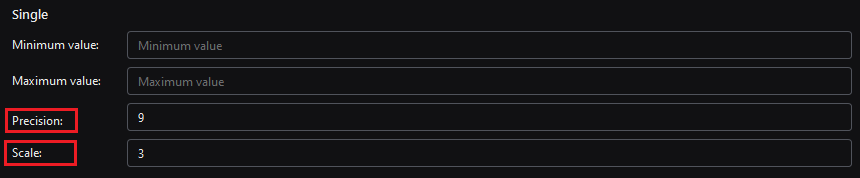
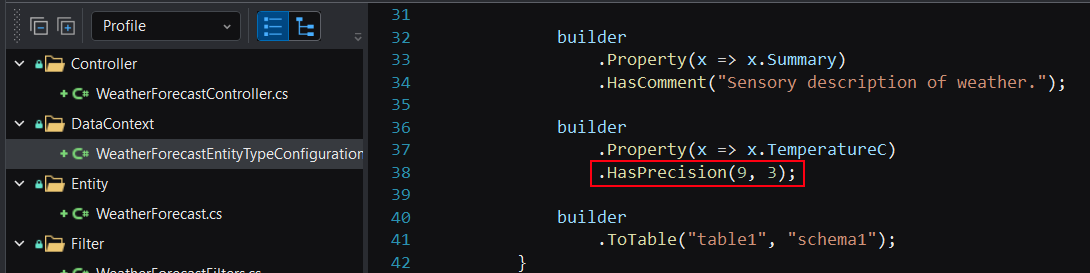
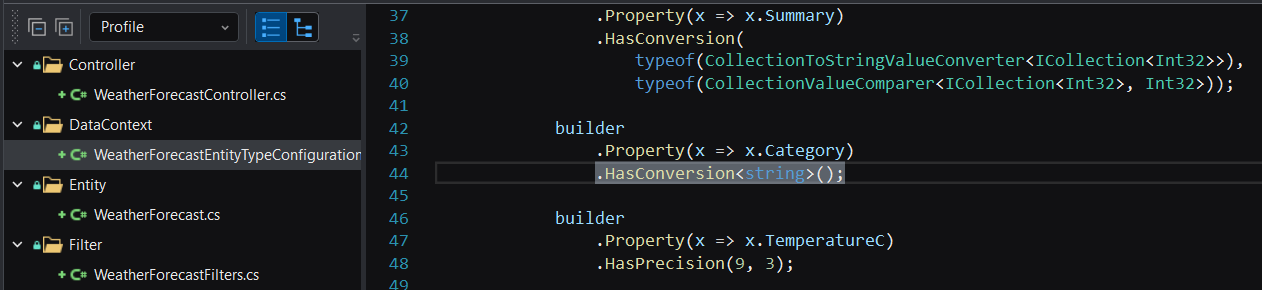
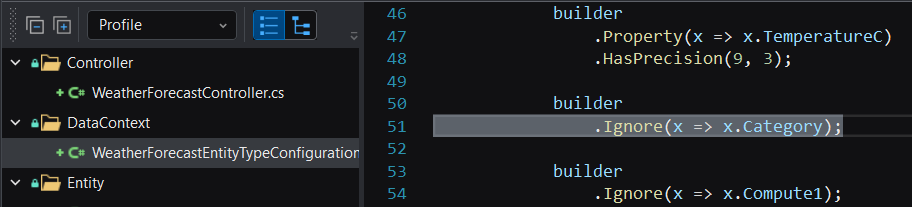
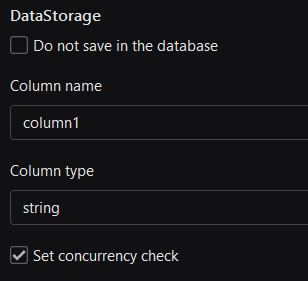
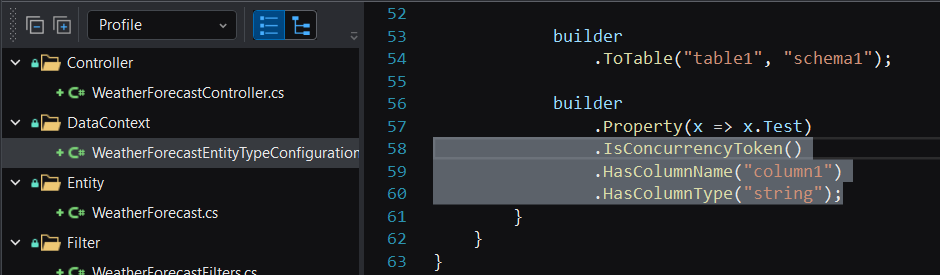
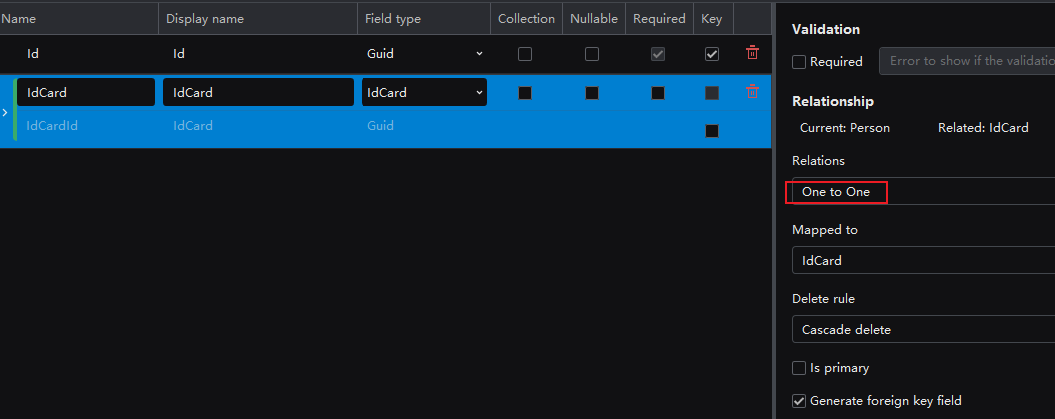
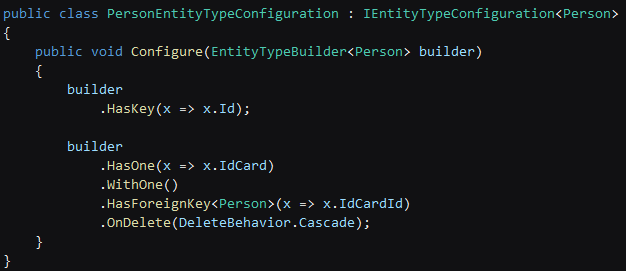
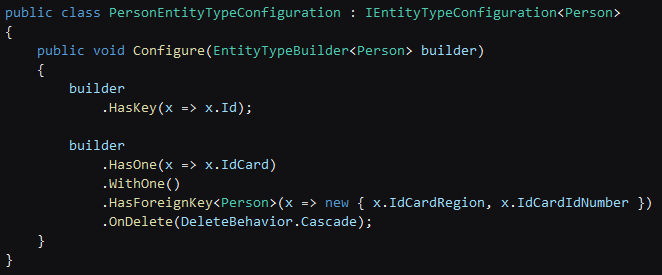
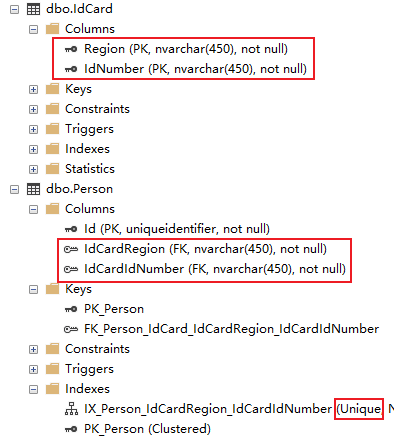
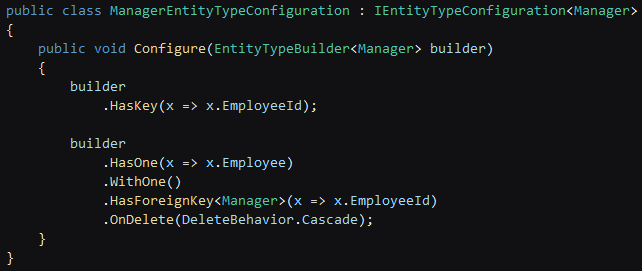
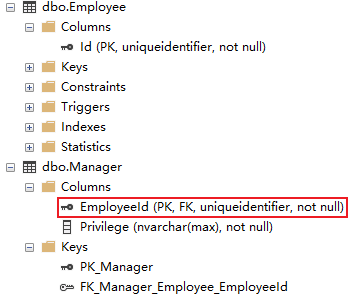
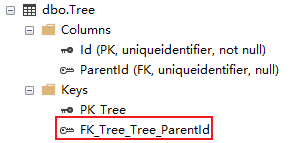
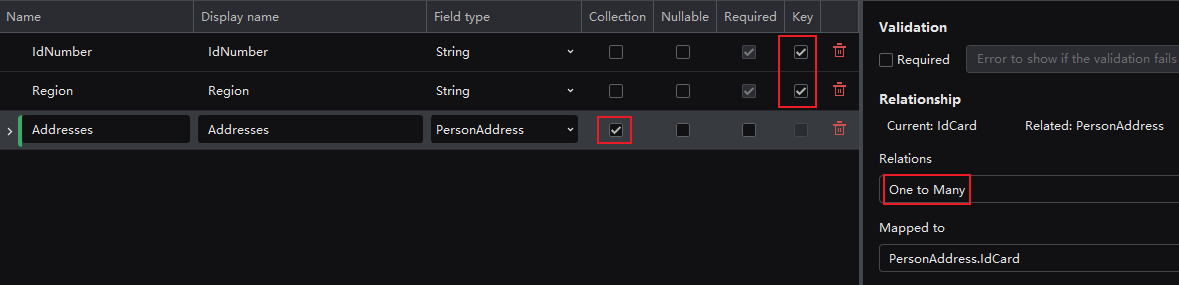
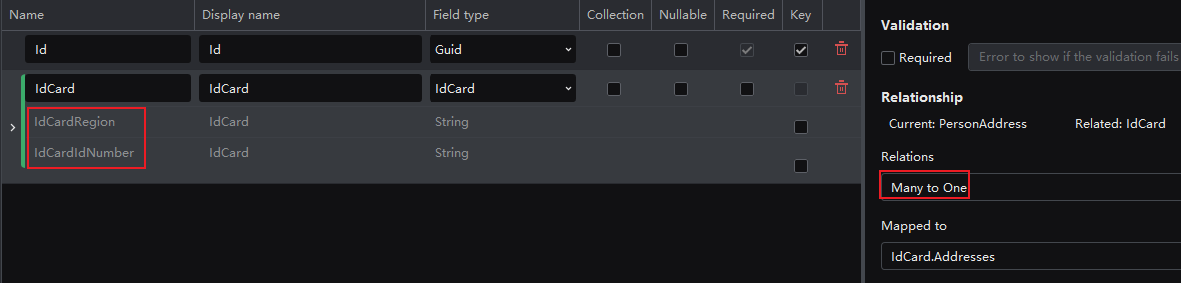
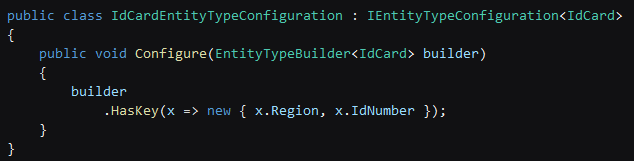
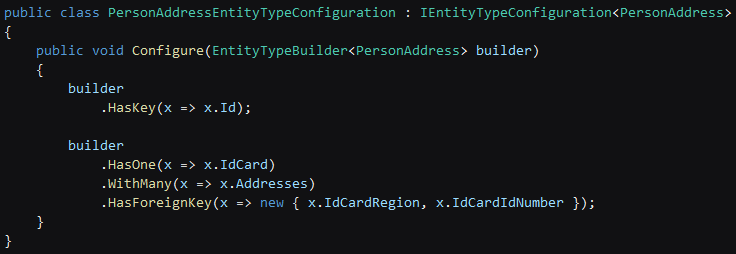
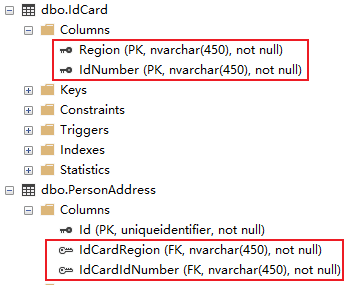
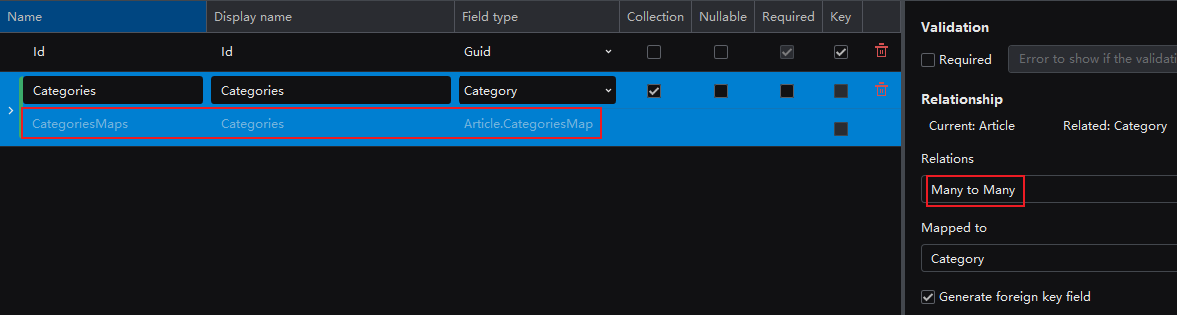
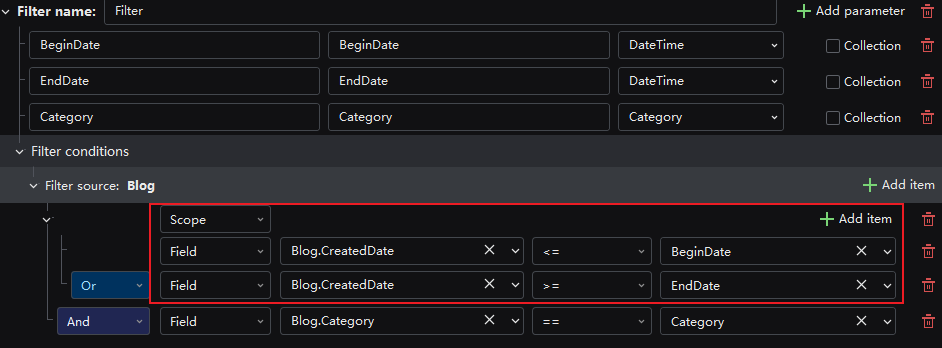
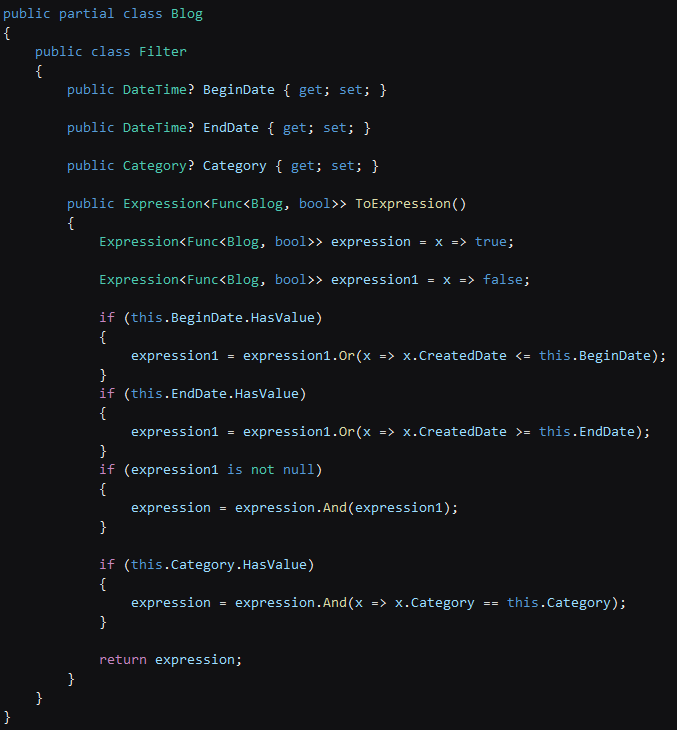
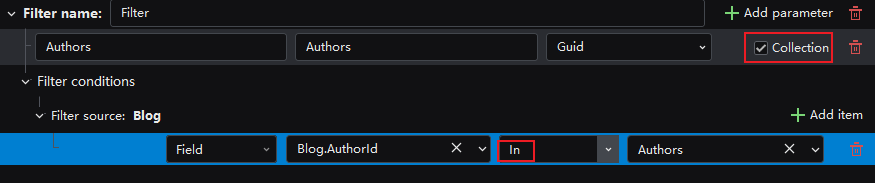
When the Nullable option is selected, the field will allow to have a null value. For example, when a field of boolean type is selected to be nullable, the data type of the field will be defined as Whether to make the current field a required field. When this option is selected, it indicates that the field is required. After the Required option is selected, you can specify the message displayed when the validation fails, and the [Required] attribute will be generated in the C# code. Specify the field as the primary key of the entity. When the Key option is selected, the [key] attribute or HasKey method will be generated in the C# code, indicating that the current field is the primary key. For example, the following code indicates that the id field is used as the entity's primary key. If you specify no primary key, a [Keyless] attribute or HasNoKey method will be generated. For more information, refer to Keyless entity. If you specify more than one fields to be the key, a composite key will be generated, for example, the following C# code indicates that the id field and the DateTime field is used as the composite key. For more information, refer to Composite primary key. Composite primary keys are mainly used in scenarios where multiple pieces of information of the item need to be stored, but uniqueness cannot be achieved only based on the ID of the item. For example, the school information system needs to count the grade point GPA of each student in each level, but it is impossible to achieve this result using only Student ID; so the "Level" field is added and used in combination with Student ID to establish a composite primary key, this composite primary key ensures the uniqueness of each student in each level. To create a composite primary key, you specify the settings as follows: Code preview: "Student ID" and "Level" form a composite primary key. Keyless entities are mainly used for the situation where the uniqueness of each piece of data need not to be considered. For example, a random name table (it doesn't matter whether the name is repeated or not). To create a keyless key, you leave the key option unselected. The entity will be marked with text "(Keyless)". For keyless entities, the services that require the primary key will not be provided. Code preview: You can specify the following validation settings for the field in the Field Design tab: Required: Whether to make the current field a required field. This option is synchronized with the Required option on the current field list. Regular validation: Click to expand the Regular validation input box, you can manually input the expression used to validate the data or select a system predefined expression from the Common regular expressions list (for example, DateTime, Domain, Email, IP address, Phone, URL etc.). After selecting a predefined expression, you can also modify the predefined expression according to your needs. When the Regular validation option is specified, the [RegularExpression] feature will be generated. Regular validation error: The message that will be displayed when regular validation fails. (This option is only available for Built-in field type.) When the validation options are set, the following C# code will be generated: Default value: Specifies the default value of the database column. If the inserted row does not have a value for that column, the default value will be used. There are three ways to specify the default value: 1) Enter the default value manually; 2) Calculate the default value through an expression; 3) Set the default value through an SQL statement. Some data types (such as String, Single, Double, Decimal) have the following options: Minimum value: Specifies the minimum value of the string field, or the minimum value of the numeric field. Maximum value: Specifies the maximum value of the string field, or the maximum value of the numeric field. Range error: The message that will be displayed when the value/range is invalid. When these options are specified, the corresponding type of attribute will be generated in the C# code。 For example, when the field type is string, the [StringLength] attribute will be generated. For example, when the field type is int32 (or single, double, decimal), the [range] attribute will be generated. For Single and Decimal type, the following options are available Precision: Specify the total number of digits (including integer digits and decimal digits) the database will store. Scale: Specify the number of decimal places the database will store. After these two properties are set, the data precision of the data will be generated. For Compute type, the following options are available Expression: Specifies the expression. Data type: Specifies the data type. Save in the database: Whether to include this field in the database. If this option is checked, this field will be included in the database table. (Entity and owned entity only) For Enum type, the following options are available Conversion: Currently only EnumToStringConverter is available, which indicates that the enum values will be converted to strings in the database. The HasConversion The generated code is as follows: The options under the DataStorage section will be used to generate and configure the corresponding properties in the entity (what are called fields here are properties in EF Core). For example, the Key option when checked will generate the HasKey method for the current field. For most options, we will generate attributes (also known as data annotations) to represent the configuration, for some special options such as Key, Index, we will generate fluent APIs to represent the configuration. The fluent API configuration takes precedence over the attributes. Do not save in the database: Whether or not to include this field in the database. If checked, an Ignore method will be generated in the C# code, indicating that this field is excluded from the database table. Column name: Specify the column name in the data table. The entity property will be mapped to this column. Column type: Specifies the column type in the data table. When Column name and Column type are specified, the HasColumnName and HasColumnType methods will be generated in the C# code. Set concurrency check: Specifies whether the data column performs concurrency conflict checking to implement optimistic concurrency control. When this option is checked, the [IsConcurrencyToken] attribute will be generated in the C# code. Content of this article This article briefly introduces how to build a relational object model in SnapDevelop and its representation in EF Core and relational databases. For more information about relationships in EF Core, refer to https://learn.microsoft.com/en-us/ef/core/modeling/relationships#definition-of-terms. You can configure the following settings for relationships in the Field Design tab: Relations: Selects the relationships between the two entities. Mapped To: Chooses the field to map to. Delete rule: An OnDelete method will be generated with the DeleteBehavior parameter supporting the following values (Cascade, SetNull, NoAction): Generate foreign key field: Selects whether to generate the foreign key field. Automatically generate values for foreign key fields: Selects whether to automatically generate values for the foreign key fields according to the specified expression. Execute on insert: Specifies to execute the expression on insert. Execute on update: Specifies to execute the expression on update. The following sections will walk you through configuring these settings for different relationship types. Contents of this section A mandatory one-to-one relationship is used when a dependent entity must be associated with a principal entity. For example: one ID card must be associated with one person and one person can only be associated with one ID card. IdCard: Person: Code generation preview: Generated table structure: An optional one-to-one relationship is used when a one-to-one relationship between the dependent entity and the principal entity is optional. For example: one department has one department leader, and one employee can only be in charge of one department at most (the department leader can be temporarily vacant). Employee: Department: Code generation preview: Generated table structure: A self-referential one-to-one relationship is used when the dependent entity and the subject entity are the same entity. For example: each department may have a parent department, and each parent department is also a department and has a parent department; so the department and the parent department belong to the same department entity. Department: Code generation preview: Generated table structure: When the principal entity uses a composite primary key, the dependent entity must also be a composite key with the same number of attributes. For example, if an ID card uses the ID number and the area as the composite primary key, a user also needs to use the ID number and the area as the foreign key. IdCard: Person: Code generation preview: Generated table structure: You can use the foreign key of an associated dependent entity as the primary key of the principal entity. For example: in an entity for managers, each manager is associated with an employee. Code generation preview: Generated table structure: Contents of this section A mandatory one-to-many relationship is used when multiple dependent entities must be associated with a principal entity. For example: a post must be associated with a blog, and a blog can be associated with multiple posts. Blog: Post: Code generation preview: Generated table structure: An optional one-to-many relationship is used when a one-to-many relationship between a principal entity and multiple dependent entities is optional. For example: a department has multiple employees, and an employee can only belong to one department (an employee can also have no department). Employee: Department: Code generation preview: Generated table structure: A self-referential one-to-many relationship is used when the dependent entity and the principal entity are the same entity. For example: more than one department may have the same parent department, and the department and the parent department belong to the same department entity. Code generation preview: Generated table structure: When the principal entity uses a composite primary key, the dependent entity must also be a composite key with the same number of attributes. For example: an ID card uses the ID number and the area as the composite primary key, and the ID card owner's address information table can have multiple records. IdCard: PersonAddress: Code generation preview: IdCard: PersonAddress: Generated table structure: Contents of this section Many-to-many relationships differ from one-to-one and one-to-many relationships in that they cannot simply be represented with just foreign keys, but instead, require a new entity type to "join" the two ends of the relationship. This is called a "Join Entity Type" and ultimately maps to a "Join Table" in a relational database. This join entity type contains foreign key-value pairs, where one pair points to the entity at one end of the relationship and the other pair points to the entity at the other end of the relationship. Thus, each joined entity and each row in the joined table represents an association between the entity types in the relationship. When there is a many-to-many relationship between two entities, the entity designer will automatically create an attribute representing the relationship between the two (as shown below). At the same time a new join entity type is created: A many-to-many relationship occurs when two entities can be associated with each other multiple times. For example: an article can have multiple categories, and a category can also be selected by multiple articles. Article: Category: Code generation preview: Generated table structure: A oneway many-to-many relationship was introduced in EF Core 7, which was implemented using dedicated navigation in earlier versions. Article: Category: No need to make any additional configuration. EF Core context configuration (EF Core 6 and EF Core 7 are slightly different): EF Core 6: EF Core 7: Generated table structure: Using the same entity type at both ends of a many-to-many relationship is called a self-referential many-to-many. For example: each person has multiple Parents and multiple Children, and they are all represented by the Person entity. Person: Code generation preview: Generated table structure: Description: The description of the field, which appears as a comment in the C# code. You can specify the following settings for the index in the Field Design tab: Add index: Adds a new index to the current index list. Name: The name of the index. Fields: Selects one or more fields to be used as index. Unique: Specifies whether to perform uniqueness validation on the index. When fields are selected and Unique is checked, the following HasIndex and IsUnique methods will be generated in the C# code, indicating that the selected field is set as a unique index. Content of this article This article briefly introduces how to use the Filter Design tab to implement data filtering in SnapDevelop. After a filter is created in the Filter Design tab, and if you select to generate the APIs with filter in the Service & API Design tab, the corresponding filter (data), service (interface and business logic), controller (invoking methods) will be generated. Contents of this section The area in the red box in the figure below is the settings of the parameter in Filter. Filter refers to filtering data from a data source (Filter source) according to a set of logic (Filter conditions) and user input (Parameters). Currently, the data types that can be selected for parameters include the basic types and enumeration types. The parameter setting provides At the same time, parameters support collection types, which are described in detail in Parameter is a "collection" below. The Filter Design tab allows you to configure the following settings for parameters: Parameter name: The name of the parameter. Display name: The display name of the parameter. Data type: The data type of the parameter. Default value: Specifies the default value of the database column. If the inserted row does not have a value for that column, the default value will be used. Collection: When the Collection option is selected, the current parameter will be converted to a collection type, for example: ICollection
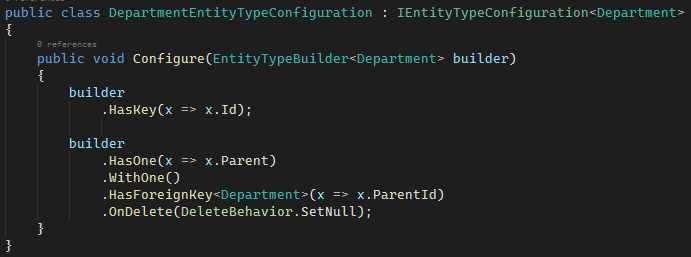
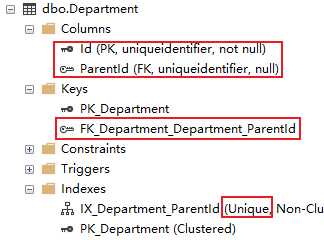
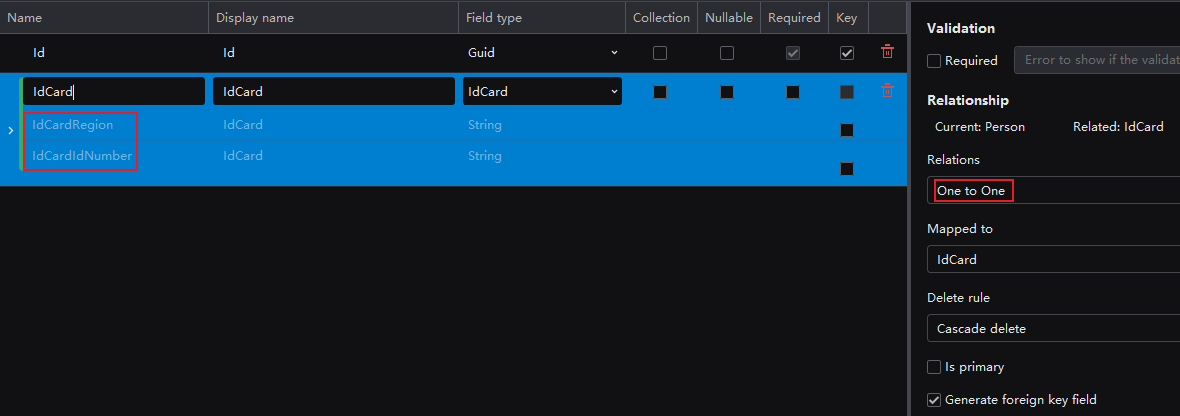
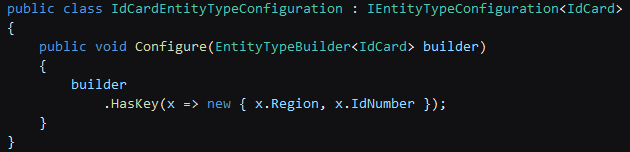
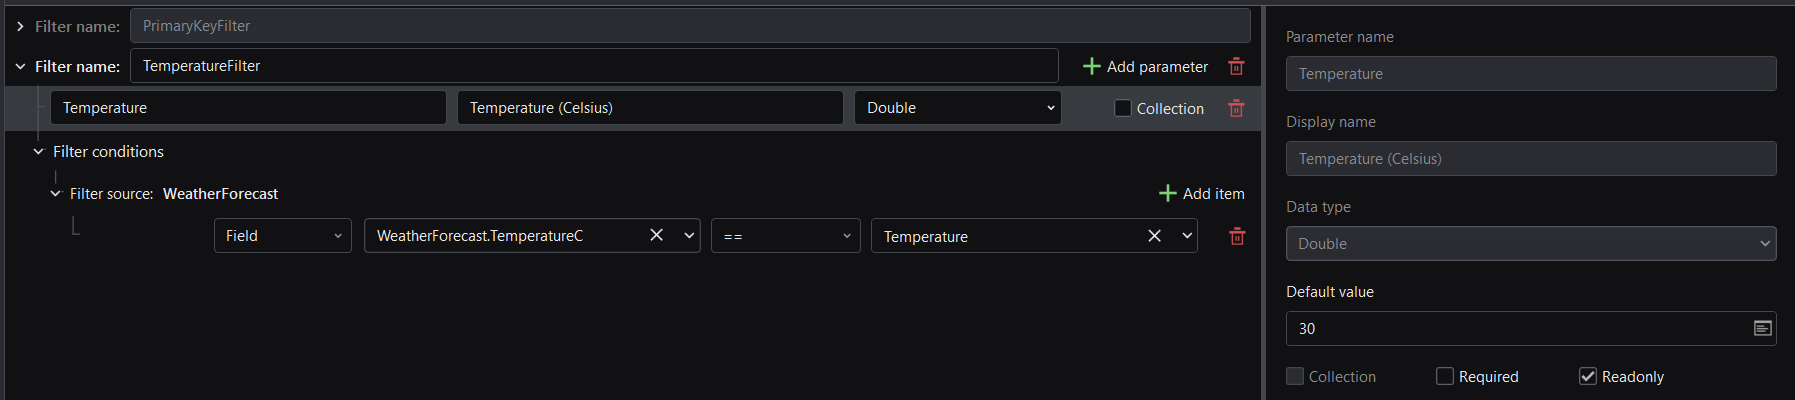
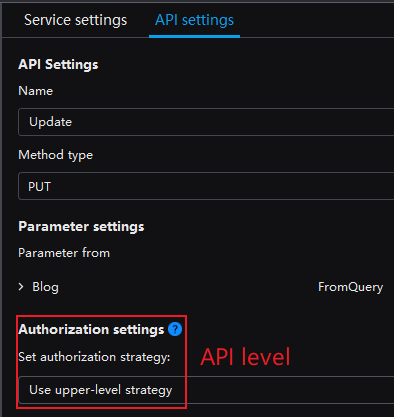
Required: Whether the parameter is required. Readonly: Specifies whether the filter is readonly. If both the search criteria and the search value are determined (which means there is no need for end users to input any value), then you can set this filter to readonly and set a default value for the filter. For example, to search for the date when temperature is 30 Celsius, you can set TemperatureC to equal to Temperature, set the default value to 30, and select the readonly option: If Readonly is selected, then only If Readonly is not selected, both Description: The description of the parameter. Condition defines the logic of the filter. There are three forms: Field, Expression and Scope. Multiple conditions can be connected with You can preview the filter syntax at the bottom right of the designer. All entities, except keyless entities, have a default primary key filter. Note that this refers to a complete entity. The base entity and owned entity are not complete entities in a certain sense; they cannot be used alone, but can only be used together as part of a complete entity; a complete entity must have fields, filters, services, and APIs modules. Default primary key filter: The Field filter is composed of three parts. The first part is the filter field, which tells the filter where the filtering logic works; the second part is the filtering parameter, which is the input of the filtering logic; the third part is the operator, which connects the field and the parameter. For example: to filter blogs according to the author, you can design as follows: The first part filters the object, that is, the author of the blog. In the field list, you can select the primary key field of the author entity, or select the foreign key AuthorId that associates the author entity with the blog entity, as shown in the two red boxes in the following figure. In the second part of the filter parameter, select the parameter AuthorId from the filter parameter list which represents the author ID. In the third part of the operator, chooses Code Generation Preview Filters end up generating an inner class of entities and combining all the logic into one expression: The Expression filter is actually the embodiment of the Field filter, but the Expression filter is more flexible and powerful. For example, to filter out blogs with more than 100 stars and more than a specified value of likes for all posts, you can design as follows: Add a parameter named Like, and set the data type to Int32 Switch the filter type to Code Generation Preview To demonstrate the usage of the Scope filter, here is a very simple example: filter blogs whose creation time is not in the specified range and whose Category is the specified value. If you design three filtering logics and connect them with Wrong example: The code generation does not produce the expected result: Instead, you need to use a Scope filter, as shown below: No matter how many sub logics there are in the red box, they will eventually appear as one-single condition to connect with the main logic. Code generation preview: The filter parameter can be a collection. For example: filter out the blogs according to the specified multiple author IDs: Code Generation Preview You can determine whether to generate the controller and services in the Service & API Design tab, including: You can then select the Generate all APIs option to generate controllers for all APIs, or select Generate API of one or more APIs to generate controllers for this/these APIs only. Content of this article This article briefly introduces how to add CRUD services in SnapDevelop. The Service & API Design tab provides default CRUD services. You can select There are three types of service tags: Base, Override, and Custom. The Service & API Design tab allows you to configure the following settings for the service: Parameter settings: Lists the request parameters of the service. Sort settings: (For GetList and GetPage) Click Add sort option to sort the data in the database. You can select a field or input an expression and then specify to sort by ascending or descending order. Assignment settings: (For Add, AddRange, and Update) You can set values for fields. You can select a field or input a value or expression. Return settings: (For Get, GetList and GetPage) Specify the return value of each response field of the service. You can select a field or input a value or expression. (For Add, AddRange, Update, and Delete) List the return value of the service. Sorting the return data: (For GetList and GetPage) Click Sort sources to select an entity and then click Add sort option to select a field or input an expression to sort the data. Description: The description of the service. The following sections will walk you through configuring these settings. Except for calculated columns and non-cascaded associated entity fields, the fields of return value can be modified to other fields, expressions or fixed values of the same data type. For example: each blog has a popularity value, if the blog creation time is more than one month, the popularity value is 0, otherwise the popularity value is the difference between the timestamp of the current time and the blog creation time multiplied by the number of stars, this field is not used as the database fields, that is, not saved to the database: Take the Get method as an example: Enter the expression: Code preview: Contents of this section The setting of database sorting will affect the sorting rules of the data source returned from the database query, and the sorting type can be field or expression. For example: to query data from the database according to the descending order of blog creation time: Select the field Code Preview: For example: to sort the blog in descending order of the multiplication of the number of stars and the total number of likes: First click the icon on the right to switch to Expression, enter the expression: Code Preview: The return value sorting setting will not affect the sorting of the data source returned from the database query, but only changes the sorting of the final returned result set. The For example, to sort the subset of the result set: sort the blogs and the posts in the blogs in the descending order of the creation time: Code Preview: The cascade query is to load data of the referenced field of the dependent entity when querying the principal entity. If the CascadeQuery option is selected, the field settings (Value, Field, Expression) in the designer can be used in the dependent entities or fields of dependent entities, except for calculated columns and non-cascaded associated entity fields. For example, when querying a blog, the author of the blog is cascade queried: Code Preview: Cascade update is to update the dependent entity while updating the principal entity. When the CascadeUpdate option is selected, the generated code will add logic for the CUD (create, update, and delete) operations of corresponding entities. For example: When updating a blog, modify the last modification date of the blog and all posts: Code Preview: Content of this article This article briefly introduces how to configure the API in SnapDevelop. The Service & API Design tab will ultimately affect the code generation of the controller layer. Through the API designer, the API request method, parameter source, and authorization can be easily configured. Simply select The Service & API Design tab allows you to configure the following settings for the API: Name: The name of the API. Method type: The default method type of the API. Parameter settings: You can select to get parameters from the following: FromQuery, FromRoute, FromForm, FromBody, or FromHeader. FromQuery: Binds parameters from the query string. FromRoute: Binds parameters from the request route. FromForm: Binds parameters from the form data in the request body. FromBody: Binds parameters from the request body. FromHeader: Binds parameters from the request header. Authorization settings: After you enable the authorization in the project property page, the API will use the default policy specified there (by default ASP.NET Core Default Policy). You can also select one of the following basic authorization strategies: Use upper-level strategy, Use application default strategy, Use anonymous strategy, or use other custom policies. Use upper-level strategy: Uses the upper-level strategy. By default there is no authorization verification. If there is a referenced class library, use the parent's default strategy. Use application default strategy: Uses the default strategy configured for the application. Use anonymous strategy: Uses the anonymous access strategy. Anonymous access allows requests to go through without authentication. During the authorization process, the permission settings under the specified policy will be validated (the user may need to code and implement the policy separately). Description: The description of the API. The following sections will walk you through configuring these settings. Each API can have a name. But note that changing the name of the API will affect the request routing of the API. For example, changing Code Preview: Each API can have a request method. You can change the request method according to requirements, or just use the default value. Code Preview: The parameter can be bound with different sources; this determines how ASP.NET Core binds the request parameters. API Designer provides five sources (excluding [FromService](https://learn.microsoft.com/aspnet/core/mvc/controllers/dependency-injection?view=aspnetcore-7.0#action-injection-with -fromservices)): For example, modify the parameter source of the Code Preview: SnapDevelop provides authorization settings at three levels: application level, controller level, and API level. Contents of this section The application-level authorization is configured on the The controller-level authorization is configured in the API designer. The API-level authorization is configured on the API settings page: You can select a basic authorization strategy or add/select a custom strategy: Basic: Custom: You can click New strategy to open the If the authorization is not enabled on the You can click the question mark icon on the right, and then click Select to enable both the authentication and authorization (the prerequisite of authorization is to pass the authentication): Let's walk through these settings using examples. Example 1: Suppose all APIs of the blog entity need to be accessed by authenticated users (that is, the ASP.NET Core default policy), and the Example 2: Suppose the By clicking the bar in the lower left corner of Entity Designer, you can have a view of all of the dependencies, expressions, and computed fields used in the current entity.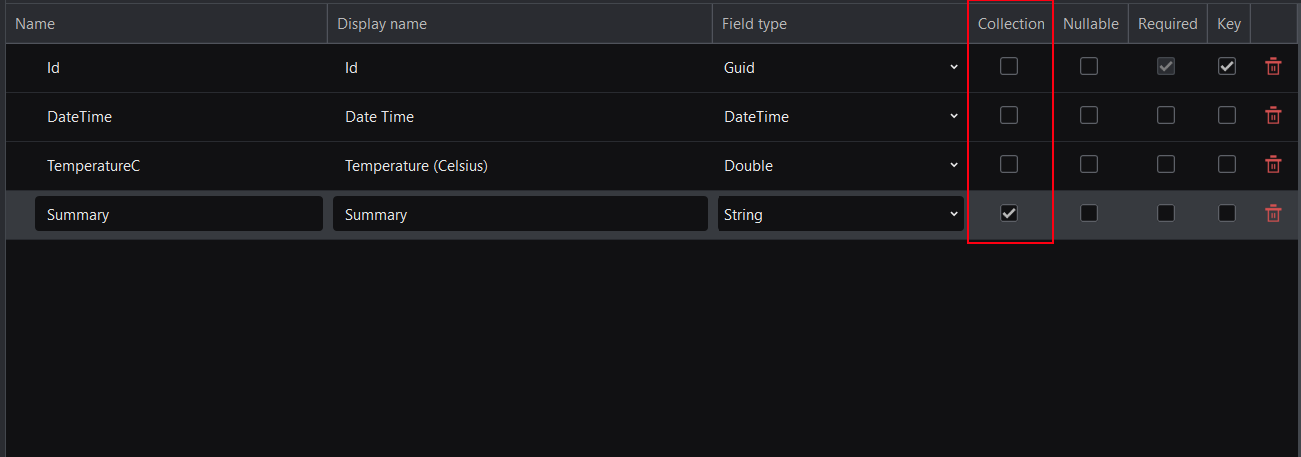
public string Summary { get; set; } = String.Empty;
public ICollection<string> Summary { get; set; } = new List<string>();
Nullable
bool?, and the field can have three values: true, false and null.
Required
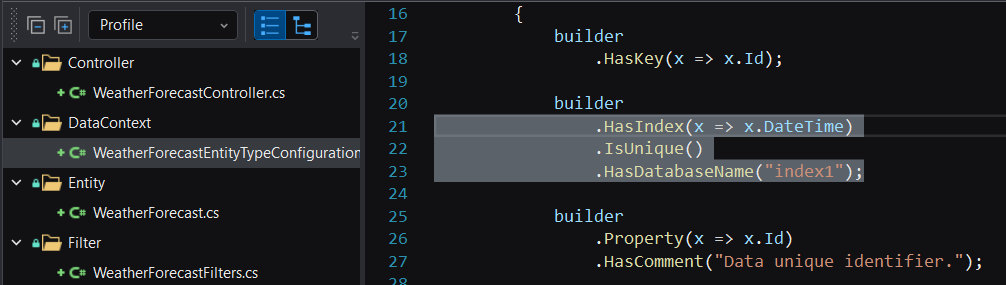
Key
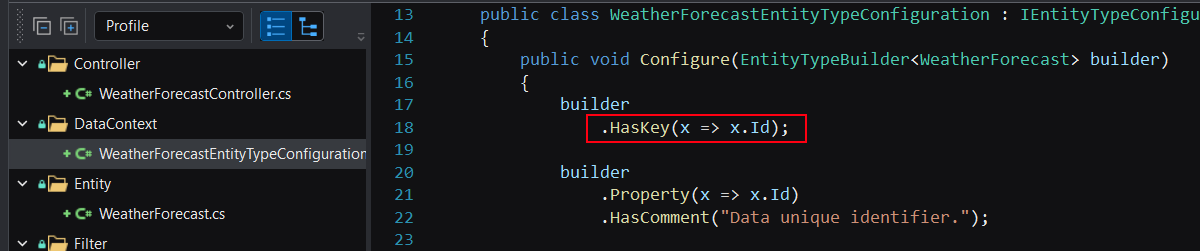
.HasKey(x => new { x.Id, x.DateTime });
Composite primary key

Keyless entity
Validation
Data value

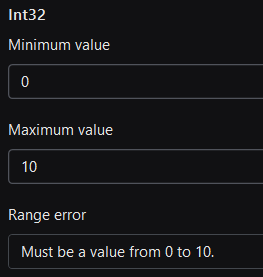
[Range(0.0, 10.0, ErrorMessage = "Must be a value from 0 to 10.")]

Data storage
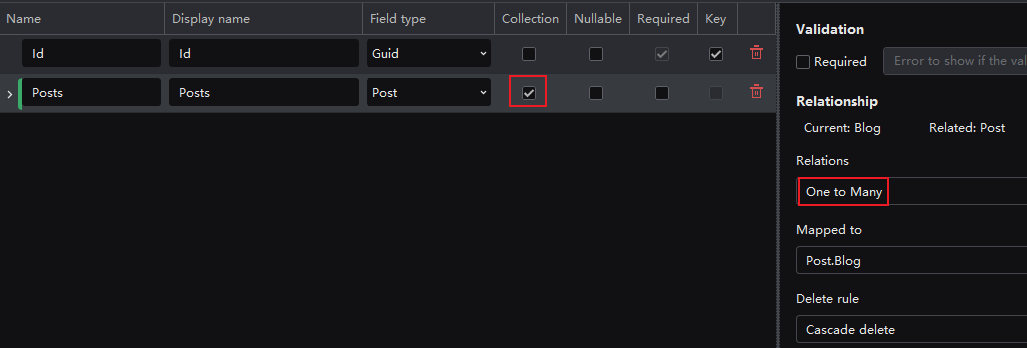
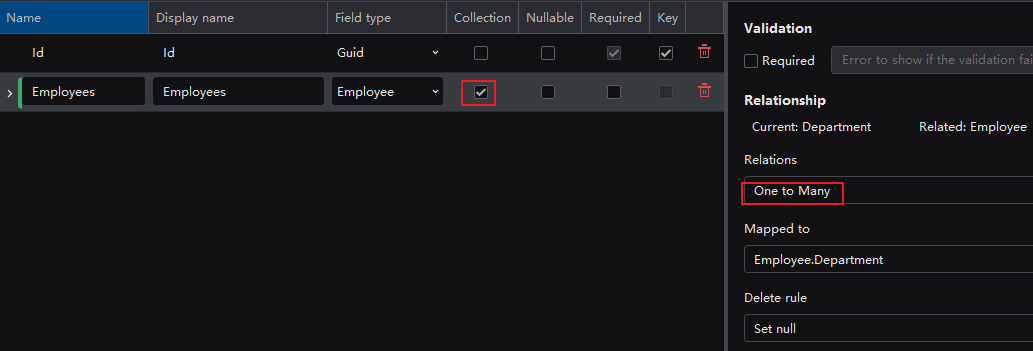
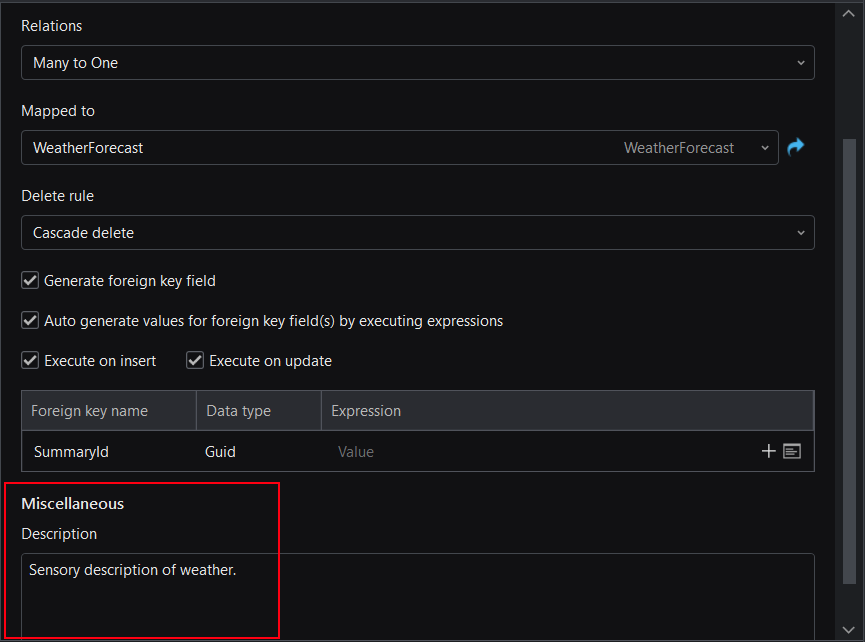
Relationship
Relationship settings
One-to-one relationship
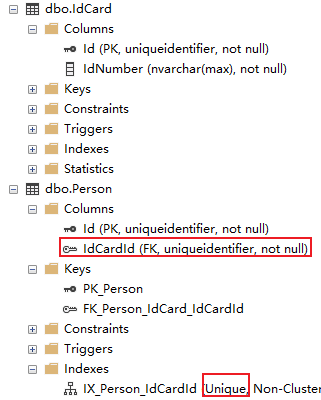
Mandatory one-to-one

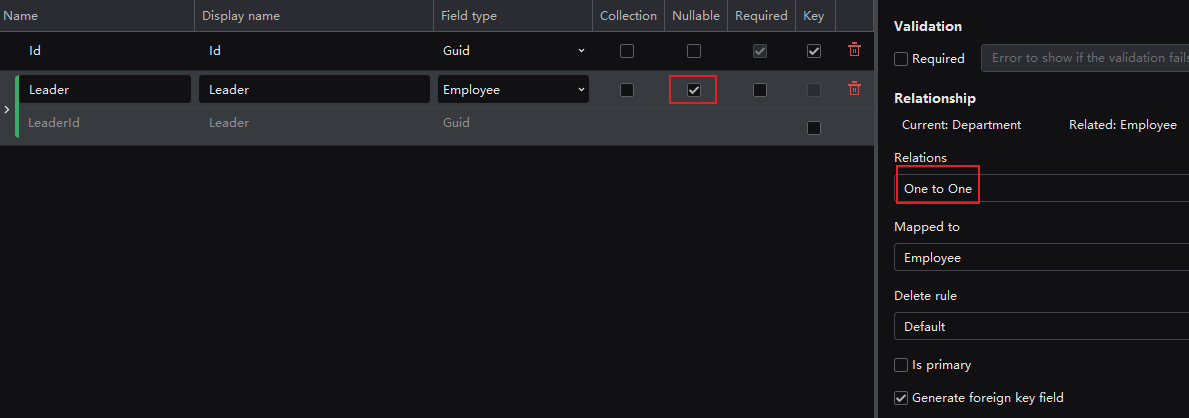
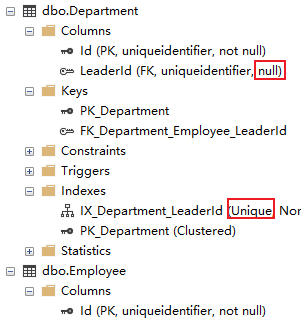
Optional one-to-one


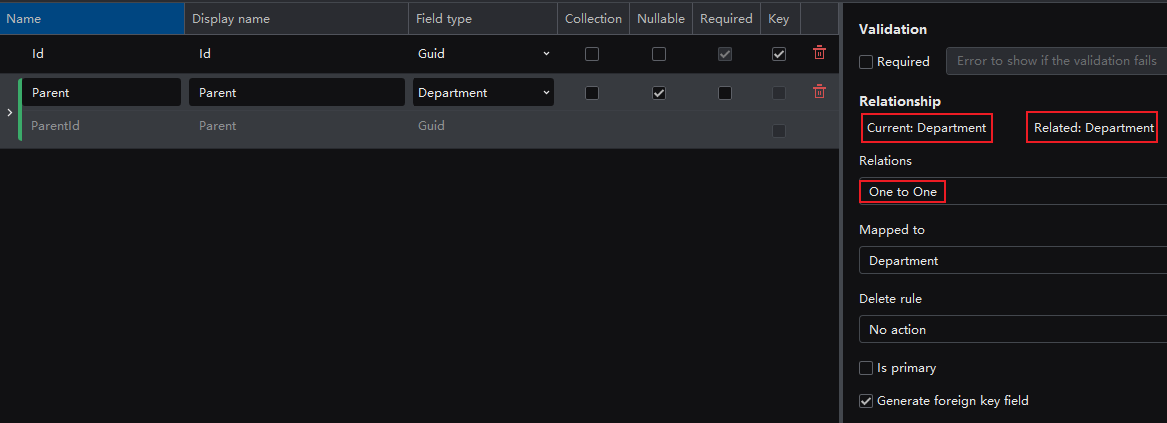
Self-referential one-to-one
One-to-one relationship with composite foreign key

One-to-one relationship with foreign key as primary key

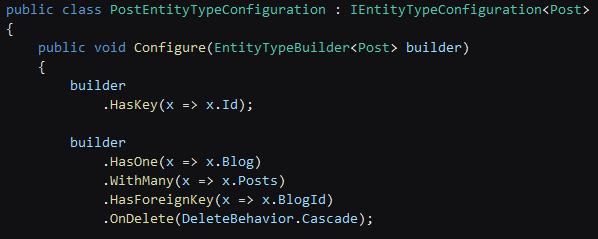
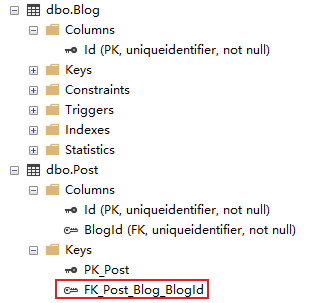
One-to-many relationship
Mandatory one-to-many

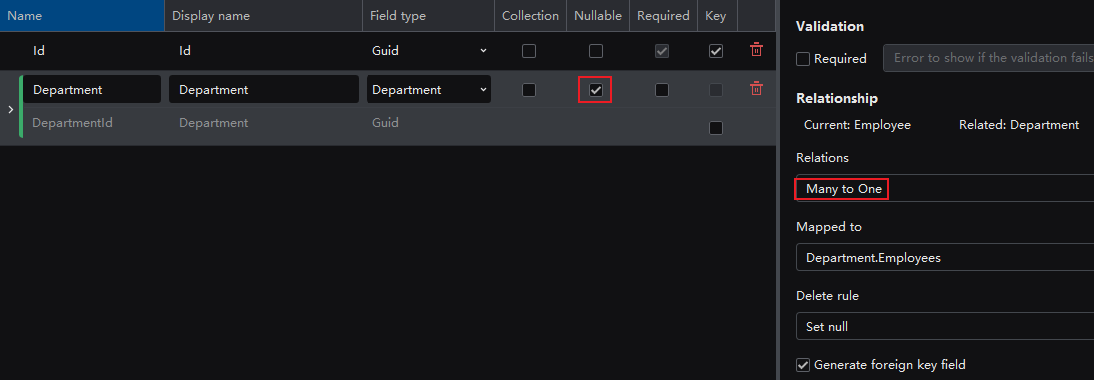
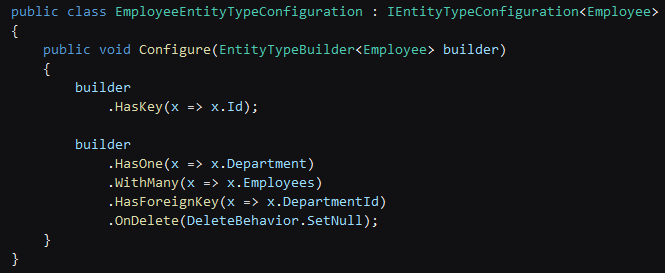
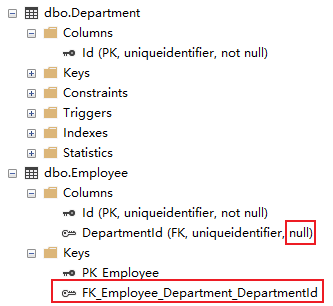
Optional one-to-many
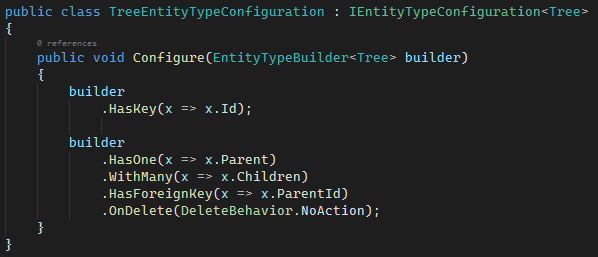
Self-referential one-to-many


One-to-many relationship with composite foreign key
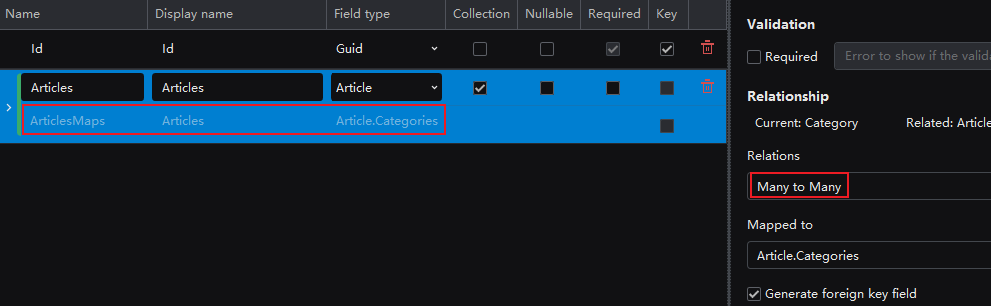
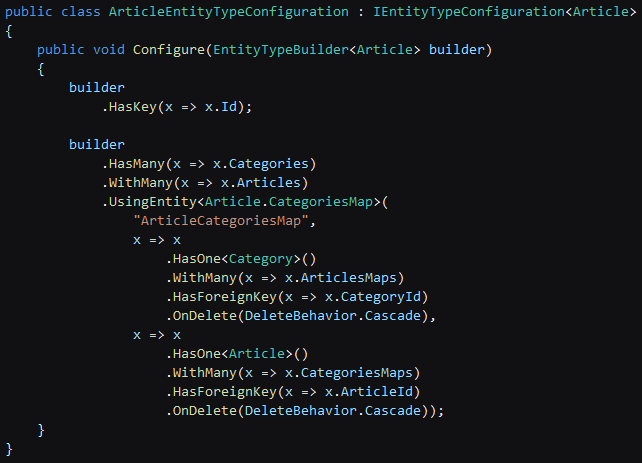
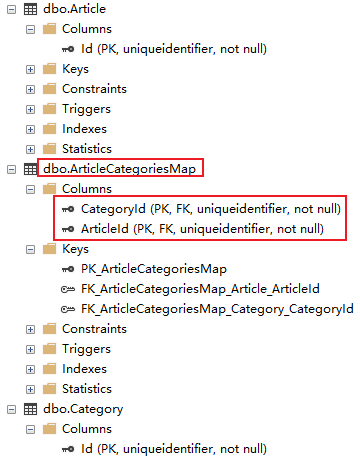
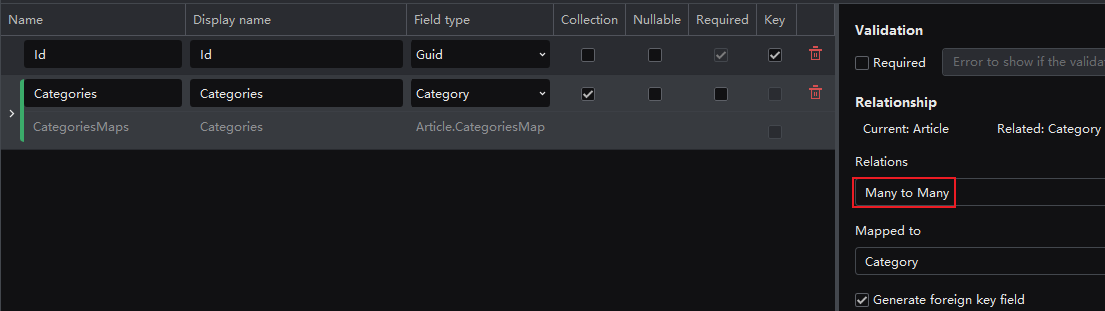
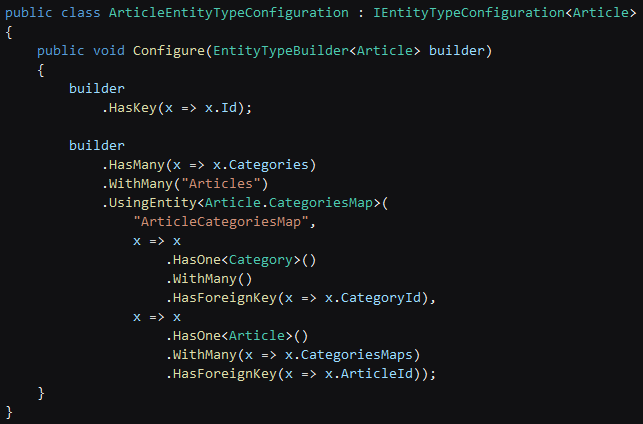
Many-to-many relationship
Overview
Join entity

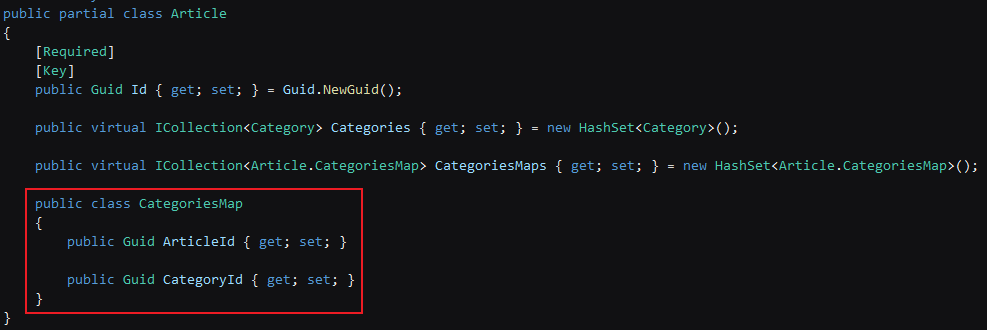
Basic many-to-many
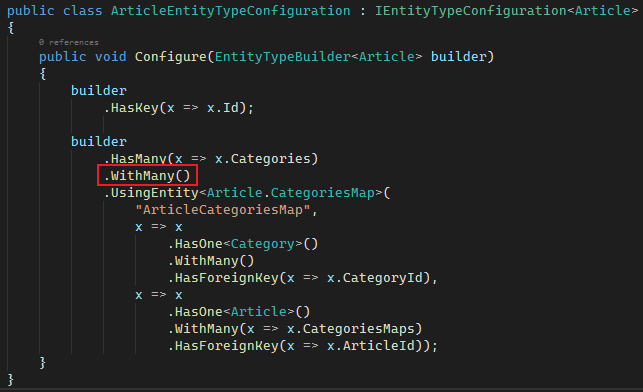
Oneway many-to-many
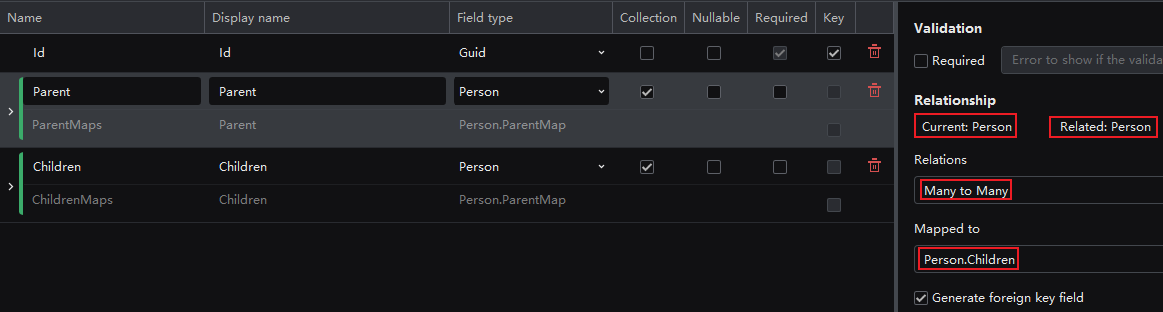
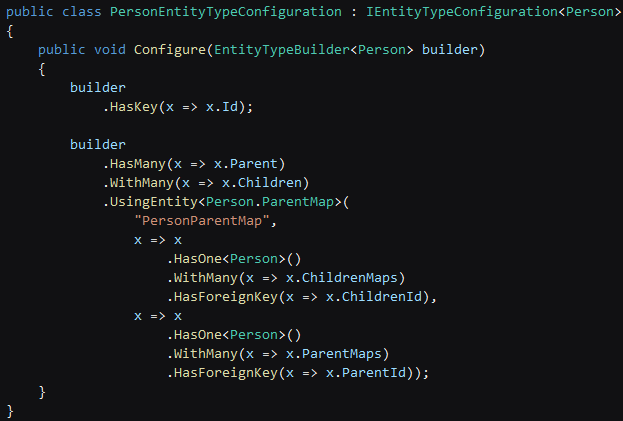
Self-referential many-to-many

Miscellaneous
Index settings

Filter design
Overview
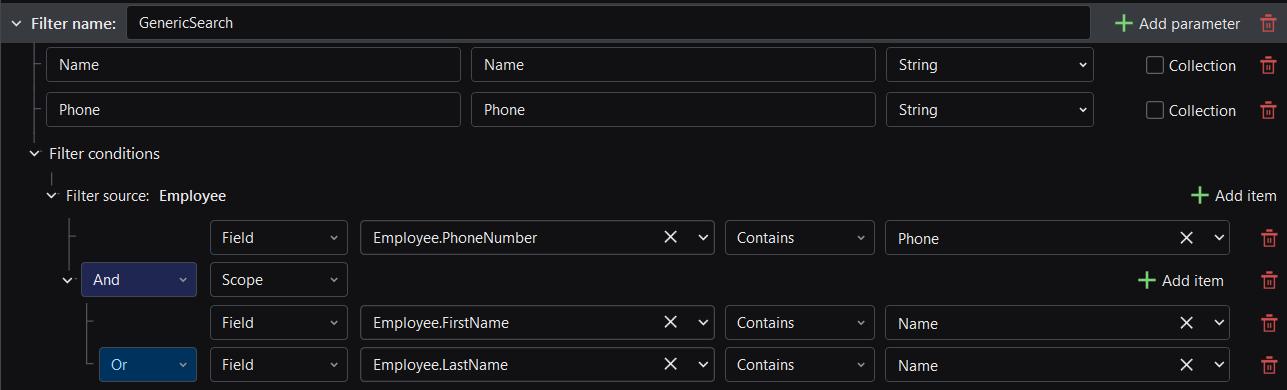
Parameter

Required and Readonly options; the Required option indicates that the parameter is required, and the Readonly option indicates that the parameter is fixed and cannot be modified.
get method will be generated.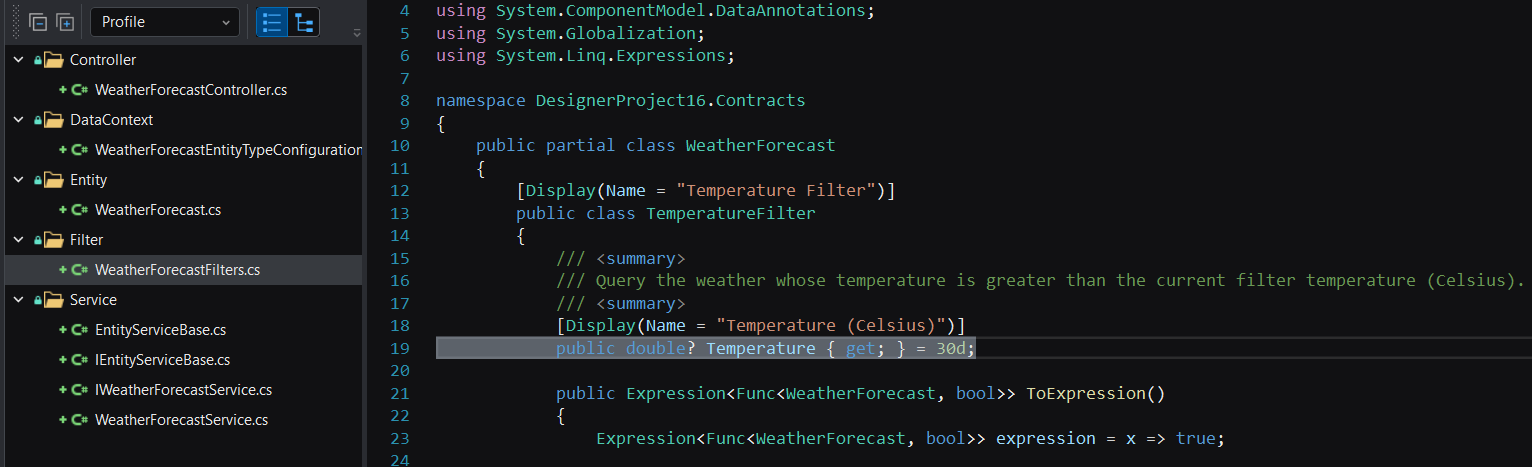
get and set methods will be generated.Condition
And or Or.
Default filter

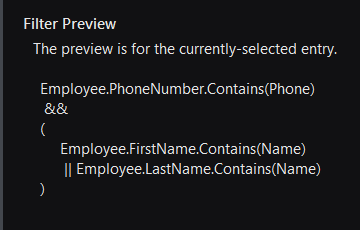
Field filter
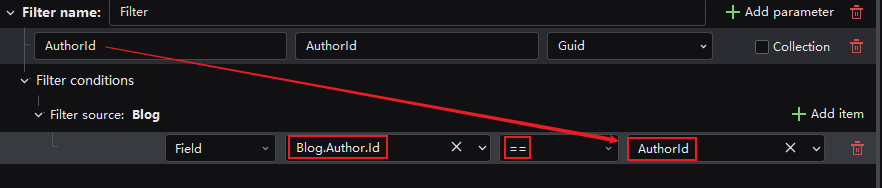
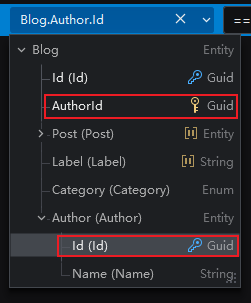
== because it needs to filter blogs equal to the input author ID.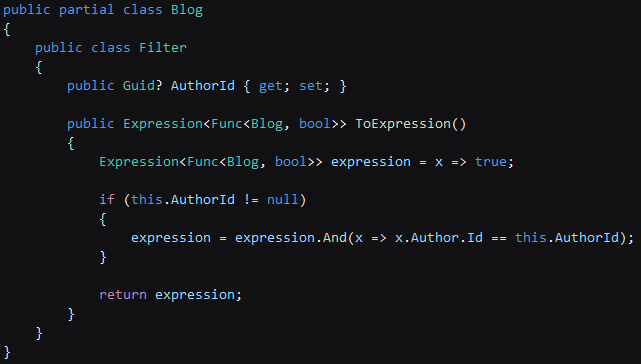
Expression filter
Readonly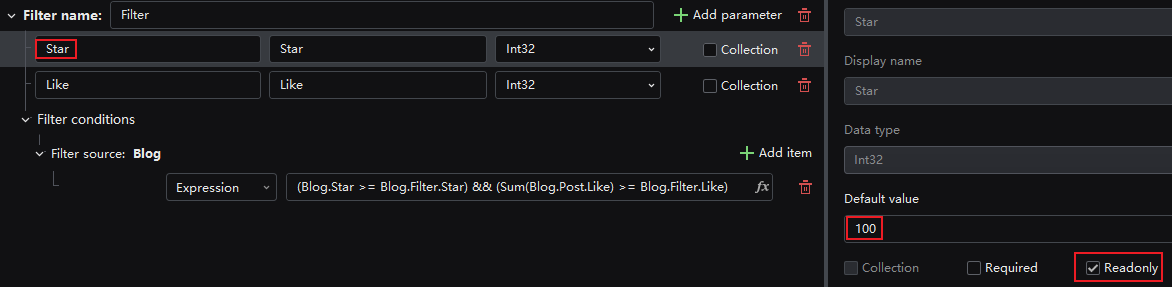
Expression, and enter the expression in the figure below, where Blog.Star is entered by clicking the selectable field, Blog.Filter.Star is entered by clicking the filter parameter, and the Sum expression function is selected from the right side of the figure below.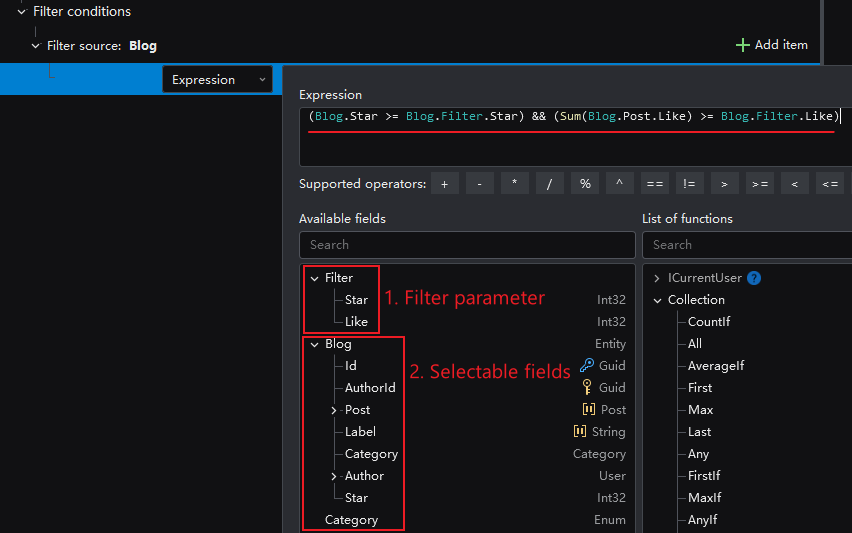

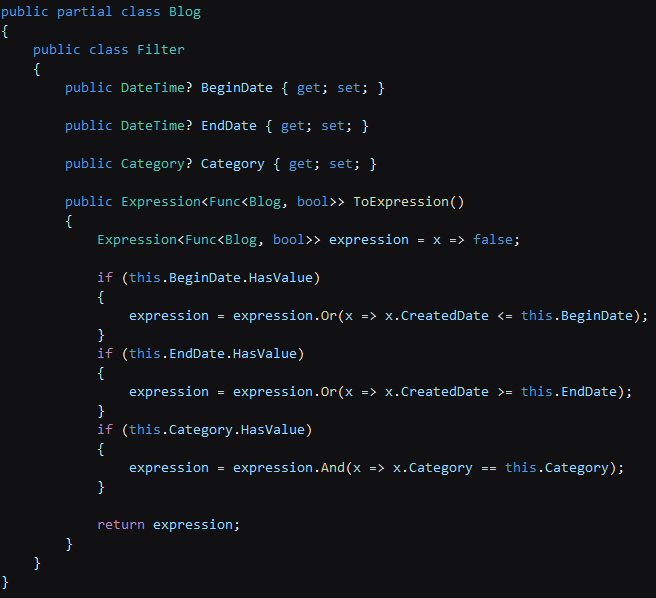
Scope filter
And or Or like below, it will not generate the desired result.
Parameter is a "collection"

Service & API design
Get, GetList, GetPage, Add, AddRange, Update, Delete and DeleteRange. You can click the Add service button to add the base and filter APIs one by one, or select the Add base services option to add all base APIs at one time.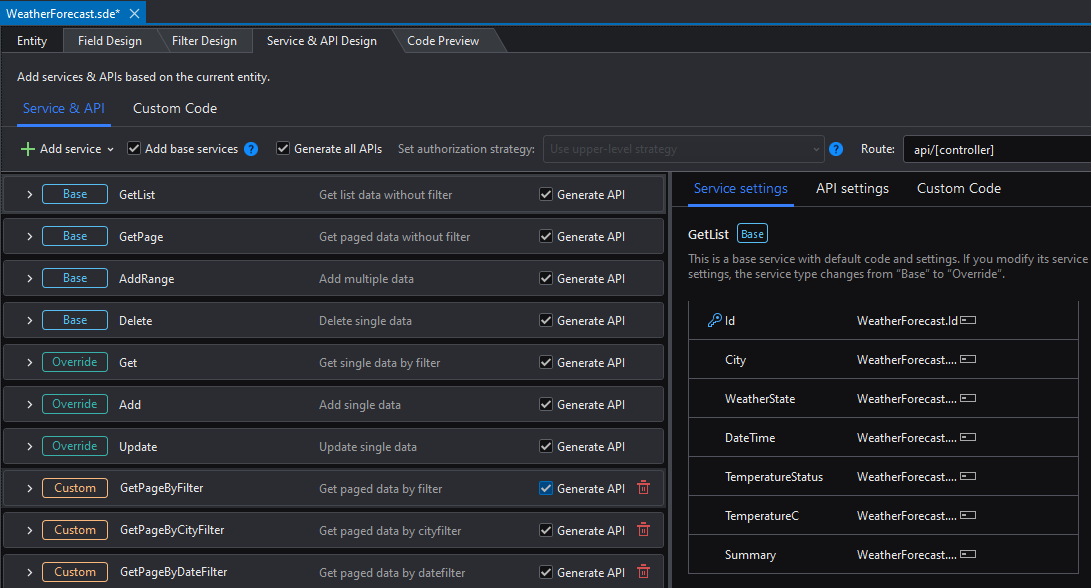
Service
Overview
Add base services to add the default services, or click Add service to add custom services (commonly used to add services with filter).
Add base services is directly marked as Override).Add service.
Return value setting

Expression.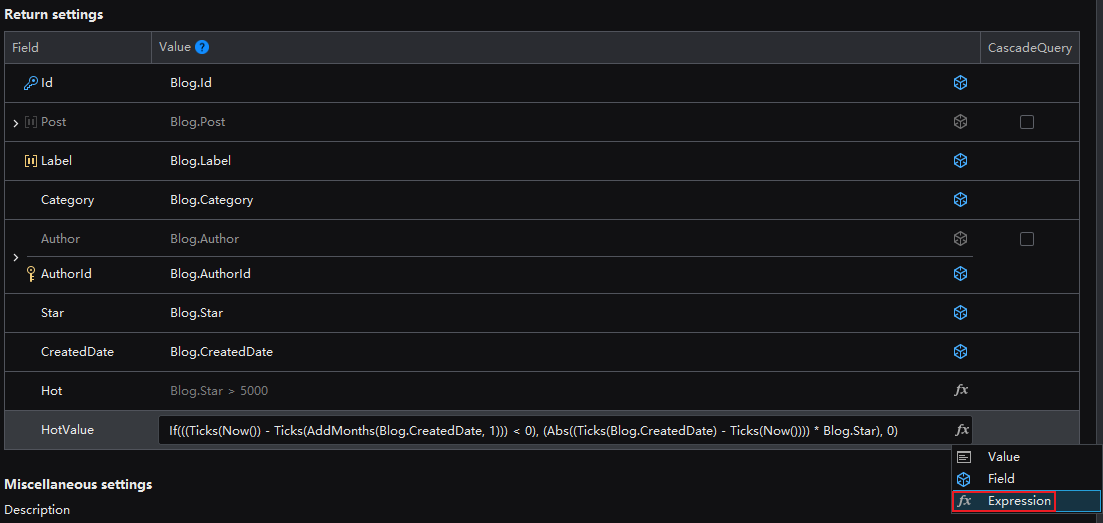
If(((Ticks(Now()) - Ticks(AddMonths(Blog.CreatedDate, 1))) < 0), (Abs(Ticks(Blog.CreatedDate) - Ticks(Now())) * Blog.Star) , 0)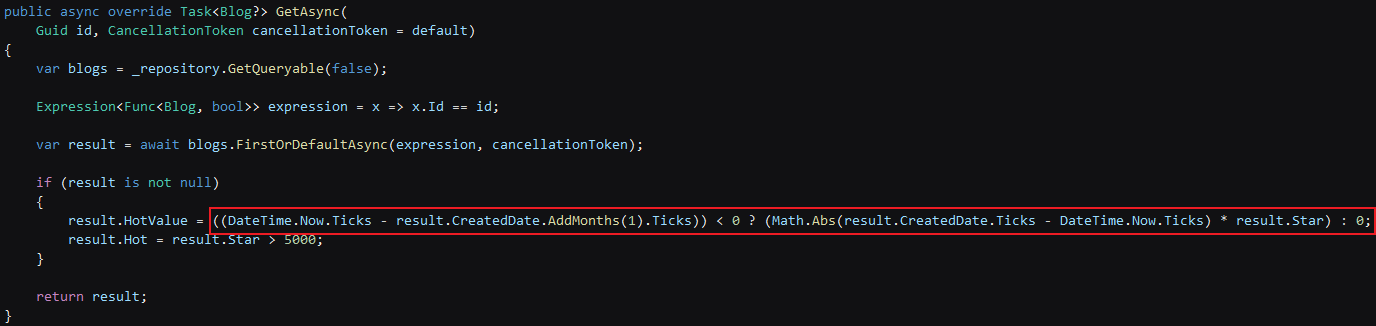
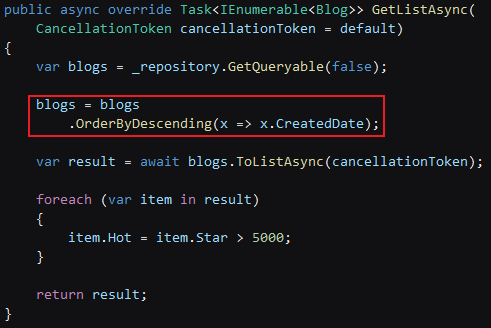
Database sorting
Sort by field
CreatedDate under the Blog entity, and set the sorting rule to Descending.
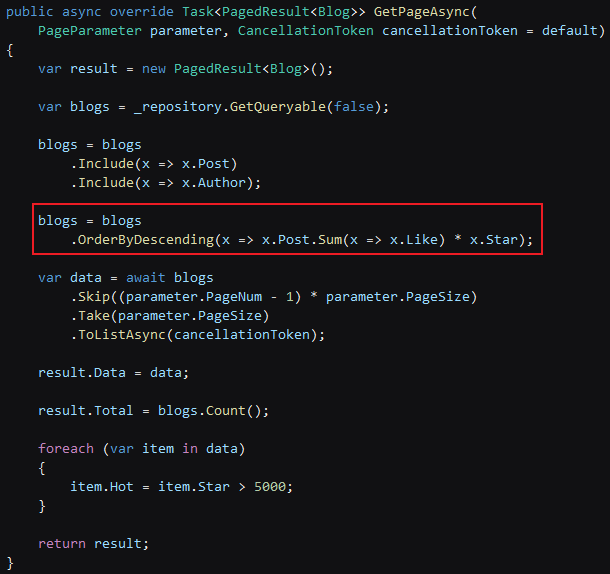
Sort by expression result
Sum(Blog.Post.Like) * Blog.Star, and set the sorting rule to Descending.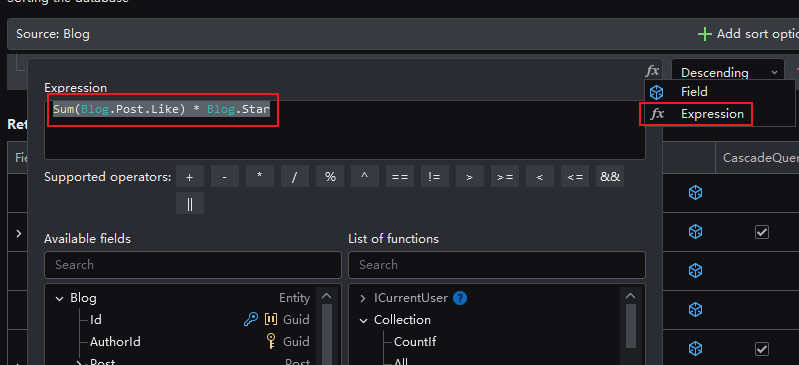
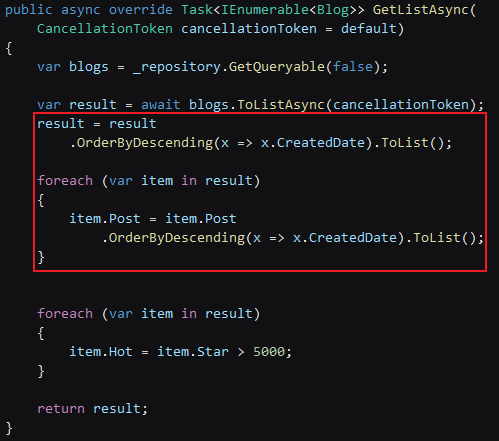
Return value sorting
Sort sources in the return value sorting indicates the entity itself and the associated entity fields in the entity. Each sorting source can set multiple sorting rules.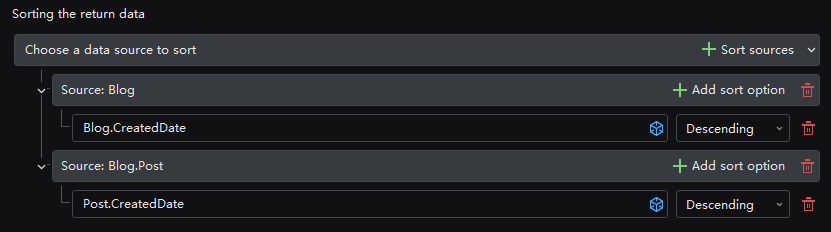
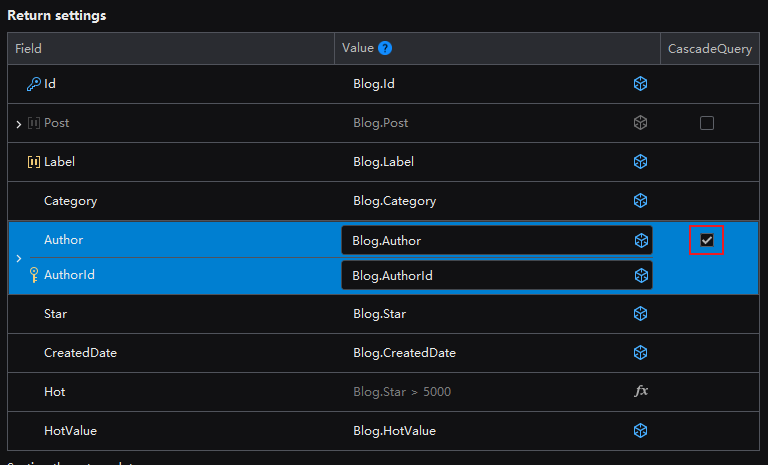
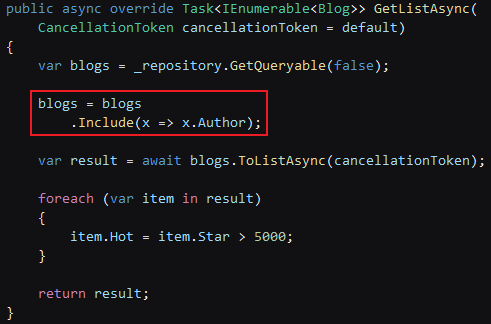
Cascade query
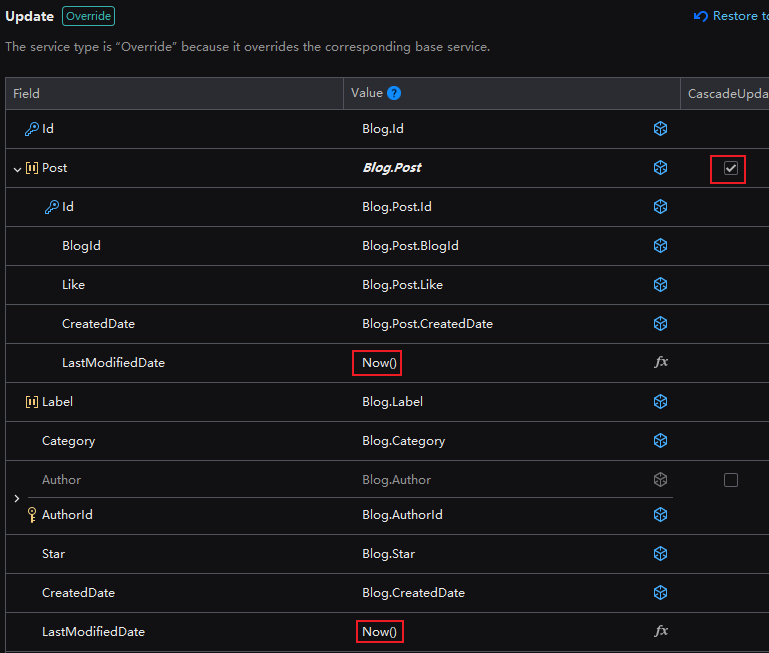
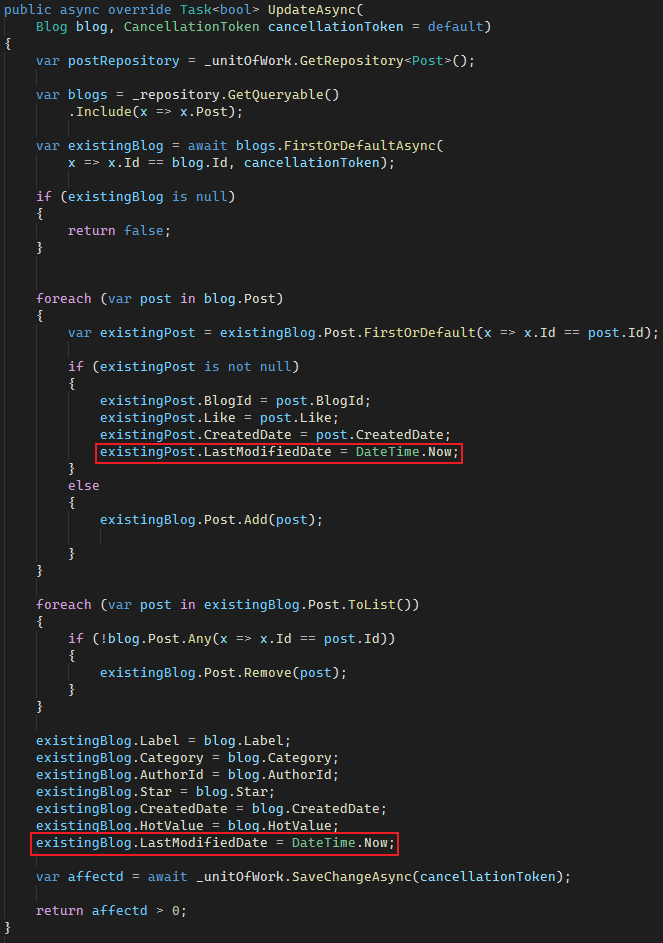
Cascade update
API
Overview
Generate all APIs to expose all base services as APIs, or select Generate API for the service that needs to be exposed as API. The APIs will be automatically generated. Of course, you can further configure the API.

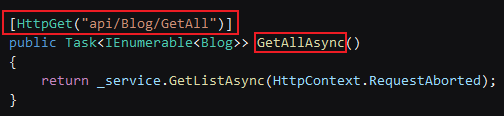
API name
GetList to GetAll:
Request method
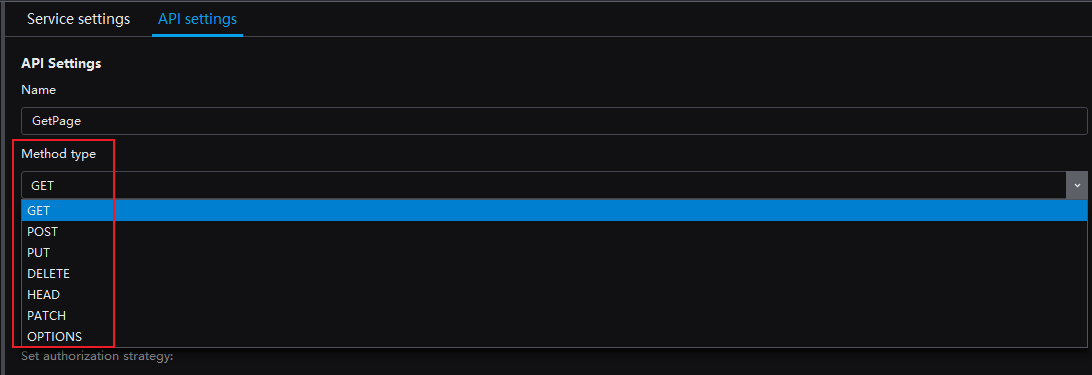

Parameter source
Update API to FromQuery: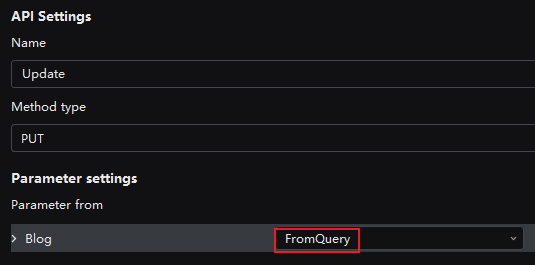

Authorization Settings
Overview
Security page. You can access it by right clicking on the project name and selecting Security).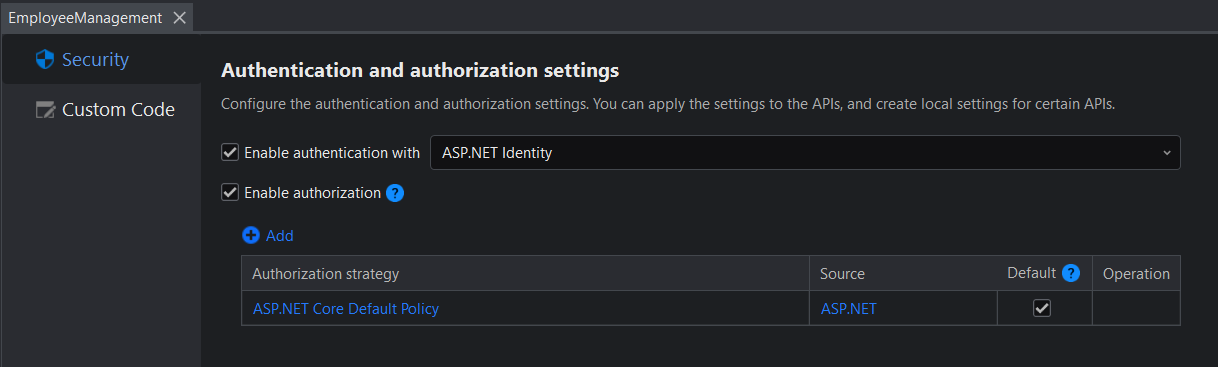

Security page.
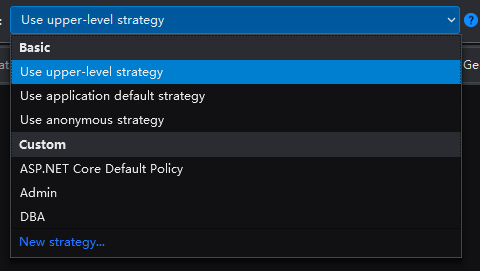
Security page will be listed too.Security page and add/rename/delete the strategies.Prerequisite
Security page, the authorization cannot be set in the API designer, as shown in the following figure:
Security setting... in the lower left corner of the pop-up page to jump to the Security page: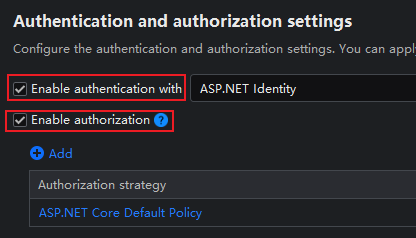
Examples
Update API needs to be authorized by the Admin policy. You can specify the settings as follows: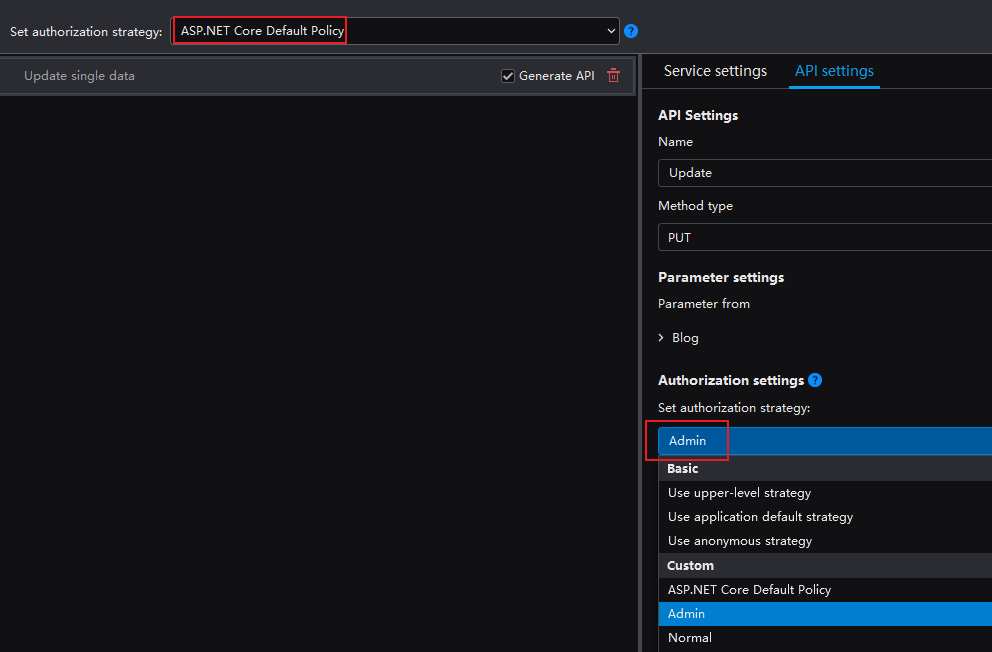
GetPage API of the blog entity allows anonymous access by unauthenticated users, but the Delete API can be accessed by authenticated users only. You can configure the settings as follows.GetPage API:
Delete API: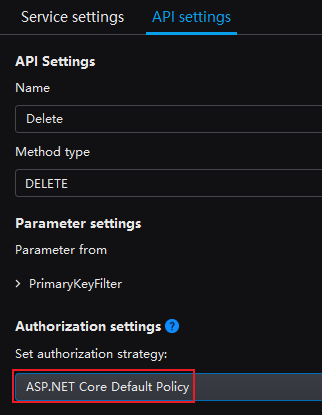
Dependency/Expression/Computed fields overview


